How to Remove Paint Brush Marks from Screenshots Easily
While editing or annotating screenshots, you can mistakenly add paint brush marks to them that can ruin the overall visuals. Removing these marks efficiently is crucial for producing cleaner, more professional screenshots, especially for presentations. We will provide the best tool that can help remove the paintbrush from screenshots within seconds.
By doing so, you can improve its visual effects, enhance the overall appeal, and get a polished result. Therefore, keep reading this article to find out why the removal of paintbrushes is necessary and how you can remove them from photos.
Part 1. Reasons to Remove Paintbrush Marks from Screenshots
We learned that having random paintbrush marks on your screenshots can disrupt the whole appeal of the photo. That is why we have gathered multiple reasons why it is necessary to remove the paintbrush from screenshots in the following:
1. Enhanced Visibility: It is important to remove paintbrush annotations from your pictures as they can help restore the original content and improve overall readability.
2. Professional Presentation: If your presentation includes such brush marks, removing them can make them look more professional and clearer, thus avoiding any distractions from the slides.
3. Aesthetic Pictures: As a photo editor, you need to keep the annotation to a minimum to avoid ruining the visual and aesthetic appeal of the image.
4. Confidential Reasons: Sometimes, you hide sensitive information with a brush mark, which is why there are unintended marks left on the paper. Therefore, you have to remove these paintbrush marks from your images to secure their quality.
5. Better Customization: You can remove paint brush from screenshots to bring out the readability and make it easy for people to focus rather than get distracted.
Part 2. Steps to Remove Paintbrush Marks With HitPaw FotorPea
Now, we understand why it is necessary to remove the paintbrush from screenshots to increase the image clarity and quality. Therefore, we introduce you to HitPaw FotorPea, which is the best photo enhancer out there for creators. With this tool, you can not only remove unwanted paintbrush marks but also upscale them with excellent results.
Its AI intelligently identifies the brushed mark and fills it with the surrounding backgrounds. After removing objects, utilize its other enhancement and cutting-edge features to bring out the best of your pictures. All in all, this tool is your best AI photo editing companion with advanced enhancement features.
Comprehensive Steps on How to Remove Paint Brush Marks Using HitPaw FotorPea
This part will provide you with easy-to-follow steps on how to remove the paintbrush from screenshots using the HitPaw FotorPea:
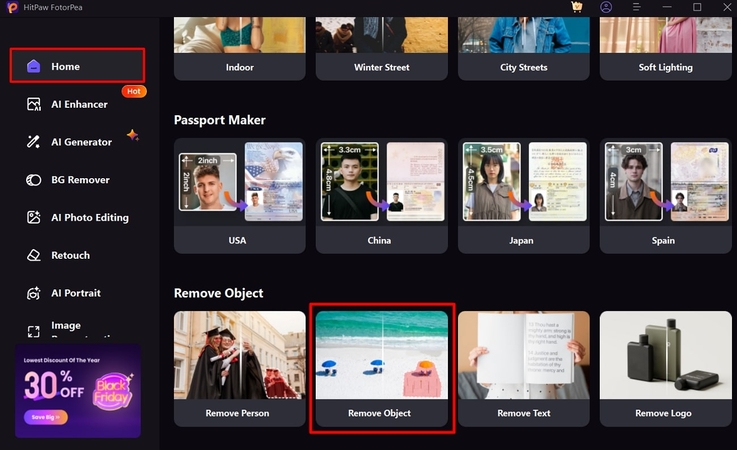
Step 1. Launch HitPaw FotorPea and Access the Object Removal Feature
Install and launch the HitPaw FotorPea software on your device, and from its main interface, access the “Home” tab. Scroll down and click the “Remove Object” option to import the desired image from the opened dialogue box.
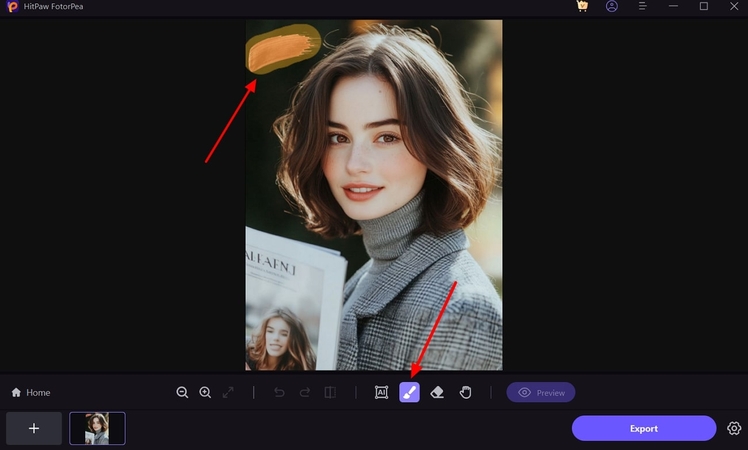
Step 2. Select the Brush Option and Brush Over the Paintbrush Mark
On the editing screen, head to the bottom toolbar and select the “Brush” icon with adjustable thickness. When selected, brush it over the desired paint brush marks on the picture thoroughly.
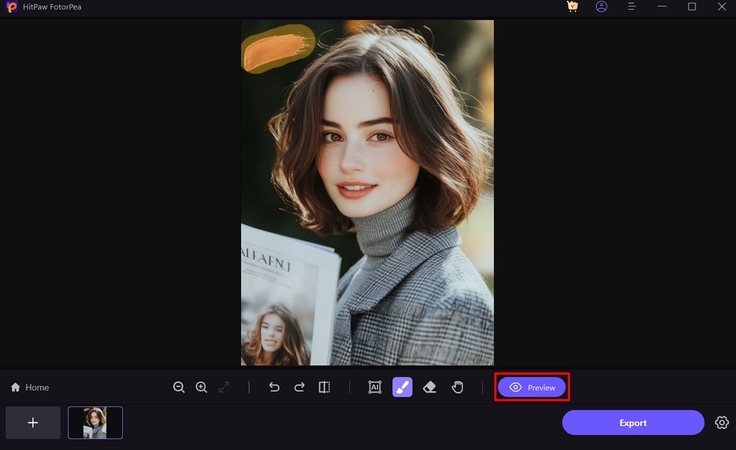
Step 3. Initiate the Removal Process
Once brushed, hit the “Preview” button to initiate the object removal process, which will take a few seconds to complete.
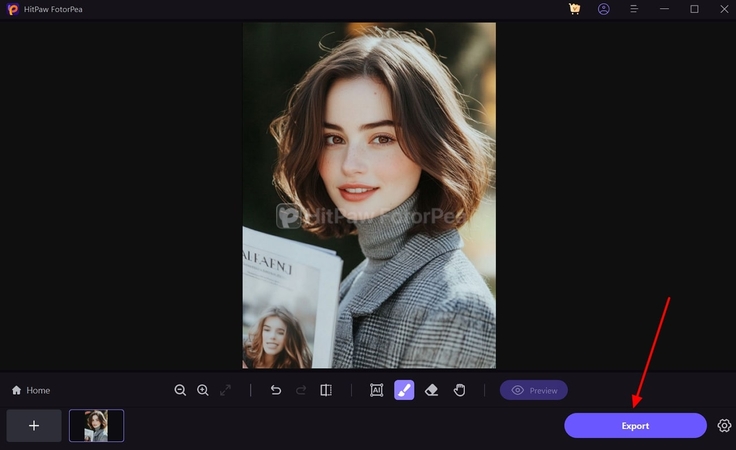
Step 4. Download the Final Result From FotorPea
When the process is completed and you are satisfied with the results, click the “Export” button at the bottom right side and save the enhanced picture.
Part 3. Detailed Instruction on Removing Paint Brush Marks with Other Tools
You might be itching for more seamless photo editors that can easily remove paintbrush from screenshots. Thus, we have gathered various other image editing tools with paintbrush removal features and more to help you out:
1. Pixlr
This offline image editor provides a suite filled with advanced AI image editors with different image editing features. With this tool, marketers can utilize the AI healing tool to remove unwanted objects or paintbrush marks. Moreover, you can further use the clone tool to refine the removed areas for better results. To help you understand these tools, we have provided the easy-to-follow steps below to remove the paintbrush from the screenshot:
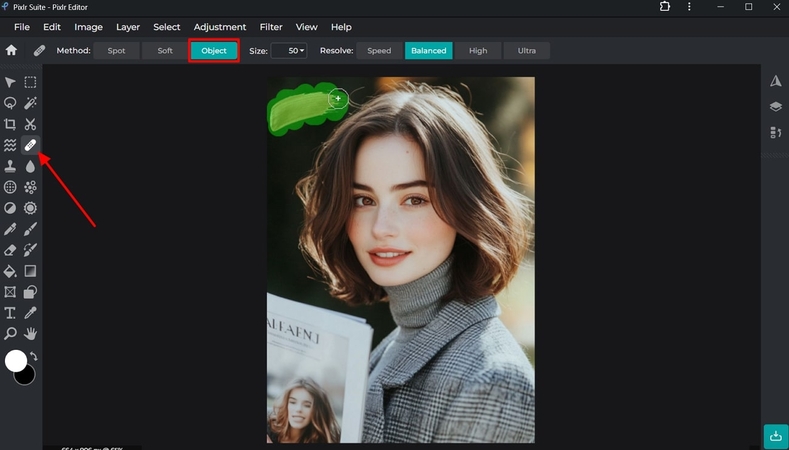
Step 1. After downloading the Pixlr Suite on your desktop, open the main interface and import the desired image. From the left-side toolbar, choose the “Heal” icon to reveal its options on the top. After that, click the “Object” option and select the desired option from the “Resolve” section. Brush over the paintbrush mark on the image to instantly receive the result.
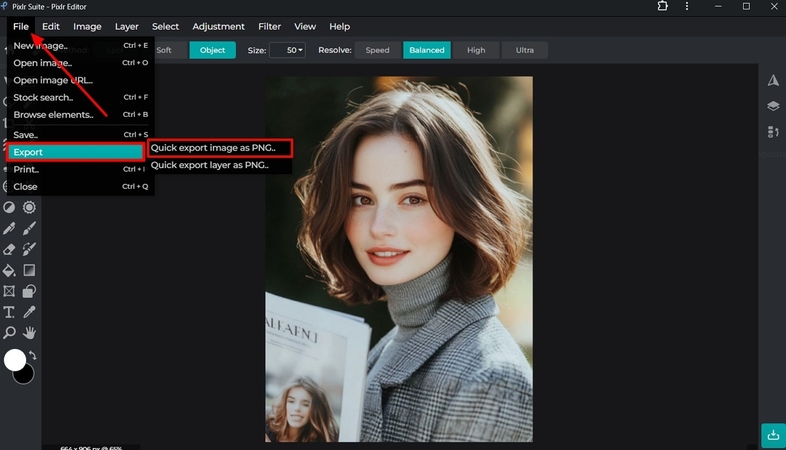
Step 2. You can also utilize the spot and soft option in the “Method” section to soften the removed area. When satisfied, go to the “File” tab at the top left and open its drop-down menu. From here, extend the “Export” option and click the “Quick Export Image as PNG...” option.
2. Pixelcut
Photographers can make their pictures look amazing by removing paint brush marks with Pixelcut, which is an easy-to-use online image editor. Its magic eraser feature specializes in decluttering photos by precisely eliminating unwanted objects. Moreover, it simplifies the process and keeps the aesthetic visuals of the picture intact. Now, look at the following steps to learn how to remove paint brush from screenshots:
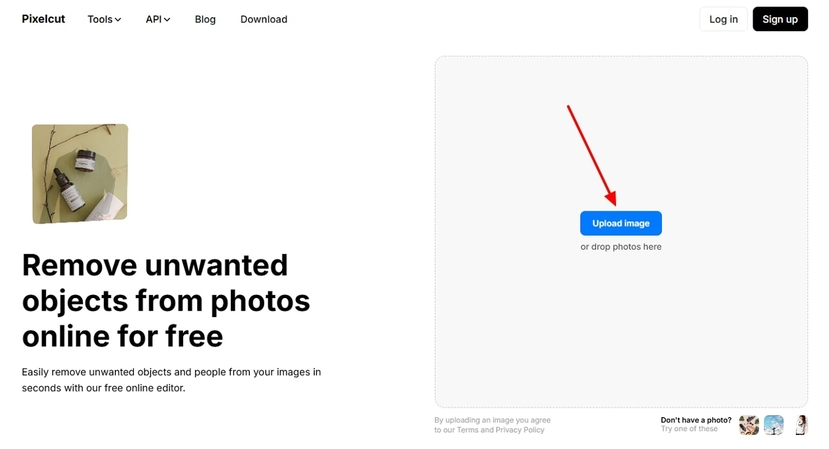
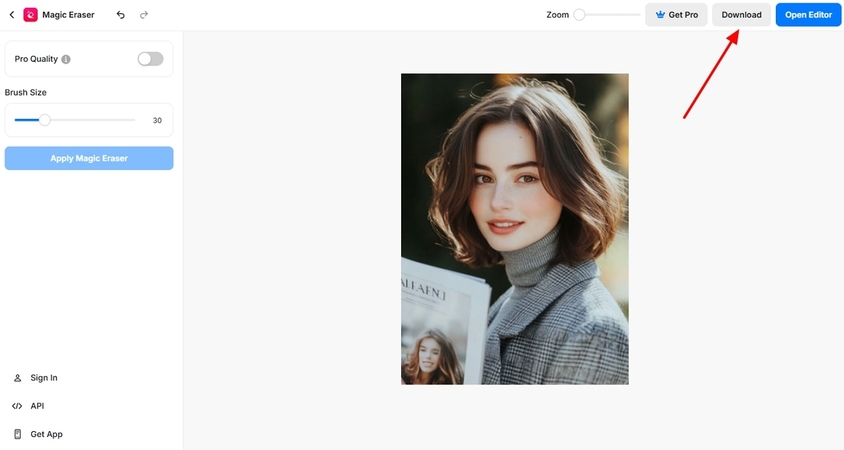
Step 1. Open Pixelcut on your browser and access its "Magic Eraser" tool from the optional toolbar above. When it opens, click the "Upload Image" button and select the image with the paintbrush mark.
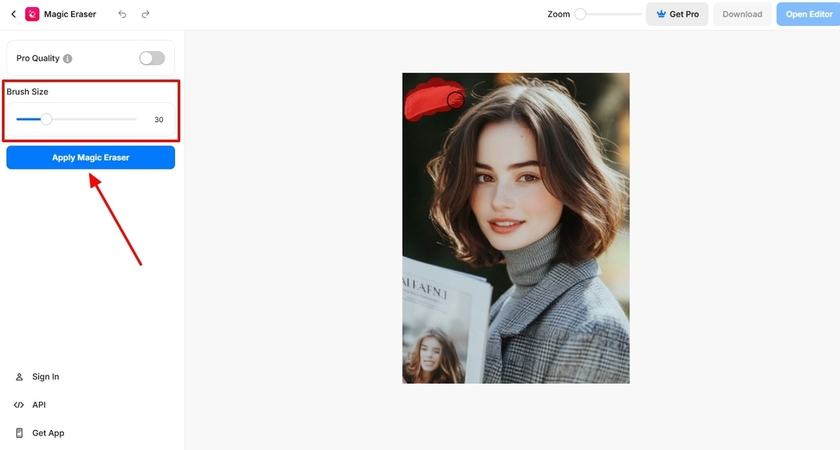
Step 2. When the picture is uploaded, go to the left-side panel, and under the “Brush Size” section, adjust the thickness of the brush. Once selected, drag the brush over the paintbrush mark on the picture and hit the “Apply Magic Eraser” button.
Step 3. After applying, the AI will seamlessly remove the mark from the picture. Now, you can head to the top right and hit the “Download” button.
3. Photoroom AI Photo Editor (Android & iOS)
For easy accessibility of photo editing tools in the palm of your hand, use Photoroom AI Photo Editor. It helps you design visually stunning content and easily remove backgrounds, objects, and more. Moreover, with its magic retouch feature, users can eliminate unwanted paintbrush marks from their pictures and apply other editing features. To learn how to remove the paintbrush from screenshots, follow the given steps:
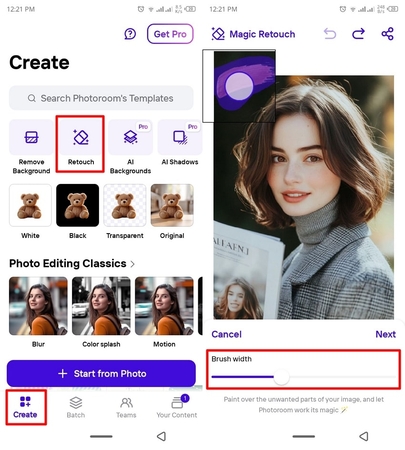
Step 1. Upon installing the Photoroom app on your mobile phone, open its main interface with all the editing options. From the “Create” tab, tap the “Retouch” feature and upload a suitable picture from your gallery. Adjust the “Brush Width” thickness by sliding the adjustable bar and brushing the unwanted paintbrush mark.
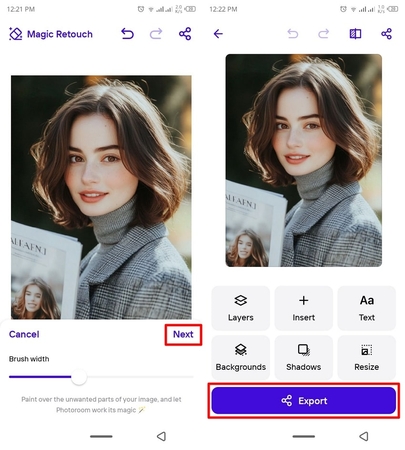
Step 2. After brushing, the paintbrush mark will magically disappear, and you can move forward by pressing “Next.” After that, hit the “Export” button and save it in your gallery or share it on Instagram, WhatsApp, and more.
Part 4. Tips to Achieve Natural Look After Removing Paint Brush Marks
After you remove the paintbrush from screenshots, the next thing that matters is how it looks. If they turn smudgy or unnatural, you need to follow the given tips to achieve a smooth and natural look:
1. Adjust Background Texture: To make your pictures look natural, use subtle blending techniques to match the background with the removed areas.
2. Use Zoom for Precision: After the editing phase, zoom in on your images to further refine the edges around the removed area for a more polished and professional look.
3. Retouch with Colors: Users can manually go in and retouch some colors around the removed areas to make them look natural and blended.
4. Soften the Edges: You can utilize the blur or smudge tool to soften the edges of the removed area gently to avoid over-smudging.
5. Use of Low-Opacity Brush: The low-opacity tool helps you adjust the opacity of the brushed area and create a blended look around the harsh ends.
Conclusion
This article provided you with comprehensive methods that can help you remove paintbrushes from screenshots accurately. We briefly discussed different tools and learned their steps to remove objects with easy-to-follow guides. Aside from these tools, the most accurate and precise paintbrush mark removal tool is HitPaw FotorPea. Its AI seamlessly detected the brushed area and filled it with the surroundings without affecting the quality of the image.


 HitPaw Edimakor
 HitPaw Univd (Video Converter)
  HitPaw VikPea (Video Enhancer)



Share this article:
Select the product rating:
Daniel Walker
Editor-in-Chief
My passion lies in bridging the gap between cutting-edge technology and everyday creativity. With years of hands-on experience, I create content that not only informs but inspires our audience to embrace digital tools confidently.
View all ArticlesLeave a Comment
Create your review for HitPaw articles