How to Remove Glasses from Photos for a Natural Look?
We have all been there when you snap the best photo, but the glasses you wear ruin the whole look and vibe of the picture. Other than that, glasses can sometimes reflect the light, which can be an obstacle to capturing the moment right.
With a few editing tricks, you can remove glasses from a photo and bring out your best features in a picture. In this article, you'll learn how to take off glasses using AI-powered tools that will cut unwanted glasses in a few clicks.
Part 1. Top Reasons to Remove Glasses from Photos
Knowing the reason behind getting rid of the glasses and achieving the perfect picture is very important. Here are a few reasons you should know why glasses cause trouble in your photo and why you should remove them:
1. Reduce Reflection and Glare: The main reason for removing glasses is that they often reflect light, creating distracting glares or reflections that can ruin the whole photo, making it blurry.
2. Achieve a More Natural Look: Removing glasses can bring out a softer and more natural look that can appeal to a closer portrait and personal photos.
3. Focus on Facial Features: Glasses can unintentionally draw attention away from features and eyes that are the main focus of photography.
4. Avoid Visual Distraction: Prescription glasses can make your eyes look smaller or larger than they are, and by knowing how to remove glasses from photos, you can achieve a perfect picture.
5. Remove Shadow from Face: The giant frames can make a shadow under the eyes or on your face and around the nose, which can be avoided by removing them.
Part 2. Best Method to Remove Glasses Using HitPaw FotorPea
After knowing the reasons why glasses ruin the picture, you might be looking for a reliable tool. In this case, HitPaw FotorPea is a photo editing tool designed with a batch removal tool. Using this, you can remove glasses or any other object from more than one image simultaneously. It has a compare feature that lets you see the before and after results of the photo.

Furthermore, if you mistakenly highlight the object you do not want to remove, you can use the reverse changing feature. Besides, with a free hand brush, you can manually select the specific dimension to remove glasses from the photo.
Other Core Features of HitPaw FotorPea
1. Eraser Feature: If you accidentally highlighted the object you didn't want to remove, this tool also has an eraser that will undo that.
2. Preview: With its preview feature, you can see the final editing results you did using this tool in case you missed something you want to remove.
3. BG Remover: It intelligently analyzes and removes the image's background, and various color options allow you to add the background to design your picture.
Step-by-Step Guide to Remove Stickers from Photos with HitPaw FotorPea
While learning the features of HitPaw FotorPea, let's move straight to a step-by-step guide to learn how to remove glasses using this tool. By following these steps, you can easily remove glasses from your pictures:
Step 1. Access the Tool and Upload the Picture
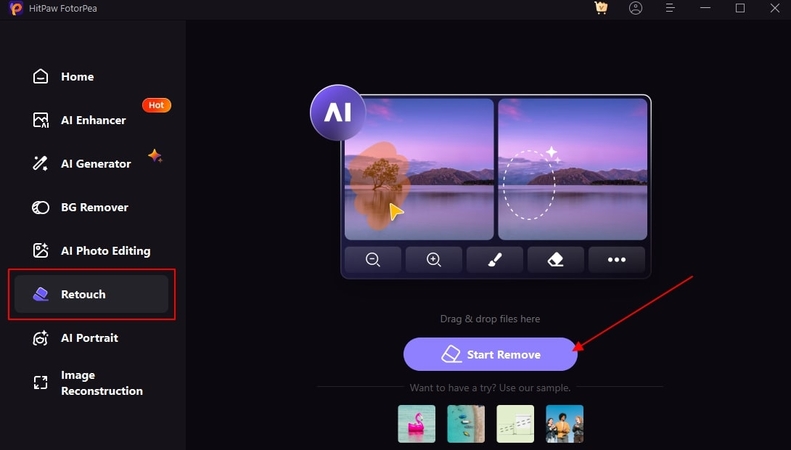
Open the HitPaw FotorPea and navigate to the “Retouch” tab on the left of the screen. After that, hit the “Start Remove” button and import the desired picture to proceed with the process.
Step 2. Highlight and Remove the Target Image
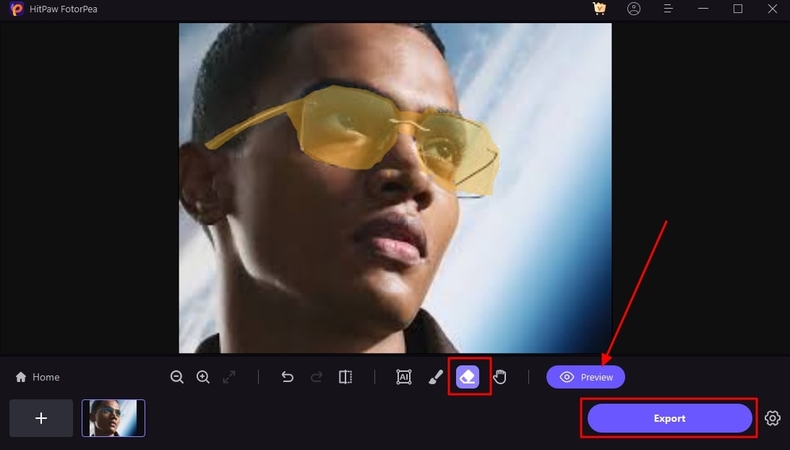
Then, highlight the glasses or any object you want to remove using the “Free-Hand brush.” Once done, click the “Preview” button to check if the image requires further editing. Lastly, tap the “Export” button and download the final result to your device.
Part 3. Other Tools for Glasses Removal – Step-by-Step Guide
Other than HitPaw FotorPea, if you are looking for flexible and advanced features, there are several different tools that you can use to remove glasses from photos. Using these tools, you can achieve precise results for removing glasses from photos, each offering different features to suit different editing needs:
1. Simplified
This software serves as an all-in-one design and editing platform, providing an efficient way to remove objects from photos, including glasses, using an AI-powered tool. On this platform, there is a free hand brush that you can adjust in size accordingly while highlighting the glasses. Hence, here is how you can use its reversing tool to undo the mistake.
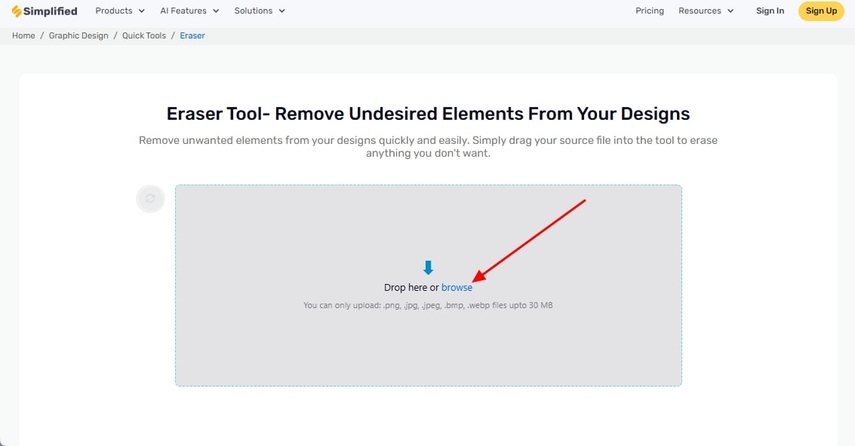
Step 1. Upon reaching the Eraser Tool of Simplified, click the “Drop Here or Browse” button to upload the picture you want to edit.
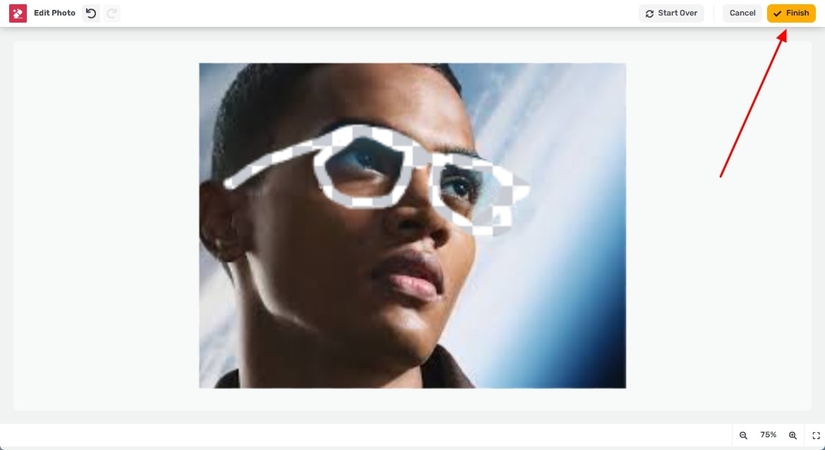
Step 2. Navigate to the brush size on the right side of the screen and highlight the glasses. Once it is done, it'll automatically remove the highlighted part, then click the "Finish" button and download the final image.
2. Picsart
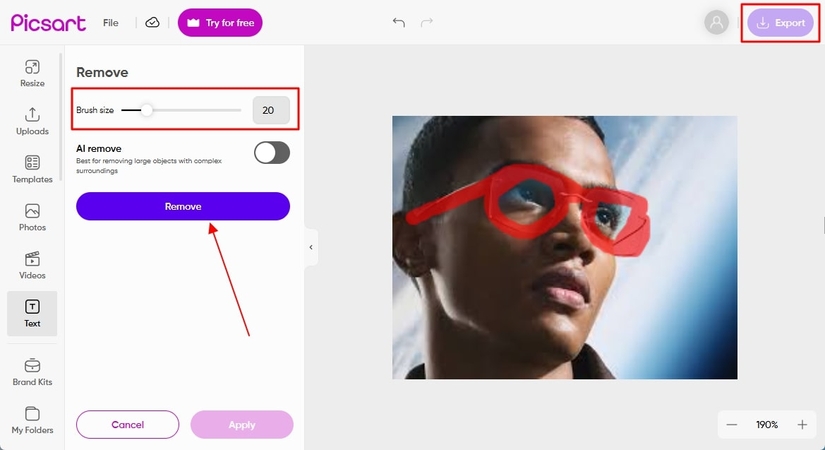
One of the standout features of Picsart is its object removal capabilities, which are designed to make photo editing simple and effective. You can zoom in and out from the available options to highlight minor and tiny details. By following these steps, you can learn how to remove glasses from photos in Picsart:
Step 1. Open the Picsart website and reach the relevant tool page; tap the “Browse Files” option to upload the image on your device.
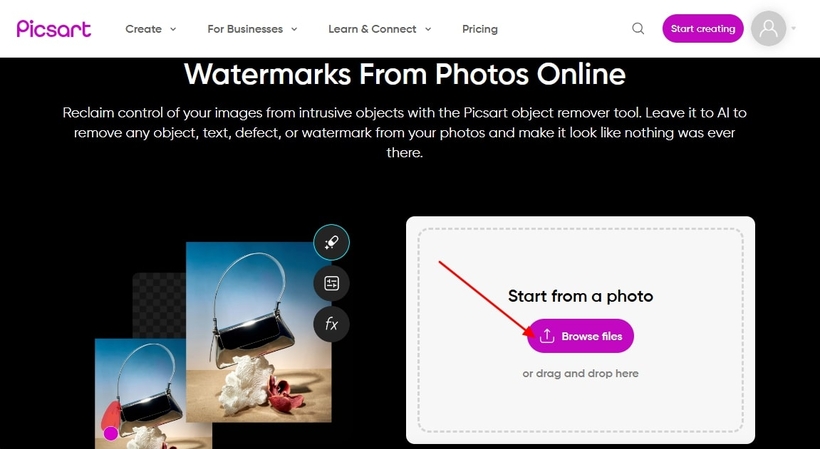
Step 2. Afterward, go to the left side of the screen, adjust "Brush Size," and highlight the glasses. When completed, tap the "Remove" button, and it'll show you the final result; then click the "Export" button and download the final image.
3.Pixelcut (Android | iOS)
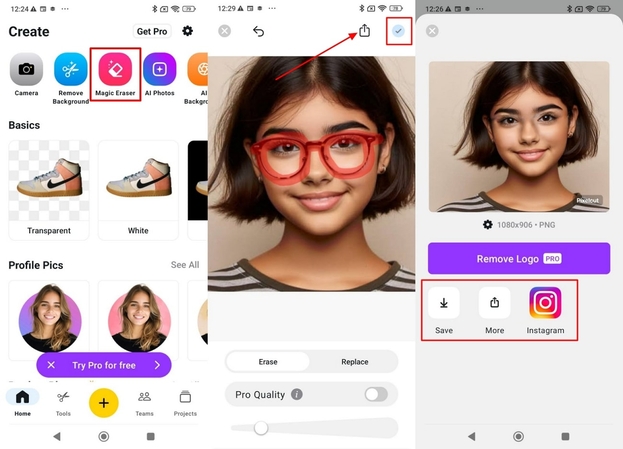
Pixelcut offers an object removal feature that removes the glasses from the photo using its free-hand brush feature, spots the unwanted sticker, and removes it from the image. Furthermore, using this tool, you can adjust the size of the brush, allowing it to cover small details. By following the steps below, you can get the perfect edited picture:
Instructions: Open the Pixelcut app and click the “Magic Eraser” tool from the main interface. After that, import the picture from the gallery and start editing by highlighting the optical. Once done, tap on the “Tick” button and save the image. Later, hit the “Share” button and send the final result to any platform you want to upload this picture.
Part 4. Tips for Achieving a Natural Look After Glasses Removal
Now that you have mastered the different AI-powered tools and steps for removing glasses, let's explore some tips and tricks. After learning how to remove glasses from a photo, find what you can do to achieve a natural look:
1. Clone Stamp and Healing Brush
You can use a blending brush on areas where the glasses once were and make edits to look more flawless. However, avoid making sweeping strokes as they can create an unnatural and smeared look, making your photo look unpleasant.
2. Recreate Eyelashes and Eyebrow Detail
Moreover, glasses can obscure details of your lashes and brows, and you may need to refine them to restore the picture's definition. For that, users can use a fine brush tool to draw missing hair lightly, following the natural direction of hair growth.
3. Adjust Skin Tone
After removing glasses, the areas around them may look uneven in tone, as glasses can often leave subtle marks on the skin, especially around the nose. You can use a low-opacity brush to paint over the areas that match your skin tone, and with that, you can avoid facing the mismatching problem in your picture.
4. Refine Nose Bridge
The red marks left by the glasses on the nose bridge can be reduced using a softening tool, making it look like the glasses were never there. For persistent marks, gentle use of a clone stamp can be used to remove the texture without losing the natural skin detail.
5. Gradual Adjustment for Natural Look
Abrupt and large changes can be prominent and make the image look edited, so apply changes in small places to see how they affect the image. Furthermore, on sensitive areas like the nose, avoiding harsh lines and minor touches can be more effective than large strokes.
Conclusion
In conclusion, this article has covered various tools and methods to remove glasses from pictures. Among all the methods, using HitPaw FotorPea, you will learn how to remove glasses from photos in real time. It makes a perfect choice for those seeking straightforward and fast editing since its advanced AI-powered tools effortlessly maintain the quality of the picture.


 HitPaw Edimakor
 HitPaw VoicePea
  HitPaw Univd (Video Converter)


Share this article:
Select the product rating:
Daniel Walker
Editor-in-Chief
My passion lies in bridging the gap between cutting-edge technology and everyday creativity. With years of hands-on experience, I create content that not only informs but inspires our audience to embrace digital tools confidently.
View all ArticlesLeave a Comment
Create your review for HitPaw articles