How to Remove Clothing Elements from Photos Using Photoshop?
For professional photographers, achieving a clean and refined look often means removing distracting elements. Whether it is for fashion or creative projects, editing out specific clothing details can make images look more focused and professional. To cater to these needs, Photoshop provides an effective solution to handle these complex edits seamlessly.
Therefore, learning how to remove dress in Photoshop allows you to gain precise control over your images. In this article, we will uncover a detailed guide to removing clothes from images by using this advanced tool and some other tools. By the end, you'll have the tools to make polished, high-quality edits that enhance any project.
Part 1. Why Do You Need Photoshop for Removing Clothing Elements?
Before moving forward, it’s important to understand why you need a tool to remove clothes and other elements from your images. Whether you’re working with artistic projects or professional portraits, this tool enables seamless edits that look natural. Below, we will discuss why it is preferred to remove clothes using Photoshop effectively:
1. Precision Tools for Detailed Edits: Precision tools, like the Clone Stamp and Healing Brush, allow for detailed accuracy. This means you can remove clothing elements without impacting surrounding areas to achieve a smooth and clean result.
2. Layer-Based Editing: The tool’s layer system allows you to make advanced edits and keep your original image intact. By editing on separate layers, you can experiment and fine-tune adjustments and make the process flexible without damaging the base photo.
3. Advanced Masking Options: This feature isolates specific areas for editing, which is perfect for targeting particular clothing elements. Additionally, you can hide or reveal parts of a layer to remove only the necessary areas without disturbing other details.
4. Additional Effects: Besides removing clothing elements, the software lets you add finishing touches like color correction and texture adjustments. These options provide extra polish to enhance the overall look of your image and align it with your creative vision.
Part 2. Guide to Remove Unwanted Clothing Elements in Photoshop
Building on its comprehensive capabilities, it is clear why this tool is ideal for edits that require precision and professionalism. When looking to remove clothes, Photoshop offers an array of powerful features that make the process highly effective. From pixel-level tools to intelligent AI-based adjustments, the tool enables users to tackle even complex edits with ease.
With its content-aware fill feature, users can select any dress within the image and replace it with a background. It allows you to select and replace unwanted areas with surrounding textures using its patch tool.
The clone stamp tool duplicates pixels from a selected area and enables precise adjustments for removing elements while preserving natural textures in the image. Thus, follow the detailed guide below to understand how to use this tool to remove clothes:
Step 1. Open Your Image in Photoshop
To commence the removal process, you need to download this advanced tool and launch it on your computer. Upon accessing the main interface, click on the “Open” button to import the desired photo into the software.

Step 2. Using the Clone Stamp Tool for Minor Edits
Afterward, right-click the "Brush” icon from the left toolbar after opening the photo. Then, you need to click on the “Clone Stamp Tool” option to move forward.
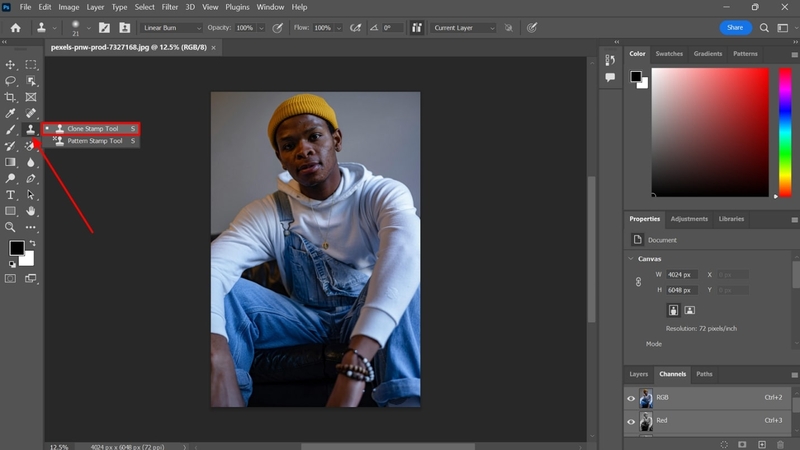
Following this, choose the area you want to duplicate while pressing the “Alt” button and drag the brush to the object you want to remove. By doing this, the software will replace the crushed area with the selected background.
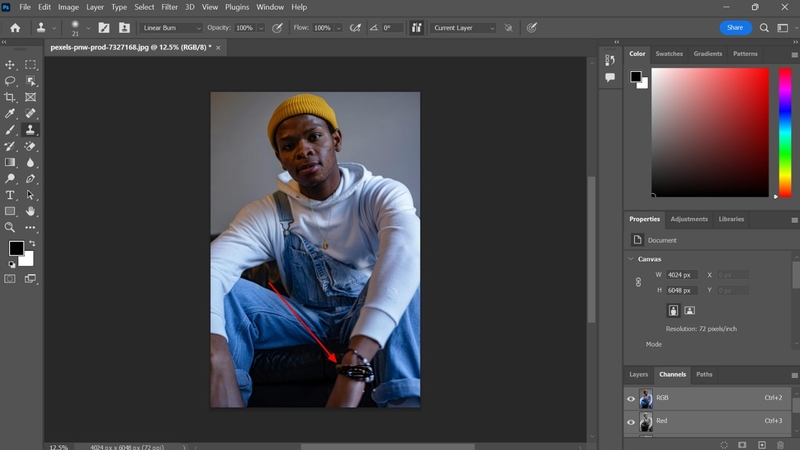
Step 3. Using the Patch Tool for Larger Edits
Moving forward after minor editing, right-click on the “Spot Healing Brush Tool” icon for more editing. Upon accessing the newly appeared popup, simply click on the “Patch Tool” option.
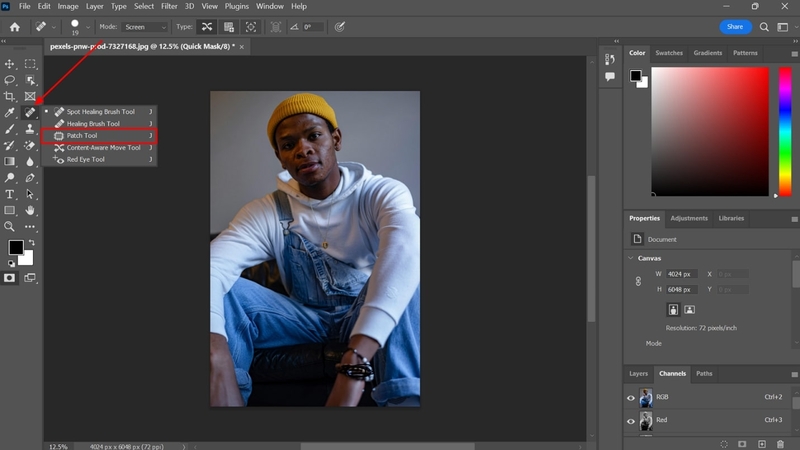
From now on, simply select the area from the image and drag it to the object that you want to remove. After making all the necessary adjustments, save the image on your computer.
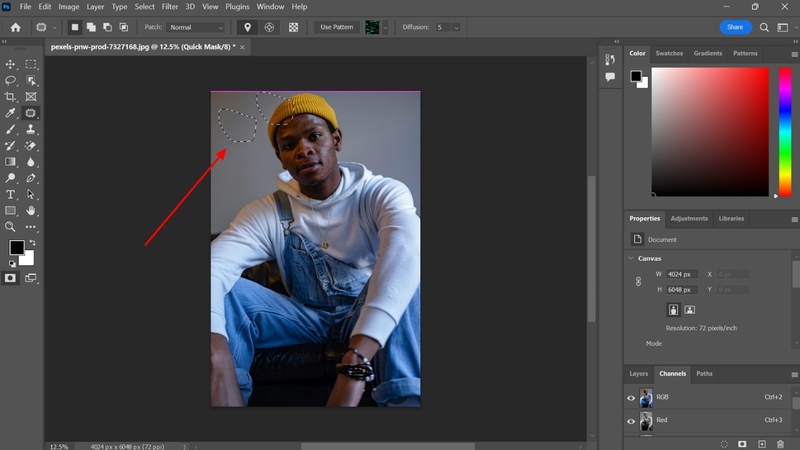
Step 4. Applying Content-Aware Fill for Complex Blending
For professional and complex blending, choose the "Content-Aware Move Tool" from the left sidebar.
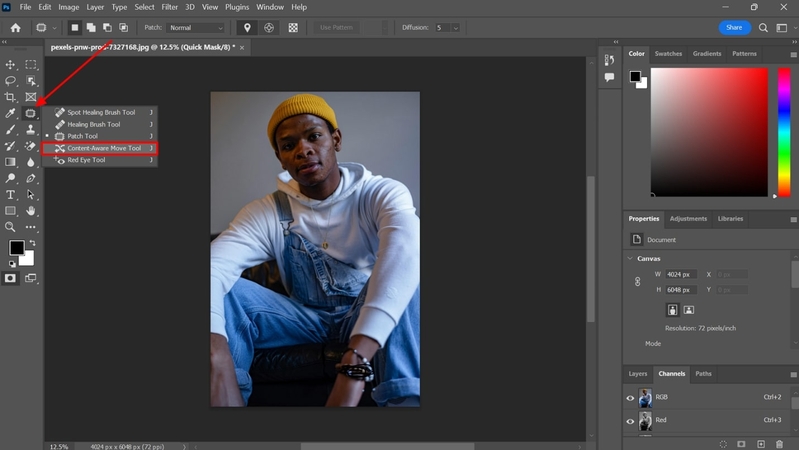
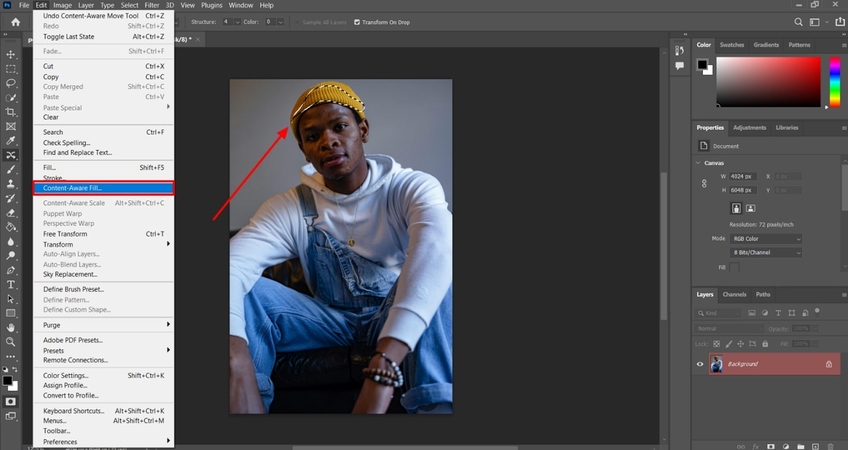
Next, select the object element from the image that you want to remove by drawing an outline on it. After that, click on the “Edit” tab and choose the “Content Aware Fill” option from the newly appeared dropdown menu.
Part 3. Alternative Tool to Remove Objects from Photos - HitPaw FotorPea
While Photoshop is a powerful tool for detailed edits, alternatives like HitPaw FotorPea offer a simpler approach for quick and easy object removal. If you’re looking to remove clothes using Photoshop but want a streamlined tool with more advanced capabilities, HitPaw FotorPea provides a straightforward solution.
You can remove unwanted objects from single or multiple images simultaneously, streamlining your editing workflow. After selecting and erasing elements, FotorPea offers a preview option to review the result before finalizing your edits. This ensures you’re satisfied with the adjustments without having to start over. Follow the steps below to learn how to use this tool to remove objects and other elements without much effort:
Step 1. Access the Software to Commence the Removing Process
To initiate, download the HitPaw FotorPea on your desktop and open it to access the main interface. Next, you need to go to the "Retouch" tab from the left sidebar of the screen. After that, simply click the "Start Remove" button to import the photo from which you want to remove objects and other elements.

Step 2. Highlight the Object From the Image to Remove it
Upon opening the photo in FotorPea, simply highlight the area or object from the image after selecting the “Brush” icon. Moving forward, click the "Export" button to download the edited images according to your preferences.

Major Benefit of Using HitPaw FotorPea
For users who find it difficult to remove dress in Photoshop techniques, FotorPea provides a streamlined experience without sacrificing quality. Here are key benefits why you should use this advanced tool to edit and remove objects from images:
1. Quick Object Removal: With this tool, you can remove elements in just a few clicks. The tool automatically blends surrounding textures and produces seamless edits without extensive editing steps.
2. Batch Editing Capability: FotorPea enables users to remove objects from multiple images at once to save time and effort. This batch-processing feature helps users complete edits faster, whether adjusting numerous photos or applying the same modification across multiple files.
3. Real-Time Preview: Before saving edits, the tool provides a real-time preview of changes by allowing users to assess and refine their adjustments. It helps avoid unwanted mistakes to ensure your edits look professional and consistent before the final save.
4. Adjustable Settings for Finishing Touches: FotorPea includes basic photo adjustment options, like brightness, contrast, and color corrections, to enhance your images. These settings allow for extra refinements after object removal and help to match the edited area seamlessly with the rest of the image.
Part 4. Tips for Achieving Natural Edits
Whether you remove clothes using Photoshop or an alternative tool, attention to detail is key. Below are some practical tips to ensure your edits blend perfectly with the original image:
1. Focus on Consistent Textures: Use tools like Photoshop’s Clone Stamp or HitPaw FotorPea’s blending options to replicate textures accurately. This ensures the edited area matches the surrounding textures and prevents noticeable discrepancies to give the photo a polished finish.
2. Adjust Colors and Lighting: After removing elements, you should check for color mismatches or lighting inconsistencies. These editing tools allow fine-tuning to align the edited section with the rest of the image.
3. Preview Before Saving: Users should preview edits before saving the changes to spot inconsistencies or areas requiring improvement. Tools like HitPaw FotorPea offer previews that allow you to perfect your adjustments before committing to the final save.
4. Practice Patience: Experimenting with different tools and settings is very important to discover what works best for each photo. With consistent effort, you’ll master techniques to create flawless edits that maintain the image’s authenticity.
Conclusion
To sum up, removing unwanted clothing elements from photos requires a combination of the right tools and techniques. With Photoshop, you have the precision and control to remove dress in Photoshop effectively to achieve high-quality results. However, for those looking for a simpler solution, HitPaw FotorPea offers a simple alternative with intuitive features that can help you remove clothes easily.


 HitPaw Edimakor
 HitPaw VikPea (Video Enhancer)
 HitPaw Univd (Video Converter)


Share this article:
Select the product rating:
Daniel Walker
Editor-in-Chief
My passion lies in bridging the gap between cutting-edge technology and everyday creativity. With years of hands-on experience, I create content that not only informs but inspires our audience to embrace digital tools confidently.
View all ArticlesLeave a Comment
Create your review for HitPaw articles