How to Save iMovie Projects on Mac
iMovie is a powerful video editing tool used by millions of Mac users worldwide. Developed by Apple, iMovie provides an intuitive platform to create professional-quality videos with ease. Whether you're compiling short clips, adding background music, or overlaying text effects, iMovie offers numerous features for creators of all skill levels.
But once you've completed your video, the next big step is saving it. In this guide, we'll walk you through the top two ways to save iMovie projects on Mac while highlighting common issues and their solutions. We'll also introduce a great alternative for converting and editing videos seamlessly.
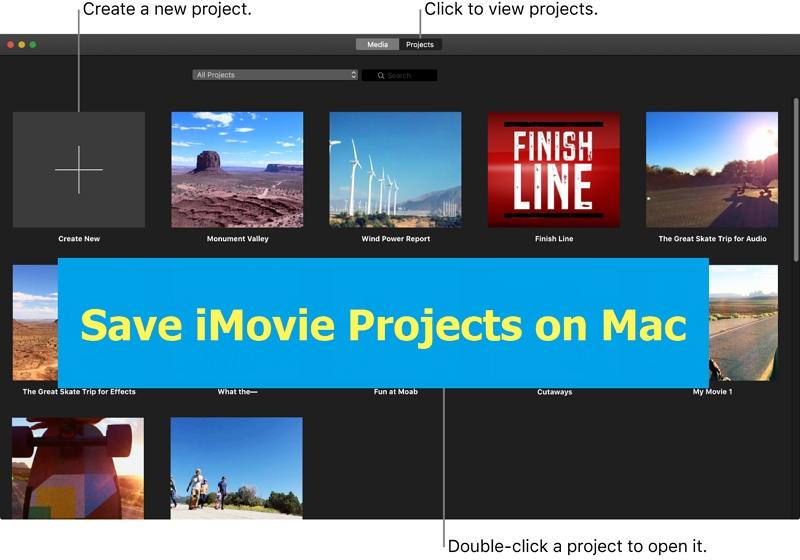
Way 1: Save an iMovie Project on Mac from Share Button
The first way to save an iMovie project is through the "Share Project" option. This method is easy and allows you to share your project in multiple formats.
Step 1.Begin by opening your iMovie project. If you're starting a new one, select a template or create a freeform movie.

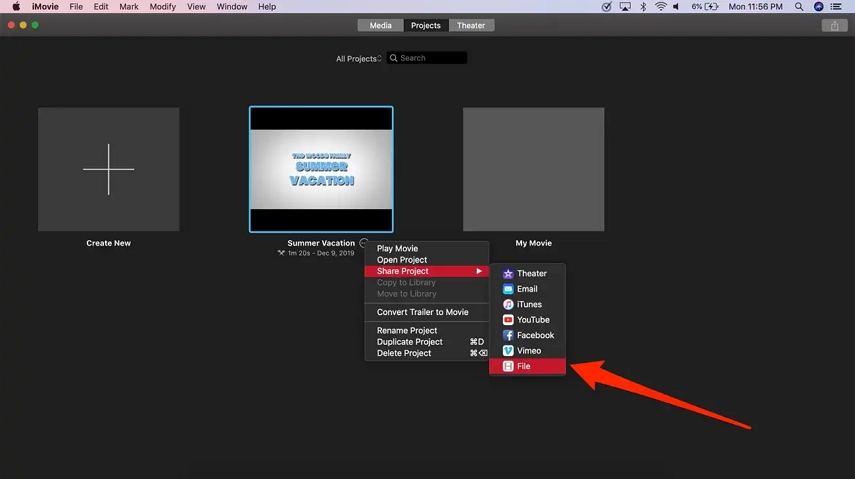
Step 2.Once you're done editing, look for the three dots near the project's name. Click on them to reveal a menu and select "Share Project”.
Step 3.In the pop-up menu, choose "File" to save a copy of your project on your Mac. You can also share it via email or social media if desired.

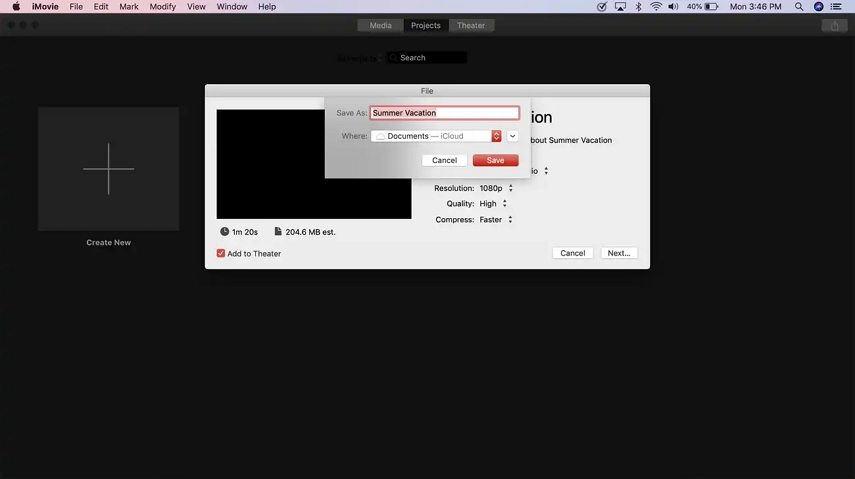
Step 4.Before saving, you can adjust video resolution, and quality, and add tags or descriptions to your file.

Step 5.Choose where you want to save the project and name the file. Finally, hit the "Save" button, and your iMovie project will be safely stored on your Mac.

This method provides flexibility in choosing your file format and destination, making it a popular choice for many.
Way 2: Save iMovie Projects on Mac From the File Menu
The second method involves using the File menu within iMovie's toolbar. Below are the steps:
- Open or create a project: Start by either opening an existing project or creating a new one.
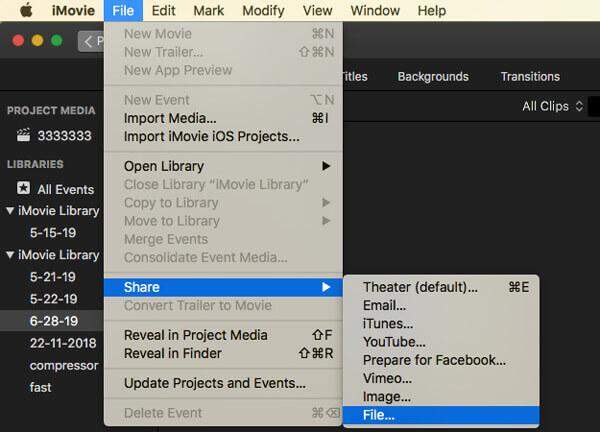
- Navigate to File Menu: Once you're finished editing, go to the top toolbar and click on “File”.
- Select Share: From the dropdown menu, select "Share," then "File”.

- Customize and Save: A similar pop-up will appear, allowing you to customize video settings. Assign a name and location, and click "Save".
This method works similarly to the "Share Project" option, but it offers a more familiar approach for those used to traditional software menus.
Why Can't I Save My iMovie on Mac and How to Fix It?
Sometimes, even after following the correct steps, you might encounter issues when trying to save your iMovie project. Here are the most common reasons why you may face these problems and how to fix them.
1. Lack of Space in Your Computer
One of the most common reasons for iMovie project save issues is insufficient disk space. iMovie projects, especially those in high resolution, can take up significant storage. To resolve this:
- Delete unused files: Free up space by deleting old files or transferring them to an external drive.
- Compress video files: Consider compressing larger files to save space without sacrificing quality.
2. Corrupted Project File
Another reason you might not be able to save your project is a corrupted file. If some of your media files are damaged or incompatible, iMovie may not allow you to save your work. To fix this:
- Remove rejected files: Delete any rejected or problematic media files from the project.
- Organize media: Ensure that all media files are stored in the same folder for smooth processing.
3.No Save Option in the Menu
In some cases, you may find that there's no save option available. This could be because iMovie automatically saves your work in real time. To access your project:
- Export the file once you're finished editing by choosing the "Share" option in the File menu.
Convert and Edit Videos Using iMovie Alternative
While iMovie is an excellent tool for Mac users, sometimes you might need additional features that go beyond basic editing. In such cases, using an alternative like HitPaw Univd (HitPaw Video Converter) for Mac can make the process smoother and faster. This software offers advanced conversion options, supporting over 1000 video formats, along with intuitive editing features.
HitPaw Univd - All-in-one Video Solutions for Win & Mac
Secure Verified. 254,145 people have downloaded it.
- Convert videos to/from iMovie and other formats without losing quality
- Batch convert files with full GPU acceleration
- Built-in editor to trim, crop, merge, add filter and even change playback speed
- Add subtitles to videos
- Download videos from YouTube, TikTok, Facebook, and other video sites
- Over 30 useful tools including image converter, image editor, AI tools, etc.
Secure Verified. 254,145 people have downloaded it.
How to Convert Videos on Mac without Losing Quality
Follow these steps to convert videos on Mac effortlessly with HitPaw Univd:
Step 1: Launch HitPaw Univd on Mac and Add Your Files
Begin by opening HitPaw Univd on your Mac or Windows computer. Click on "Add Video" or simply drag and drop your desired video files into the program.

Step 2: Add Subtitles (Optional)
To add subtitles to a video, click on “Add Subtitles” option. HitPaw Univd supports file types like SRT, ASS, VTT, and SSA. You can add external subtitles one at a time and arrange them in your preferred order.

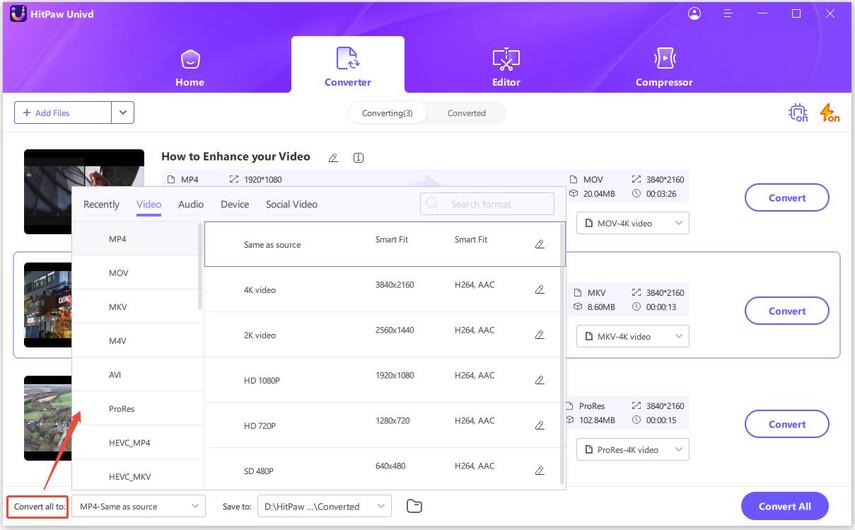
Step 3: Choose an Output Format
Select an output format by clicking the drop-down icon next to each file. You can also apply a unified format for all files by selecting “Convert All to” in the bottom left corner. If you'd like to convert video to iMovie format, please select MOV format in the Video category.
Step 4: Convert the Video
Once you're ready, click "Convert" or "Convert All" to start converting all videos without losing quality.

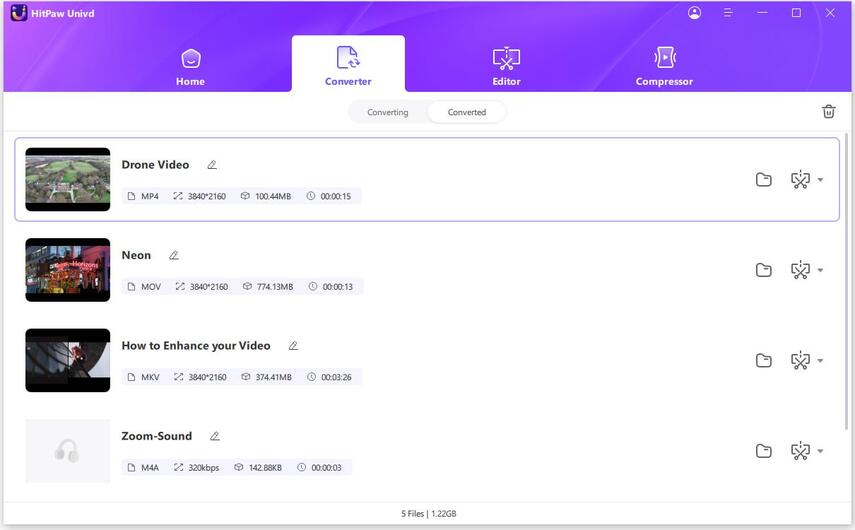
Step 5: Access Your Converted Files
After conversion, go to the “Converted” tab to locate your files. Click on “Open Folder” to view them, or click “Add to edit” if further modifications are required.
Conclusion
Saving your iMovie projects on Mac can be done in a few simple steps using either the Share Project option or the File menu. However, knowing how to troubleshoot common problems like lack of space or corrupted files is essential to avoid losing your work. Moreover, when iMovie doesn't meet all your video editing needs, switching to alternatives like HitPaw Univd can provide additional tools and capabilities to enhance your creations. With the right guidance and tools, video editing on Mac becomes a seamless, enjoyable process.




 HitPaw VoicePea
  HitPaw VikPea (Video Enhancer)
 HitPaw FotorPea


Share this article:
Select the product rating:
Daniel Walker
Editor-in-Chief
My passion lies in bridging the gap between cutting-edge technology and everyday creativity. With years of hands-on experience, I create content that not only informs but inspires our audience to embrace digital tools confidently.
View all ArticlesLeave a Comment
Create your review for HitPaw articles