How to Change Video Resolution on Windows & Mac in 2025
Changing the resolution of a video can improve its compatibility, reduce file size, or enhance its visual quality for various devices. Whether you're a casual user or a professional, learning how to change resolution of a video is essential in today's media-centric world. This guide will walk you through everything you need to know about changing video resolution on Windows and Mac.
Part 1. Why Do You Need to Change Video Resolution?
Changing video resolution is essential for ensuring optimal playback, managing storage space, and enhancing the overall viewing experience. Changing video resolution serves multiple purposes. Here are the key reasons:
- Optimize for Device Compatibility: Some devices or platforms support specific resolutions. Adjusting ensures smooth playback and prevents any unnecessary errors.
- Reduce File Size: Lower resolutions consume less storage, ideal for sharing or archiving. This is especially helpful for mobile users with limited storage space.
- Improve Viewing Experience: Higher resolutions enhance video clarity on modern screens. Watching videos on HD or 4K-capable devices is much more enjoyable when the resolution is appropriate.
- Adjust for Bandwidth Constraints: Smaller resolutions are perfect for streaming on slower internet connections. This ensures a buffer-free viewing experience.
- Prepare for Editing: Certain video editors work better with specific resolutions for precise editing, making post-production easier and faster.
Part 2. Best Ways to Change Resolution of Video on Windows and Mac
This section covers five of the best tools to help you efficiently adjust video resolution on both Windows and Mac systems. From beginner-friendly options to advanced software, these tools cater to various needs and skill levels.
1. HitPaw Univd (HitPaw Video Converter)
HitPaw Univd is a versatile tool that simplifies the process of adjusting video resolutions. It supports numerous formats and allows you to adjust video resolution effortlessly. Whether you need HD, Full HD, or a custom size, this software provides excellent results with user-friendly features. It's an ideal choice for both professionals and beginners, thanks to its intuitive design and robust capabilities.
Features of HitPaw Univd:
HitPaw Univd - All-in-one Video Solutions for Win & Mac
Secure Verified. 254,145 people have downloaded it.
- Supports over 1000 formats for conversion, ensuring compatibility with virtually any device.
- Batch conversion for handling multiple files simultaneously, saving you time.
- Allows custom resolution settings, making it flexible for unique requirements.
- Maintains original video quality with minimal loss during conversion.
- Easy-to-navigate interface with quick processing to deliver results fast.
Secure Verified. 254,145 people have downloaded it.
How to Change Resolution of a Video with HitPaw Univd
Changing video resolution with HitPaw is straightforward, thanks to its user-friendly interface and efficient processing capabilities.
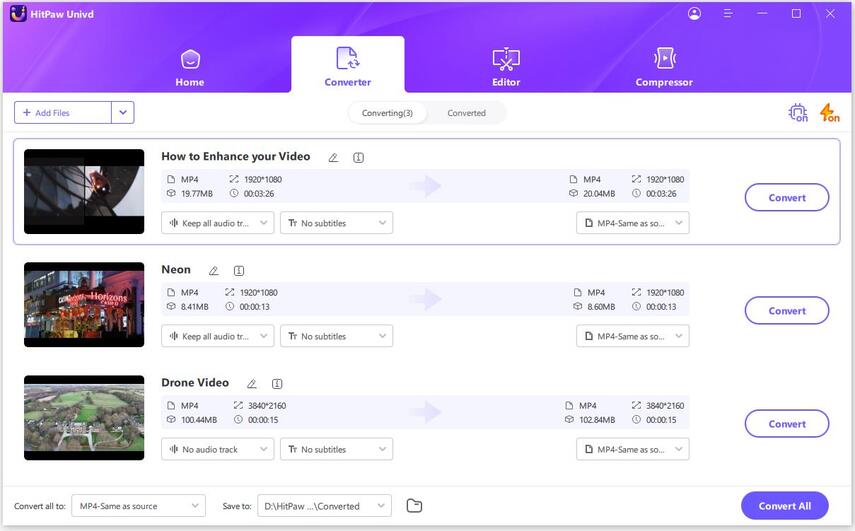
Step 1: Open HitPaw Univd and Add Files:Launch HitPaw Univd and select the "Add Video" button to import your files. You can also drag and drop videos directly into the program.
Step 2: Select an Output Format
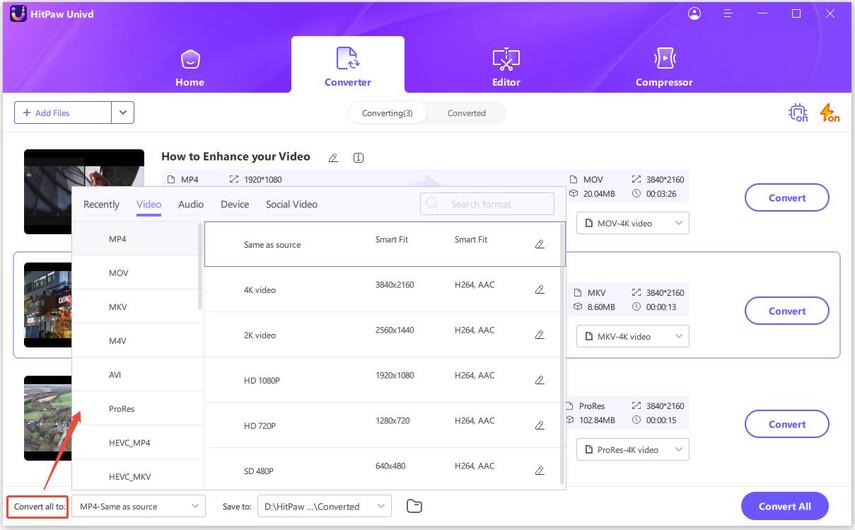
Select Resolution and Output Format: Click the inverted triangle icon near each file to select an output format, click "Convert all to" for unified settings across files.
Step 3: Edit Video Resolution
After selecting the output format, you can click the edit button to adjust video parameters including the resolution.

Step 4: Convert the Video
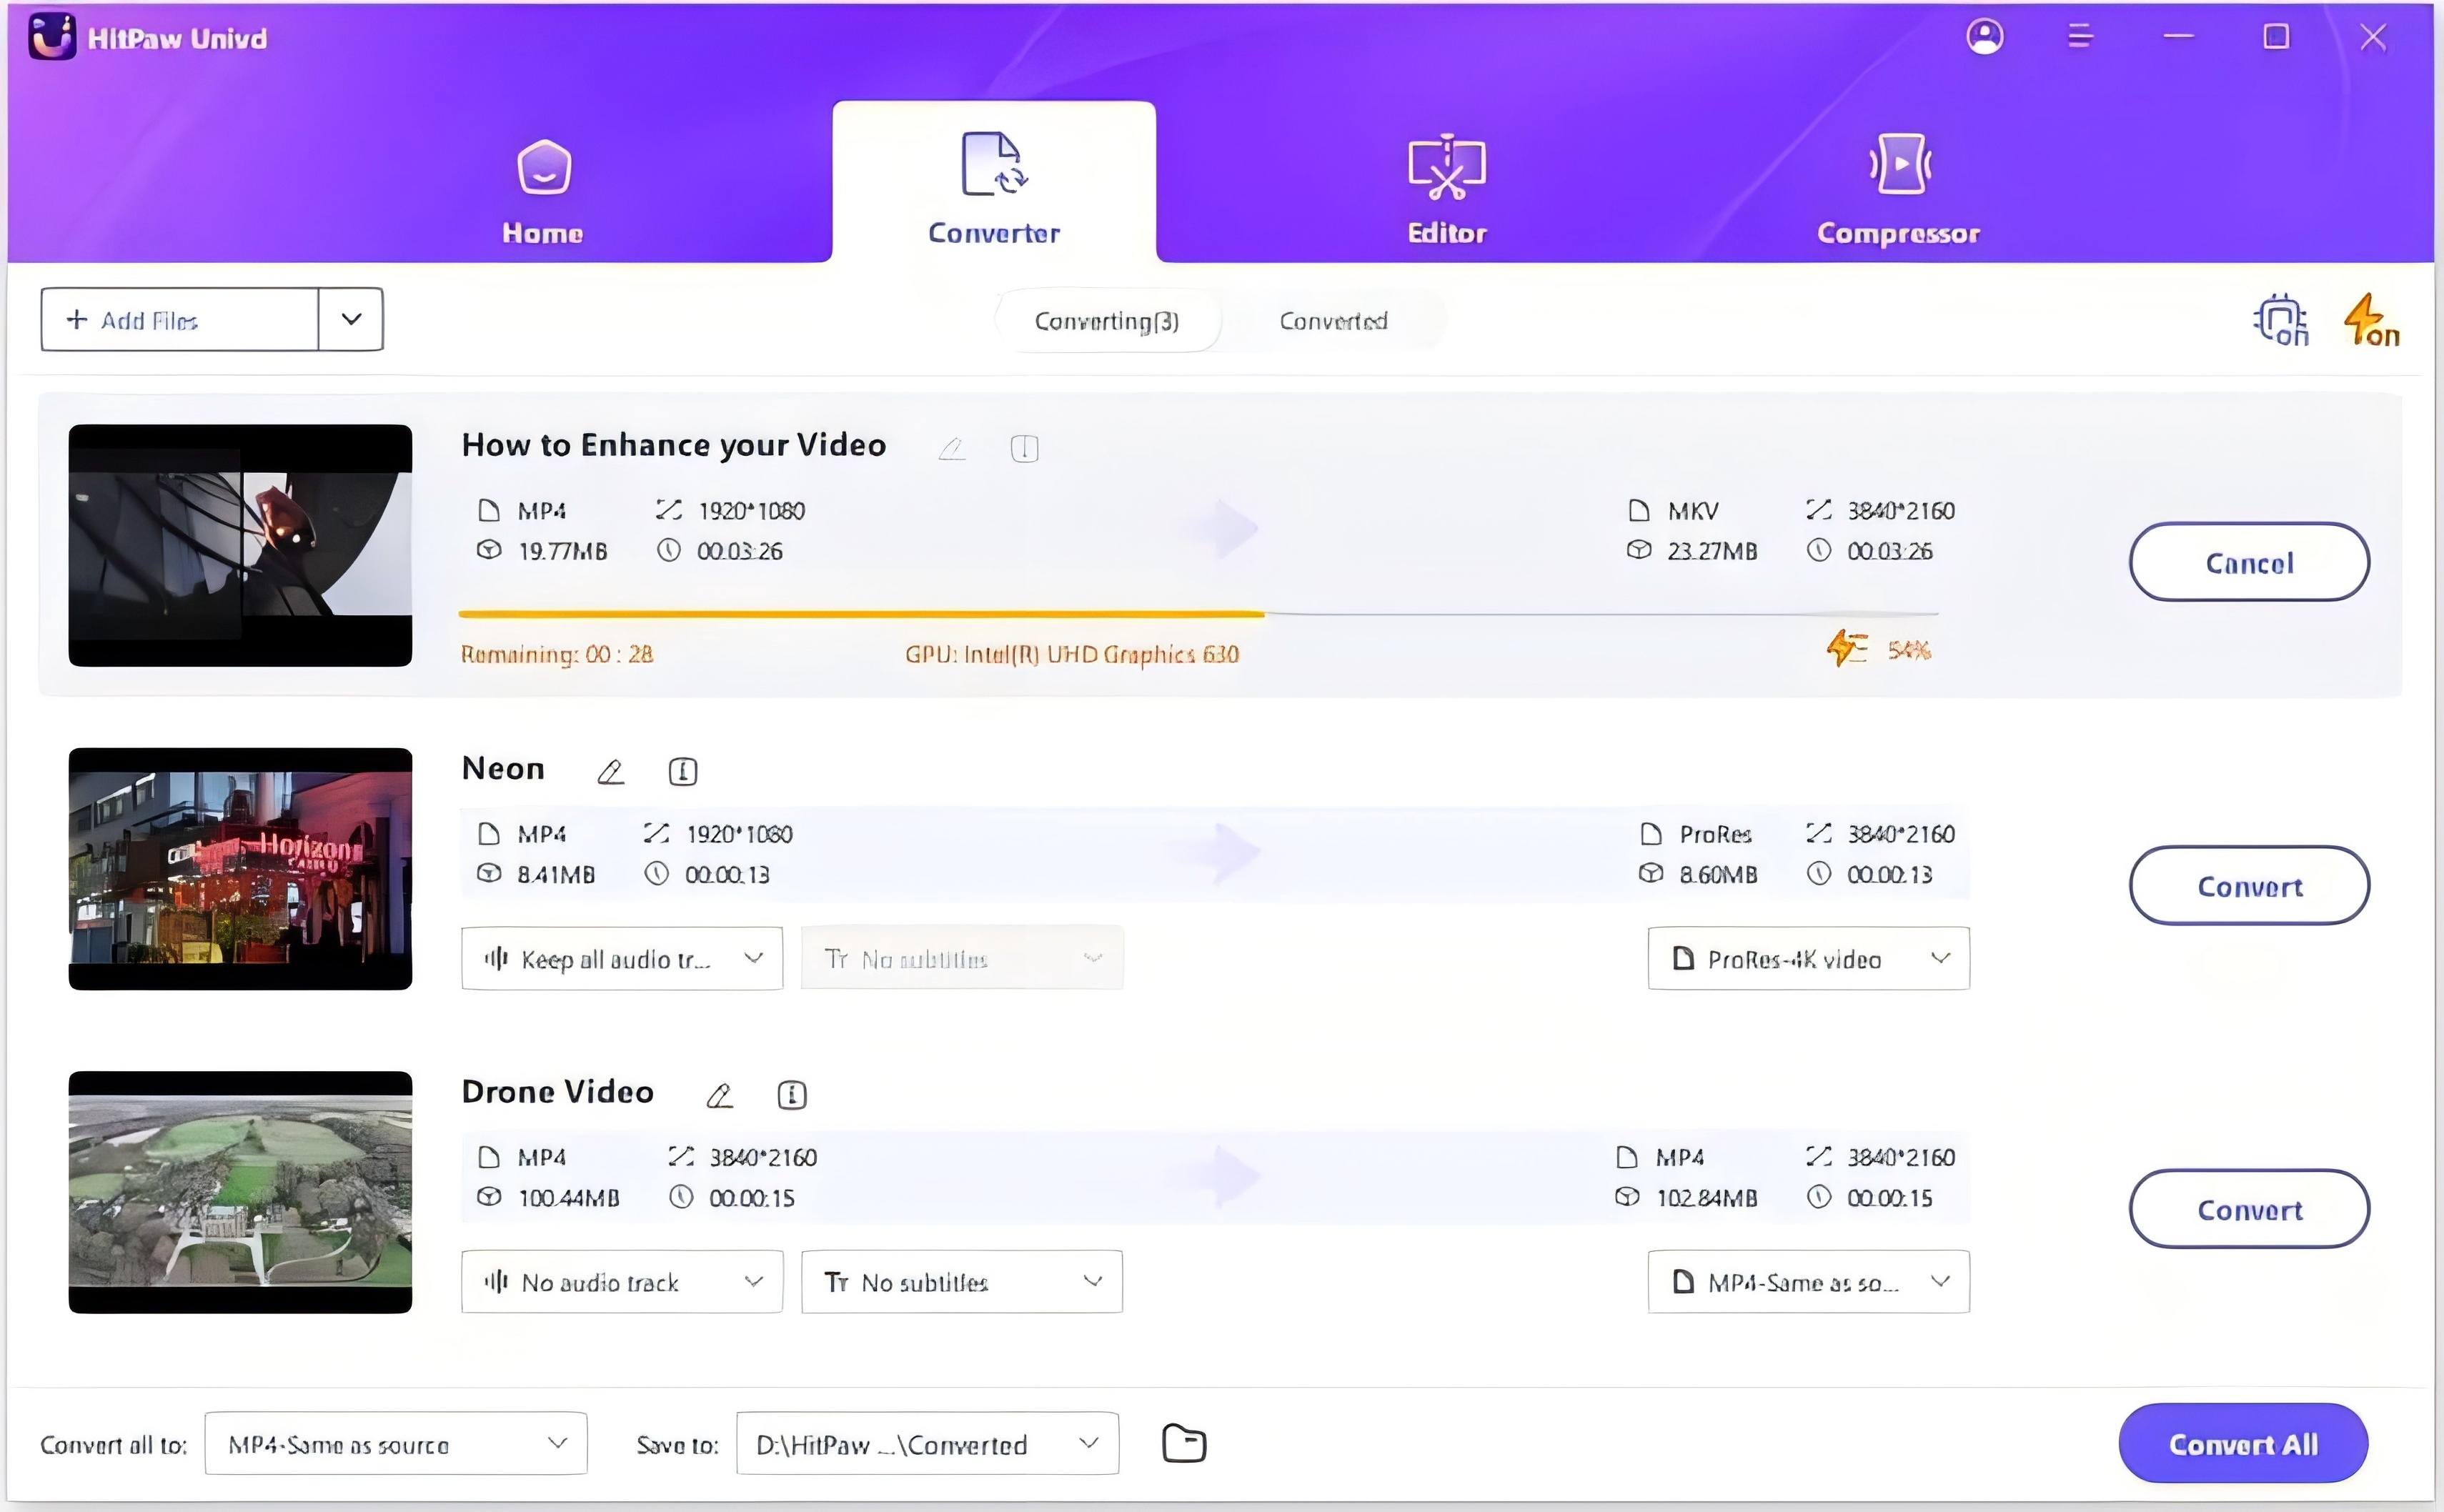
Click "Convert" (or "Convert All" for batch processing) to start converting the video.
Step 5: Access the Converted Files
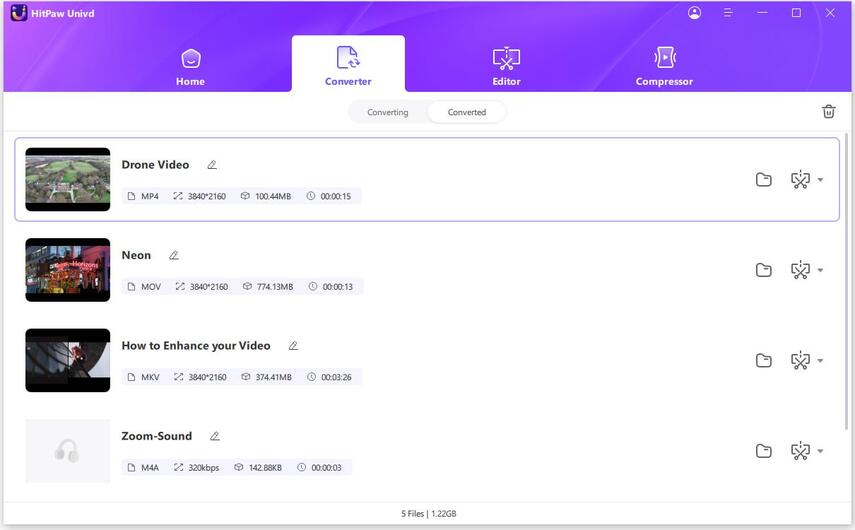
Once the conversion is complete, go to the "Converted" tab to view your finished files. Click "Open Folder" to locate them or add them to the editing list for further modifications. Click the Convert button and save the output file to your chosen location. The process is quick and hassle-free.
2. VLC Media Player
VLC is not just a media player; it's also a robust tool for video editing, including resolution changes. It supports most video formats, making it a go-to option for many users. VLC is particularly popular because it's free, open-source, and compatible with a wide range of operating systems, making it accessible to nearly everyone.
How to Edit Video Resolution on VLC
VLC makes resolution editing simple with its built-in conversion features. It supports popular formats and allows custom resolution adjustments for precise control.
Step 1: Download and Install VLC Media PlayerDownload the VLC installation file for your operating system. After downloading, complete the installation by following the instructions and launch the program.
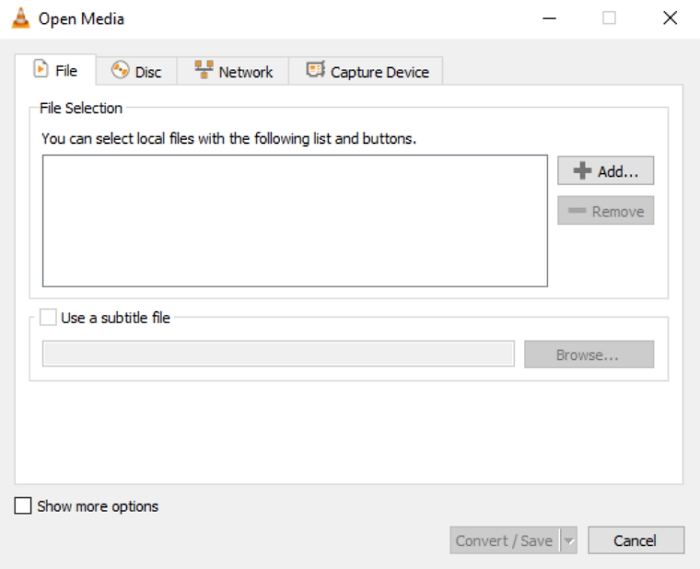
Step 2: Add Your VideoOpen VLC, navigate to the Media menu, and select Convert / Save. In the dialog box, click Add to locate and select your video file. Confirm by clicking Convert / Save.
Step 3: Change the Resolution of Your Clip
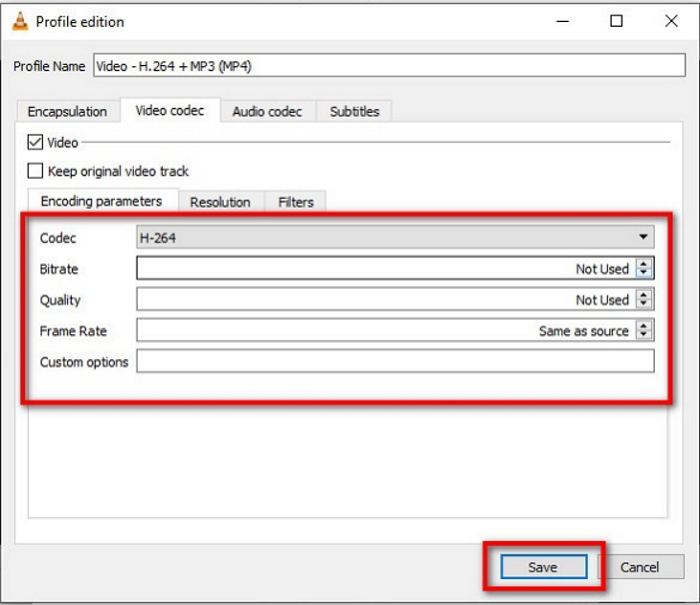
Choose a preset from the Profile menu, such as Video - H.264 + MP3 (MP4). Customize further by clicking the wrench icon, going to the Video Codec tab, and adjusting resolution settings under the Resolution section.
Step 4: Convert the Video
Specify the destination folder by clicking Browse and naming your file. Press Start to begin the conversion and wait until the process is complete.
Pros
- Free and open-source, accessible to everyone.
- Supports multiple formats, making it highly versatile.
- Lightweight and easy to use, even on older devices.
Cons
- Limited output format options compared to dedicated converters.
- No resolution presets, requiring manual adjustments.
3. HandBrake
HandBrake is a powerful open-source video converter, ideal for users familiar with advanced settings. It supports custom resolutions and detailed encoding options. With its flexibility and extensive features, HandBrake is often the top choice for video professionals who need precise control over output settings.
How Can I Change the Resolution of a Video Using HandBrake
HandBrake offers robust features for changing video resolution with detailed customization options. This tool is particularly suited for advanced users looking to fine-tune video settings.
Step 1: Install HandBrakeDownload HandBrake for your platform and install it. After the installation, launch the program to start converting videos.
Step 2: Upload Your FileAdd your file using the File button for single files or Folder (Batch Scan) for multiple files. Drag and drop functionality is also available.
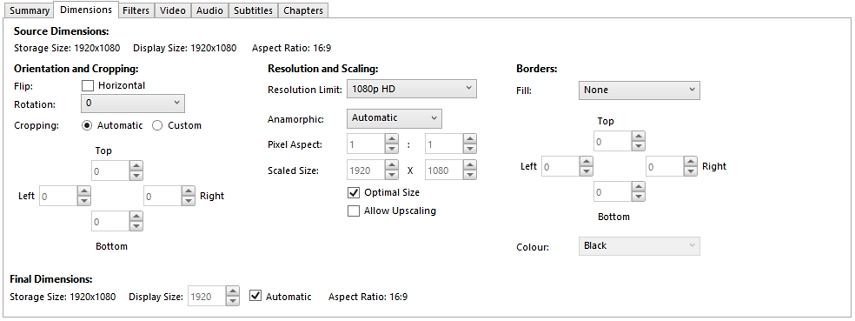
Step 3: Change the Video ResolutionTo adjust the resolution, either select a preset from the Preset drop-down menu or manually input the width and height under the Dimensions tab.
Step 4: Convert the VideoClick the Start Encode button to begin the conversion. Once finished, your video will be saved with the new resolution.
Pros
- Completely free and open-source, with no hidden costs.
- Advanced features for experienced users, including codec selection and bitrate adjustments.
- Supports batch processing to handle multiple files at once.
Cons
- Steeper learning curve for beginners, as the interface is more technical.
- Limited default presets for casual users.
Part 3. How to Change Video Resolution Online
In addition to the primary tools listed above, several other video resolution changers are available online. These platforms are often lightweight, user-friendly, and accessible without requiring installation, making them perfect for quick edits.
1. HDconvert
HDconvert is a simple and efficient online tool that helps users compress or adjust video resolutions without downloading additional software. Its interface is designed for quick navigation, making it suitable for casual users who need to modify videos without complications. With options to convert videos to 720p, 480p, and other resolutions, HDconvert ensures compatibility with various devices.
How to Change Video Resolution
Step 1: Add Videos for ConversionVisit the HDconvert website, click Convert File Now, and upload your video by dragging it into the interface or selecting it manually.
Step 2: Change the Video ParametersChoose the desired resolution (e.g., 720p or 480p) and confirm other output settings. Make additional adjustments as needed in the advanced settings.
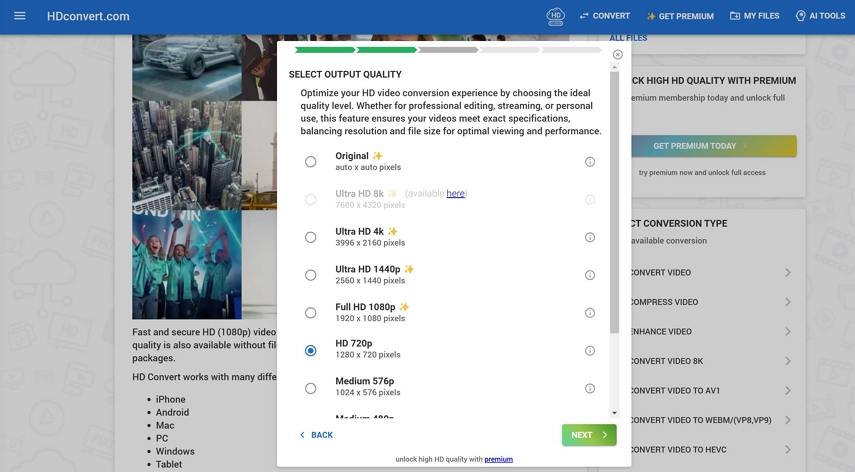
Step 3: Begin the Conversion
Choose between the free or premium option and click Convert 1 File. Wait for the process to finish and download the converted file.
Pros
- No installation required, saving disk space.
- Free to use, with an optional premium version for advanced features.
Cons
- Requires internet connection, making it unsuitable for offline use.
- Limited free options for higher resolutions.
2. Online-Convert.com
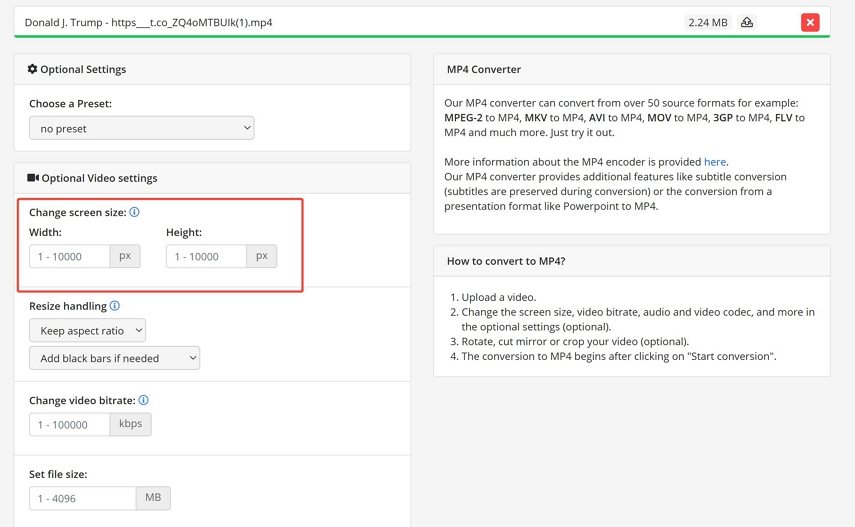
Online-Convert.com is a robust platform that supports over 50 video formats and provides extensive options for changing video resolution. Whether you need to adjust pixel dimensions or alter the aspect ratio, this tool delivers precise results. Additionally, the service offers options to optimize videos for specific devices, making it a versatile choice for many users.
How to Change Video Resolution
Step 1:Visit Online-Convert.com and upload your video. You can also add files from cloud storage or via URL.
Step 2:Enter desired width and height in the resolution settings section.

Step 3:Click "Start" to initiate the process. Once complete, download the file.
Pros
- Supports over 50 formats, offering extensive compatibility.
- Custom pixel adjustments for precise resizing.
Cons
- Internet-dependent, limiting flexibility.
- Overwhelming options for beginners, requiring some familiarity.
3. Convert-Video-Online.com
Convert-Video-Online.com is designed for simplicity, catering to users with minimal technical expertise. This platform enables quick video resolution changes while offering standard presets for common devices. Its intuitive interface ensures that users can navigate the process seamlessly, making it a reliable choice for basic video adjustments.
How to Change Video Resolution
Step 1: Open the WebsiteVisit Convert-Video-Online.com to begin the process.
Step 2: Upload the VideoClick Open File to upload a video from your device or use a cloud storage option.
Step 3: Set Video ResolutionChoose the output format and select a resolution from the provided list. Adjust additional settings if needed.
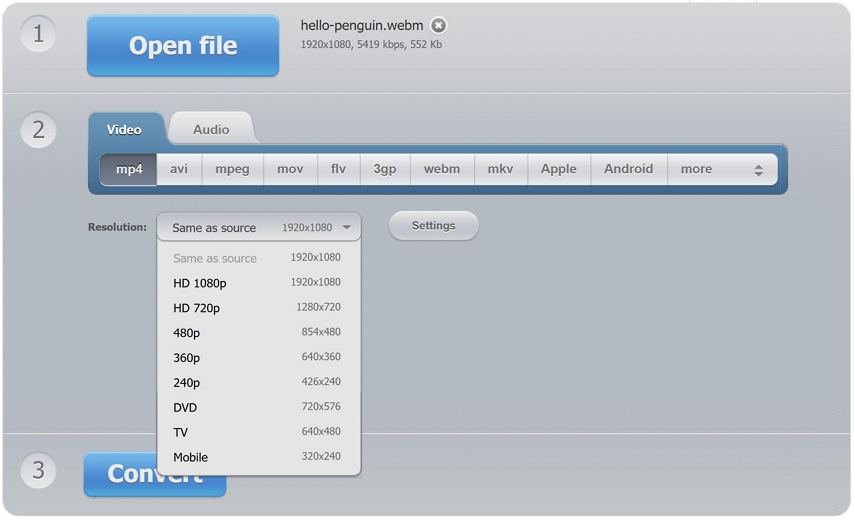
Step 4: Resize the Video
Click Convert and wait for the process to finish. Download the resized video to your computer or cloud storage.
Pros
- Beginner-friendly, with clear instructions for each step.
- Free and simple interface, ideal for non-technical users.
Cons
- Limited to basic features, lacking advanced customization.
- May not support less common file formats.
Conclusion
Changing video resolution on Windows and Mac has never been easier. With tools like HitPaw Univd, VLC, and HandBrake, you can adjust video resolution effortlessly. Whether you're looking for advanced editing or quick adjustments, there's a solution tailored to your needs. Incorporate the steps shared here and enjoy optimized videos for any platform or device. Start transforming your videos today with these top-notch tools!



 HitPaw VoicePea
  HitPaw VikPea (Video Enhancer)
 HitPaw FotorPea


Share this article:
Select the product rating:
Daniel Walker
Editor-in-Chief
My passion lies in bridging the gap between cutting-edge technology and everyday creativity. With years of hands-on experience, I create content that not only informs but inspires our audience to embrace digital tools confidently.
View all ArticlesLeave a Comment
Create your review for HitPaw articles