How to Trim Videos Using QuickTime Player: A Step-by-Step Guide
Trimming the videos is necessary to capture the attention of the viewers. It might happen that some parts of the video remain silent, so trimming the unnecessary parts from the video will make the scenes more relevant and dramatic. QuickTime player trim video is a magnificent tool that allows you to trim the videos without affecting the overall quality of videos.
If you're interested in trimming the videos through QuickTime, this post is all set to introduce the step by step guide to trim the videos without asking you to do much.
Part 1: What is QuickTime Player?
QuickTime player is a brilliant software application that is designed to share, record, edit, and play the audio and video files on the Mac. It was designed back in 1991 and is supported by the Director, HyperCard, PowerPoint and MovieWorks.
Part 2: How to Trim Videos in QuickTime Player
Opting for the Quicktime trim video only takes few moments before trimming the unnecessary parts from the videos as you can look at the step by step guide below to trim the videos via QuickTime Player.
Step 1: To begin with, you'll need to start the QuickTime Player on the Mac computer and You can search for this app through Spotlight search. You can also launch the Finder app in the Dock and select the Applications icon from the left-hand side menu. Next, you'll need to search for QuickTime from the right-hand side menu. After launching the QuickTime Player, you'll need to press the File button and choose the Open File icon.

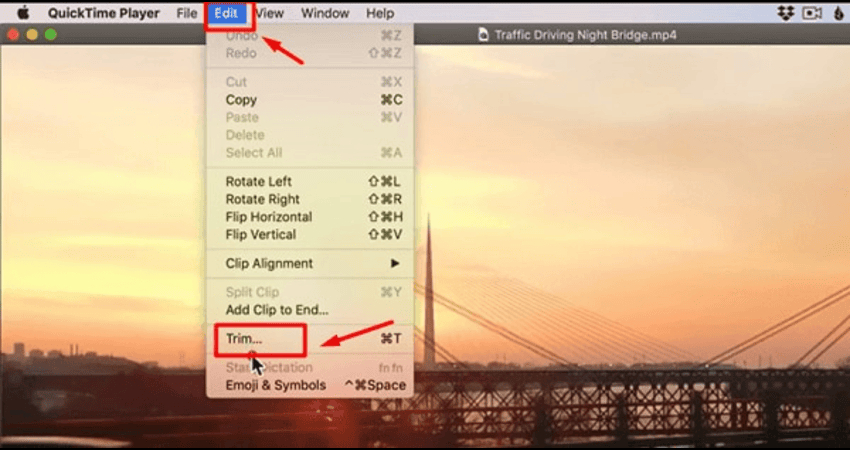
Step 2: Choose the video you wish to trim and tap on the Edit tab from the top menu with the video open. Next, you'll need to choose the Trim icon from the drop-down menu and then you can rely on the keyboard shortcut command+T.

Step 3: Now, you can notice the yellow trimming bar around the video's length at the bottom of the screen. If you intend to QuickTime trim video, you'll need to drag the handles and this way app tends to remove everything outside your yellow bar.
After trimming the videos, you'll need to press the Trim icon on the screen's right side and then the play icon helps you to preview the video anytime you want to opt for during the editing process.
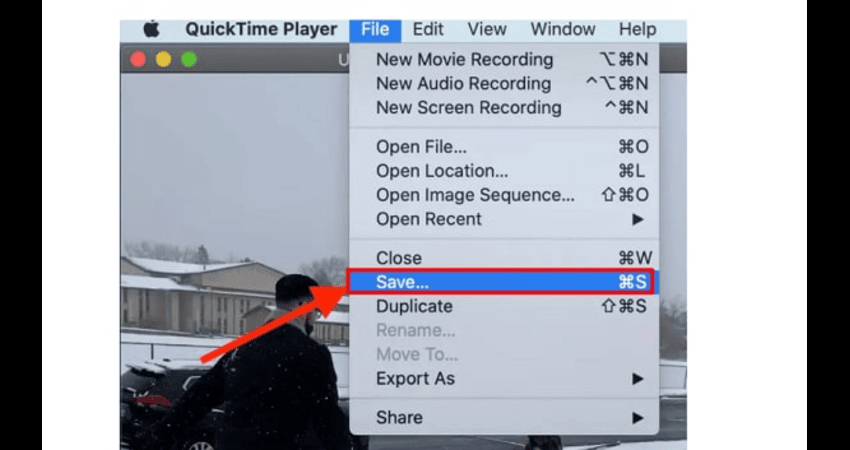
After tapping on the File button, you'll need to hit the Save icon to save the trimmed videos. Now, you'll need to name your trimmed video and then choose the location where you want to save the videos and then hit the Save icon to download the video into the computer.

Bonus Tips: Best QuickTime Player Alternatives to Edit Videos
Although, QuickTime player is an appropriate way to edit the videos but, this tool could be difficult to use and might take extra time editing the videos. Thus, the HitPaw Univd remains the best way to edit the videos as apart from trimming the videos, the HitPaw Univd is capable of performing several more editing functions, including adding filters, cropping the videos, and rotating or flipping the videos.
While editing the videos, HitPaw Univd tends to maintain the overall video quality and it also supports batch editing, meaning you can edit multiple videos simulataneosly. This tool doesn't come up with annoying ads and you won't see the watermark in the video while editing the numerous parameters of the videos.
Main Features of HitPaw Univd
- Allows you to trim or cut the videos effortlessly
- No video quality loss was detected while editing the videos
- Compatible with Mac and Windows
- Allows you to edit multiple videos simulataneosly
- Does not insert the watermark in the video
- No ads found offering the ads-free experience
How to edit the videos through HitPaw Univd?
Step 1: Install the HitPaw UnivdTo start with, you'll need to jump into the official webpage of the HitPaw Univd and then click on the Download button to download the software. In the next phase, you'll need to install the software and then start the software. Next, you'll need to tap on the Edit icon and then select the Cut button.

Step 2: Cut or Trim the video
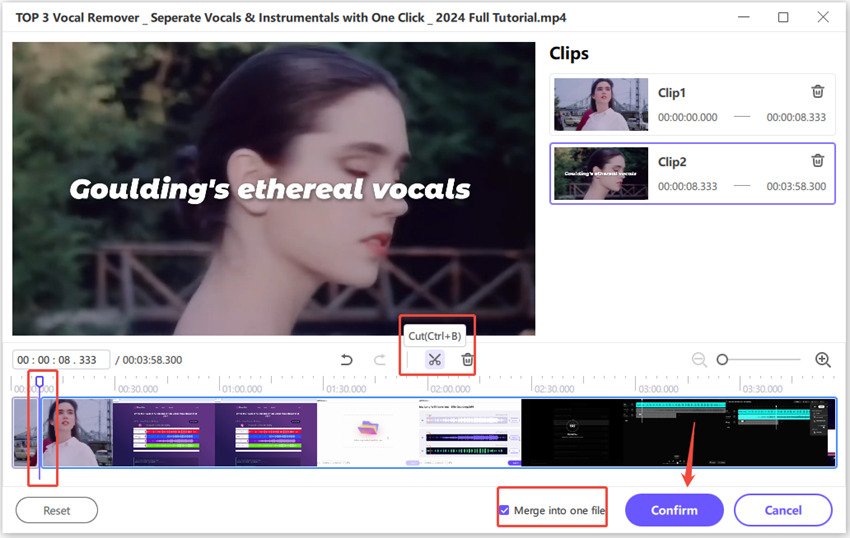
After importing the video to the timeline of the video, you'll need to preview the video into your software's timeline. Next, you'll need to drag the playhead to the video part you're looking to get rid of. Press on the scissor icon afterwards to split the video and you've got the leverage to repeat the process continuously to cut more video clips.
Apart from cutting the videos, you've got the chance to merge the video clips by checking the ''Merge into one file'' icon. You can start exporting the video clips by hitting the Confirm button.

Step 3: Crop or rotate the video
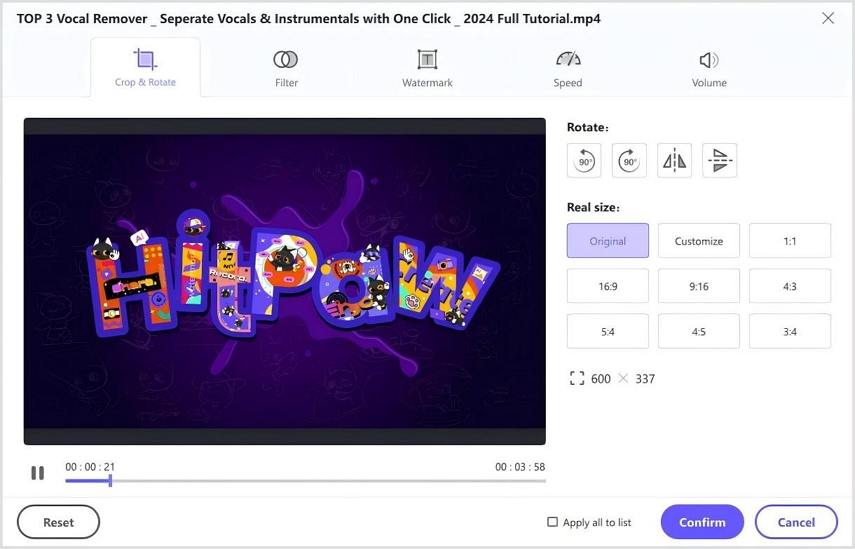
Apart from cutting or trimming the video, you can also crop or rotate the videos effortlessly. You've got the chance to rotate your video 90 degrees clockwise and 90 degrees counterclockwise before rotating the video upside down.
After rotating the video, you'll need to drag your four sides of the matrix to select the frames you want to crop or you can also choose the applicable ratio from the scale on the right side to crop your video automatically. You can then preview the video by hitting the Play button.

FAQs about QuickTime Player Trim Video
Q1. Can QuickTime Player trim video?
A1. Trimming the videos on the QuickTime player is so simple that you'll only need to launch the video in the QuickTime player and then navigate to the menu bar. Press the Edit icon and then choose the Trim button before selecting the Command+T icon. You can then customize the handles to choose the part of videos you wish to keep and hit the Trim button to finalize all the changes. In the next phase, you'll be able to save the trimmed video by using the File, Save and Export buttons.
Q2. Can I edit my video in QuickTime?
A2. Yes, QuickTime Player comes up with the basic editing features. You can now rearrange, split, and trim the videos and rotating and flipping the videos is also on the cards. Although, QuickTime Player doesn't come up with advanced editing credentials like detailed color corrections, effects and transitions. If you want to opt for more advanced editing, HitPaw Univd remains the best tool for applying several video editing techniques on the videos.
Conclusion
Cutting the unnecessary clips from the video is always on the cards courtesy of the QuickTime player trim video. Apart from enabling you to trim the videos, HitPaw Univd tends to maintain the overall quality of the videos.
When it comes to performing the video editing techniques on the videos, no one comes closer to the HitPaw Univd. It is a highly versatile tool that allows you to modify the numerous parameters of video while maintaining the overall quality of videos. HitPaw Univd also supports batch editing that allows you to customize multiple editing clips simultaneously.


 HitPaw Edimakor
 HitPaw VikPea (Video Enhancer)
 HitPaw FotorPea

Share this article:
Select the product rating:
Daniel Walker
Editor-in-Chief
My passion lies in bridging the gap between cutting-edge technology and everyday creativity. With years of hands-on experience, I create content that not only informs but inspires our audience to embrace digital tools confidently.
View all ArticlesLeave a Comment
Create your review for HitPaw articles