How to Copy Spotify Music to USB
In today's digital age, streaming services like Spotify have revolutionized the way we consume music. With millions of songs at our fingertips, it's no wonder that Spotify has become a go-to platform for music lovers worldwide. However, what happens when you want to take your favorite Spotify tracks offline and listen to them on the go? That's where the need to copy Spotify music to a USB drive arises. Here, we'll walk you through the process of copying Spotify music to a USB drive, allowing you to enjoy your favorite tunes anytime, anywhere.
Part 1. Can I Copy Spotify Music to USB?
Listening to music on your mobile device can use up your data allowance and reduce battery life. This is when transferring your preferred Spotify songs to a USB stick becomes a practical solution. It allows you to create a personalized playlist of your favorite tunes and enjoy them offline, eliminating the need for an ongoing internet connection.
What You Need:
To start this process, make sure you have the following:
- A Windows or Mac computer.
- A USB flash drive formatted in FAT32 or exFAT.
- HitPaw Spotify Music Converter on your computer to download Spotify songs to DRM-free MP3 format
Part 2: How to Convert Spotify Music to MP3
When copying Spotify music to a USB drive, it's crucial to understand that Spotify employs DRM (Digital Rights Management) protection, limiting user access to downloaded music. This measure is implemented to prevent unauthorized sharing and distribution of Spotify's vast music catalog. The downloaded files are encrypted and closely linked to the Spotify app, preventing direct transfer to a USB drive for offline listening.
HitPaw Spotify Music Converter offers a comprehensive solution for Spotify users seeking liberation from these constraints. This robust software enables you to convert Spotify music into a universally compatible format like MP3, effectively removing the DRM protection. As a result, you can seamlessly transfer DRM-free Spotify music files to your USB drive.
Key Features of HitPAW Spotify Music Converter
- Download songs, albums, playlists, podcasts, and artist from Spotify
- Convert Spotify to like MP3, M4A, FLAC, WAV
- Built player allows downloading music without installing Spotify app
- Enable offline playback of Spotify music on any device, including USB, MP3 player, DJ software, etc.
- Works with both Windows and macOS
How to Convert Spotify Music to MP3 and Transfer to USB
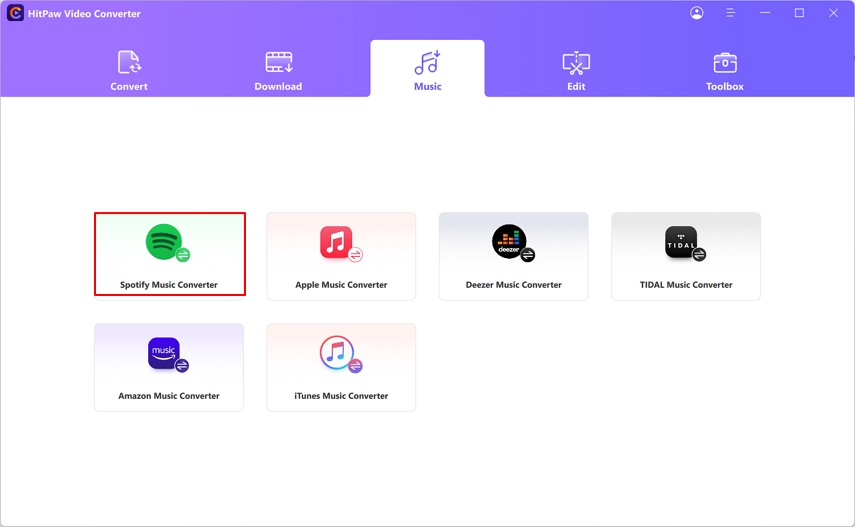
Step 1.To begin your journey with HitPaw Spotify Music Converter, launch HitPaw Univd (HitPaw Video Converter) and navigate to the Music section and select Spotify Music Converter.

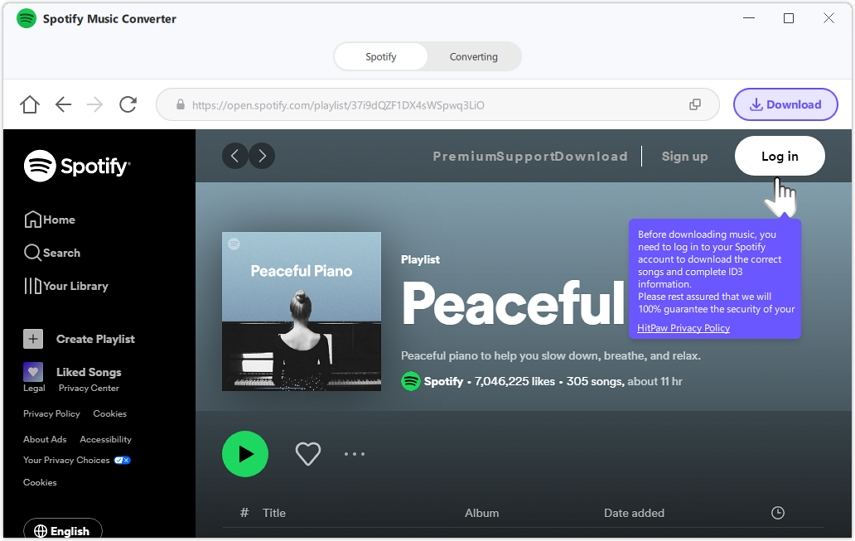
Step 2.Before you can access and download songs from Spotify, you'll need to log in to the web player with your Spotify account. Simply click the "Log In" button located in the upper right corner of the interface and enter your Spotify credentials to sign in.

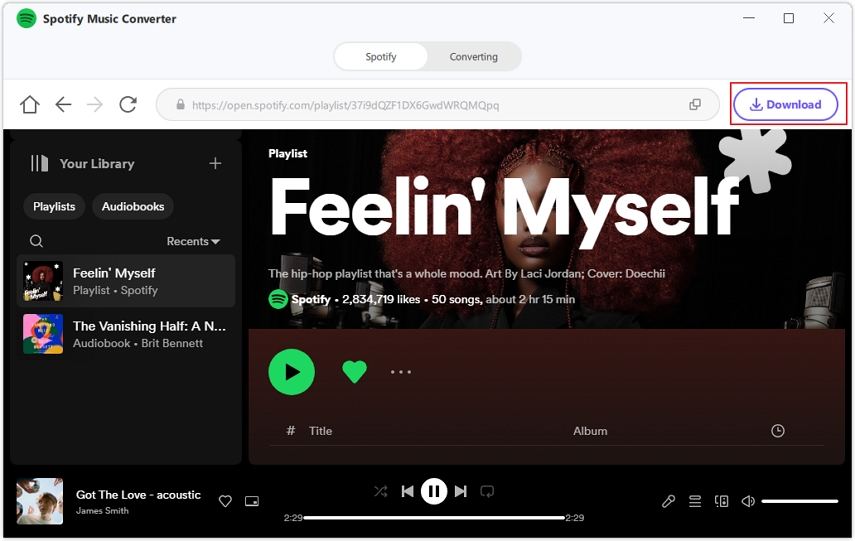
Step 3.Explore the vast library of Spotify's extensive music collection using the built-in Spotify web player. Search for your favorite artists, albums, or songs and enjoy millions of tracks right from within the HitPaw Spotify Music Converter interface. When you click the Download button, it will start analyzing the track/playlist/album/artist.

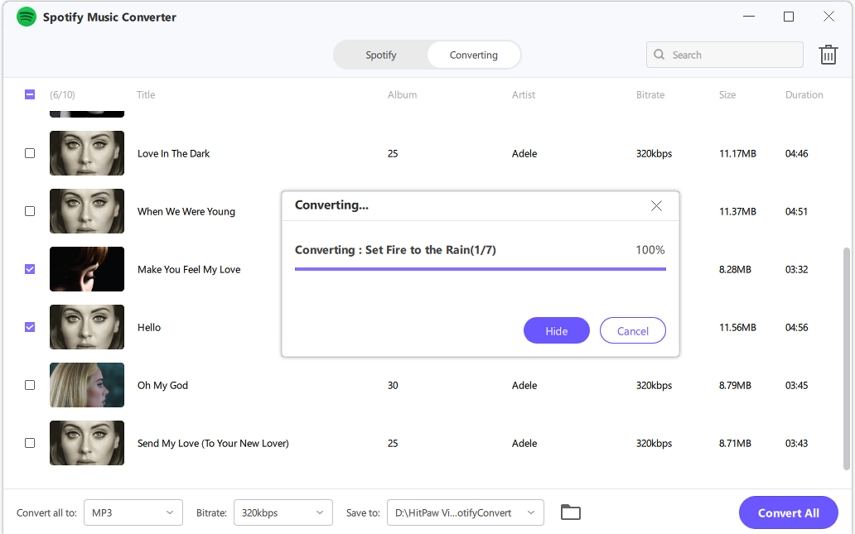
Step 4.Once the analysis is complete, switch to the "Converting" tab to preview the songs. Here, you can choose your desired output format for the downloaded music files.
Step 5.Finally, click the "Convert All" button to initiate the batch conversion process. HitPaw Spotify Music Converter will convert your selected Spotify music to MP3 for USB flash drive.

Part 3. How to Transfer Downloaded Spotify Music to USB
Now that your Spotify music has been downloaded and converted to MP3, it's simple to transfer these tracks to your USB drive. It's akin to organizing your digital music library, making the process straightforward.
For Windows PC Users:
- Plug your USB drive into your computer's USB port, and it should automatically be recognized.
- Open File Explorer by clicking the folder icon on your taskbar or pressing the Windows key + E. Find your USB drive listed under "This PC" on File Explorer's left sidebar.
- Go to the location on your PC where you've saved your converted MP3 music files.
- Highlight the music files and folders you wish to transfer (use Ctrl+A to select everything). Then, right-click and select "Copy" or press Ctrl+C.
- Go back to your USB drive in File Explorer, right-click in the drive's window, and select "Paste" (Ctrl+V).
- Wait until the transfer is complete. Then, right-click your USB drive in File Explorer and click "Eject". Your USB drive can now be safely removed.
For Mac Users:
- Insert your USB drive into one of your Mac's USB ports.
- Open Finder by clicking the smiley face icon in your dock.
- Look for your USB drive under "Devices" in Finder's left sidebar.
- Go to the location on your Mac where your MP3 files are saved.
- Choose the music files and folders you wish to transfer. Then, drag and drop them into your USB drive listed in the Finder sidebar.
- To safely remove your USB drive, right-click on it in the Finder sidebar and choose "Eject".
Conclusion
Copying Spotify music to a USB drive opens up a world of possibilities for music enthusiasts. Whether you're looking to create a personalized offline playlist for your car or simply want to enjoy your favorite tunes without relying on an internet connection, the process is simple with the help of HitPaw Spotify Music Converter. By following the steps outlined in this guide, you'll be able to copy Spotify music to a USB drive with ease, ensuring that your music collection is always within reach, wherever life takes you.



 HitPaw Edimakor
 HitPaw Watermark Remover
  HitPaw VikPea (Video Enhancer)

Share this article:
Select the product rating:
Daniel Walker
Editor-in-Chief
My passion lies in bridging the gap between cutting-edge technology and everyday creativity. With years of hands-on experience, I create content that not only informs but inspires our audience to embrace digital tools confidently.
View all ArticlesLeave a Comment
Create your review for HitPaw articles