How to Authorize a Computer for Apple Music
The most likely reason you read this article is that you want to know how to authorize computer for Apple Music. Apple Music is one of the best streaming services, allowing users to listen to their favorite music and discover new artists. While many Mac users love using this service on their computers to enjoy the lossless audio on the platform, there are times when new Mac users might have to authorize their computer with Apple ID to proceed with listening to music.
If you just found yourself in the same boat, then we are sure you must want to know how to authorize your computer. Well, we have this aspect covered for you. Hop on below to read a detailed guide on how do you authorize a computer for Apple Music.
Part 1: How to Authorize Computer for Apple Music and iTunes?
When you Google 'how to authorize your computer for Apple Music', multiple ways to do the task might pop up. However, we understand that not everyone is a tech genius and would have difficulty processing some problematic ways to authorize their computers. Keeping this in mind, we have concluded two of the easiest ways how to authorize my computer for Apple Music and iTunes.
For Apple Music
To authorize a computer for Apple Music, you have to follow the simple steps we have mentioned below:
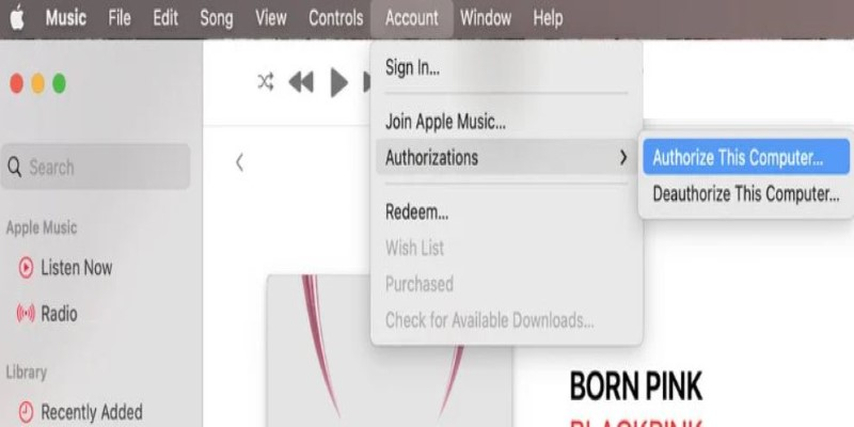
- Open your Music application on your computer. (Mac Catalina or later)
- Go to 'Accounts' in the Apple Menu and check if your Apple ID is signed in.
- Tap the Account label at the top, and click on the 'Authorize this computer' option in the dialog box.
- Lastly, sign into the Music Application using your Apple ID and Password.
- Your Mac computer is now authorized with your Apple ID for Apple Music.
For iTunes
If you were wondering how do I authorize my computer for Apple Music using iTunes, we have this aspect covered below as well. All you have to do is follow the simple steps which we have mentioned below:
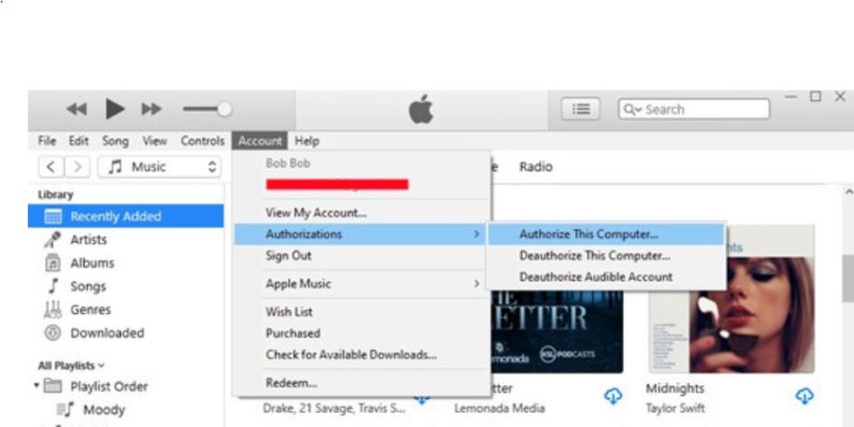
- Open the iTunes app on your MacOS Mojave or earlier.
- Choose the 'Account' and ensure your Apple ID is signed in. If not, sign in to your iTunes using your account credentials.
- Once signed in, click on the Authorizations and then select Authorize This Computer.
- You will then be asked for your Apple ID and password to continue.
- Once done, click on the Authorize button. Your computer is now authorized to play music on iTunes.
Part 2: How to Deauthorize Computer for Apple Music and iTunes?
Now that you know how to authorize a computer for Apple Music, we are sure the thought of deauthorizing your laptop later might have crossed your head. If that is the case, do not worry; we also have this aspect covered for you. Here is how you can deauthorize your computer for Apple Music and iTunes:
For Apple Music
To deauthorize your Mac for Apple Music, you have to follow these steps:
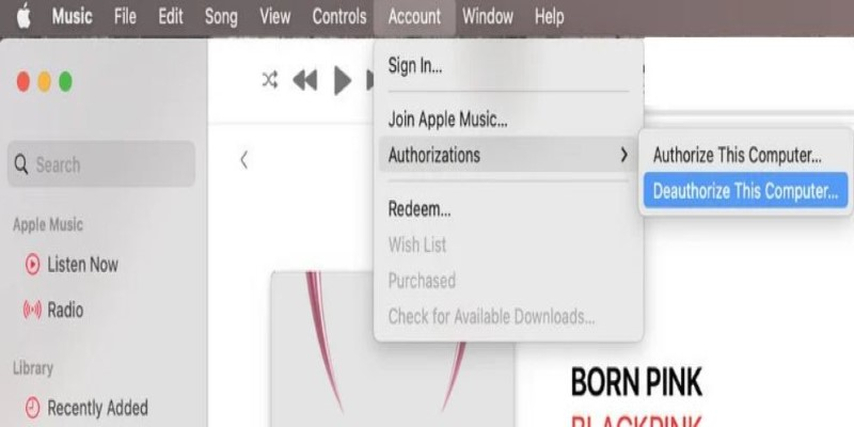
- In the Music application section on your Mac, tap on Account and then to the Authorization section. Tapping on it will give you two options: select Deauthorize This Computer.
- Still, use your Apple ID and password to continue.
- Click on the Deauthorize button.
- Now, your Mac has been deauthorized by Apple Music.
For iTunes
To deauthorize your Mac for iTunes, follow the steps we have mentioned here:
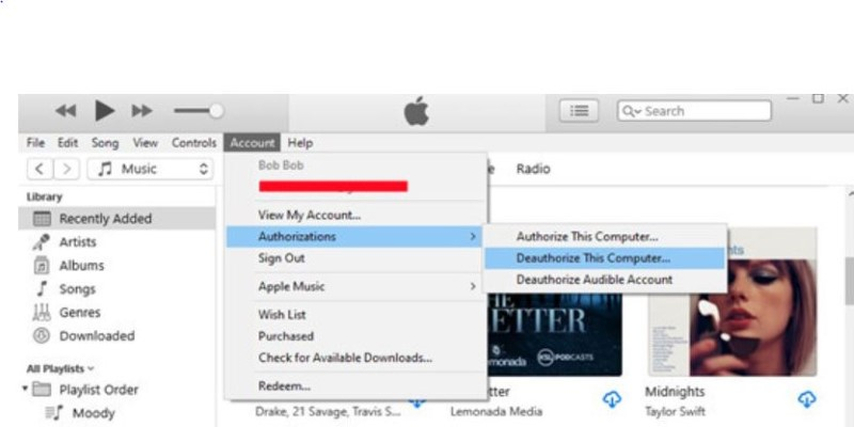
- In the iTunes application on your computer, click on the Account button and then go to Authorization> Deauthorize this Computer.
- Now, enter your Apple ID and password.
- Tap on the Deauthorize button.
Part 3: How to See How Many Computers Are Authorized?
Now that you know all the steps to authorize a computer for Apple Music, our next target of focus would be to see how many computers are authorized with your Apple Music account. Want to know how you can check this? Follow the steps we have mentioned below:
For Apple Music
To see how many computers are authorized from your Apple Music account, you have to:
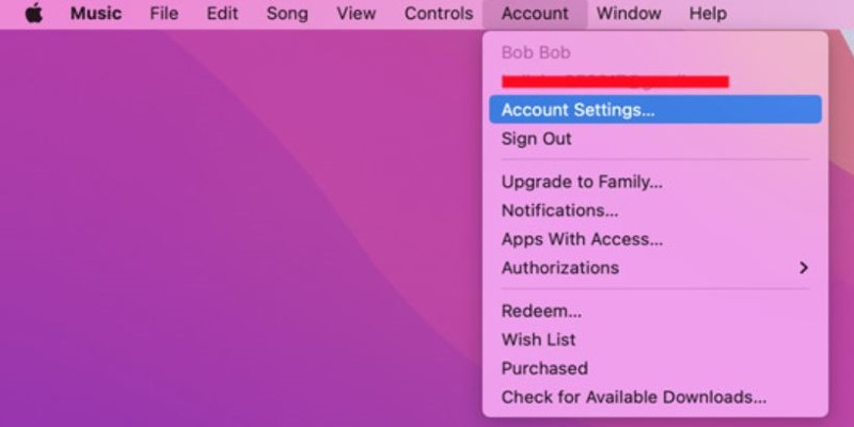
- Open the Music app and go to Account > Account Settings,
- Now, sign in to your Apple ID and password.
- On top of your Account Information page, look next to the Computer Authorization section and check the number of authorized computers.
- To authorize all computers, tap on the Deauthorize All button.
For iTunes
To see how many computers are authorized from your iTunes account, you have to:
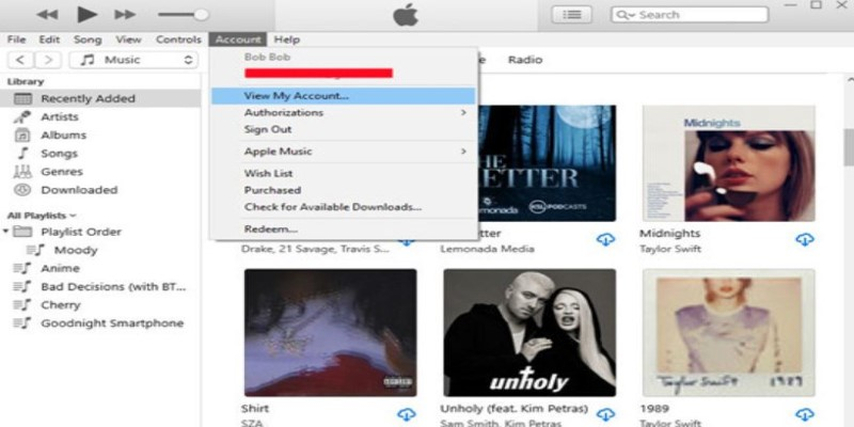
- Open your iTunes application and go to Accounts > View My Accounts. This will open the Accounts Information page. If asked to sign in, enter your password and continue.
- Check the Apple ID Summary section at the top of the Computer Authorization tab.
- Now, look next to the same tab and check how many computers are authorized.
- To authorize all your computers from iTunes, tap on Deauthorize All.
Part 4: How to Download Apple Music to MP3 on Windows & Mac?
If you want to download Apple Music to MP3 on your Windows or Mac, we suggest you use the HitPaw Univd (HitPaw Video Converter). This tool is exceptional and provides several unique features. Here are a few of those:
Main Features of HitPaw Univd Around Downloading from Apple Music
- The service allows you to easily download songs from Apple Music, Spotify, Tidal, Deezer, and Amazon Music.
- You can download albums, songs, artists, and podcasts from Apple Music with a single link through this video converter.
- The music downloaded from Apple Music is lossless and high-quality.
- All conversions made from Apple Music would be blazing fast.
How to Download from Apple Music using HitPaw Univd?
Intrigued and want to know how to use Apple Music using HitPaw Univd. Here are the steps you need to follow:
Step 1:Install the HitPaw Univd and launch the program on your computer. Now, choose Apple Music Converter from the toolbox.

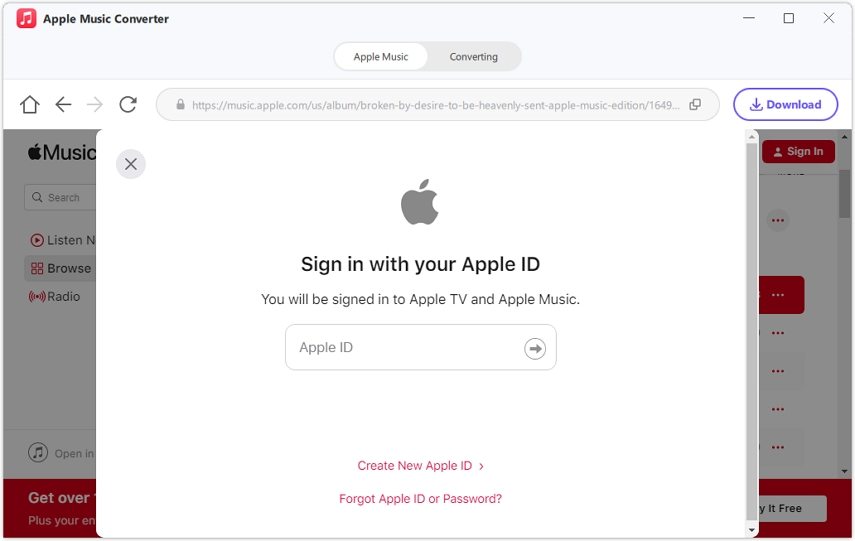
Step 2:It will not be time to log in to your Apple Music Account.

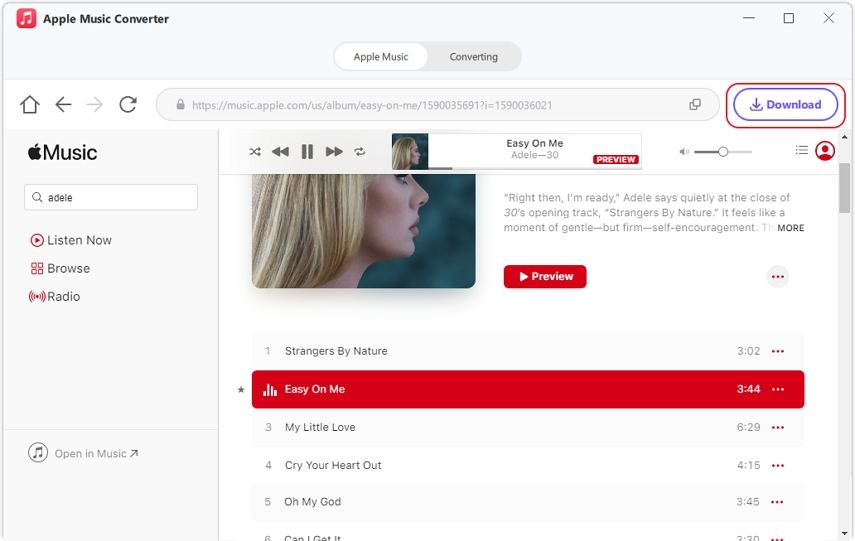
Step 3:Through the built-in media player, you can access your favorite songs to listen directly. The URL bar will display an album URL for the artist or song you searched for and a download button. Pressing on this download button will enable the tool to analyze your album.

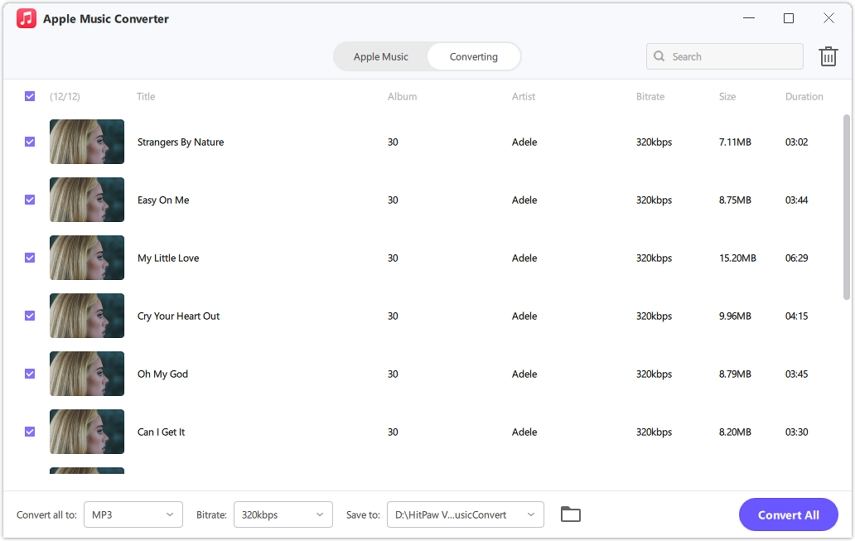
Step 4:Once the analysis is complete, go to the Converting tad. From here you can review all your selected songs.

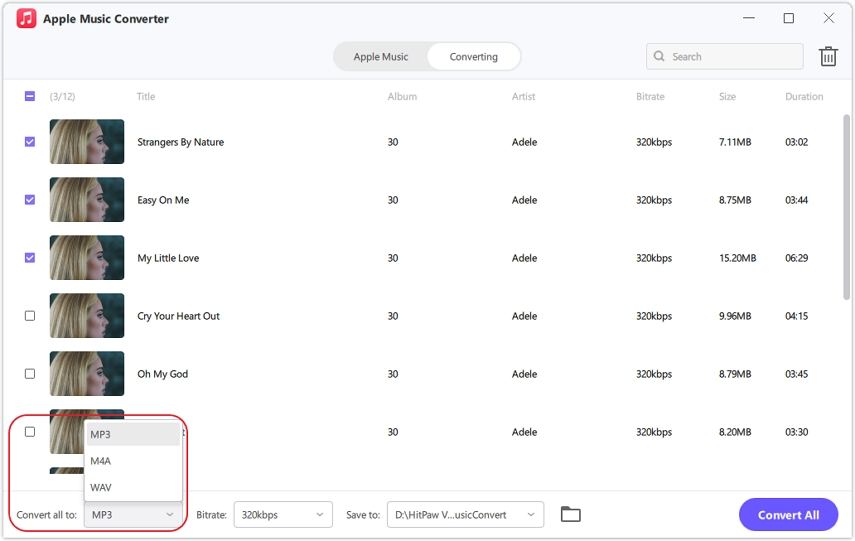
Step 5:The by-default format will be MP3. However, you can select the one which you like from the supported list.

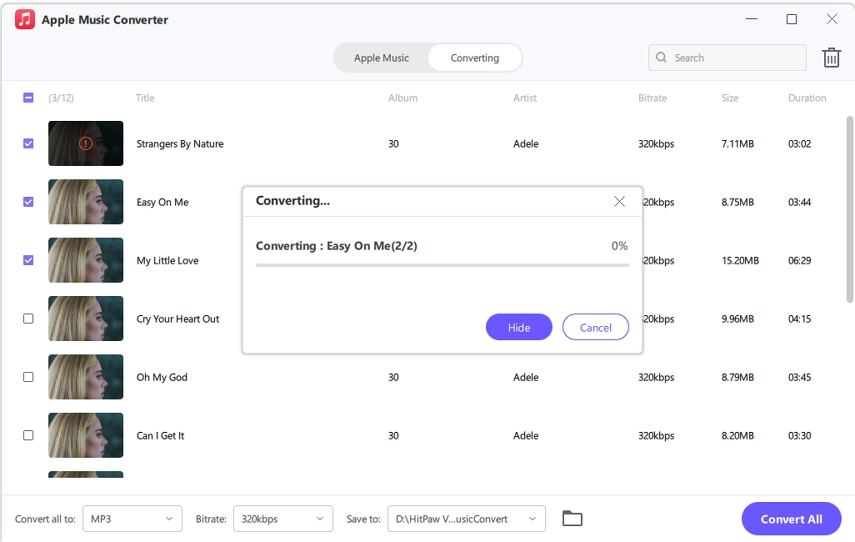
Step 6:Tap the Convert All button to convert Apple Music to MP3.

Watch the following video to learn more details:
FAQs
Q1. Why is my Mac not authorized for music?
A1. This might be because you used a different Apple ID to purchase the items you want to play.
Q2. Why do I have to keep authorizing my computer for Apple Music?
A2. Repeated requests to authorize your computer for recent store downloads usually indicate corrupt or incomplete copies.
Conclusion
We hope this article on how to authorize computer for Apple Music helped you understand the required steps to complete this process. Moreover, if you want to download your favorite Apple Music songs directly to your computer, we suggest you use the HitPaw Univd.



 HitPaw VikPea
 HitPaw Watermark Remover


Share this article:
Select the product rating:
Daniel Walker
Editor-in-Chief
My passion lies in bridging the gap between cutting-edge technology and everyday creativity. With years of hands-on experience, I create content that not only informs but inspires our audience to embrace digital tools confidently.
View all ArticlesLeave a Comment
Create your review for HitPaw articles