How to Blur Face in Video using Adobe Premiere Pro[2025]
With the proliferation of videos being captured and shared online, privacy concerns around recognizable faces are on the rise. Whether due to security reasons, adhering to content guidelines, or simply respecting people's privacy, blurring faces in video is often necessary before publishing. Adobe Premiere Pro is a powerful video editing software that provides versatile tools to edit and enhance videos in various ways. One useful technique in Premiere Pro is the ability to track objects and faces in a video and apply effects like blurring to maintain anonymity. Continue to read and you will figure out the steps on how to blue faces in Premier Pro in the right way.
Part 1: Steps to Blur Faces in Adobe Premier Pro
When you want to blur face in Adobe Premier Pro, there are few specific steps you should follow. Let's take a look at what those steps are.
Step 1. Importing Your Video
To get started, launch Adobe Premiere Pro and create a new project. Go to File > Import and select the video containing faces you want to blur. The video will be imported into your Project panel. Drag and drop the video from Project panel into your Timeline to begin editing.
Step 2. Applying the Blur Effect
With your video in the Timeline, go to the Effects panel and type "Gaussian Blur" in the search bar. Drag and drop the Gaussian Blur effect onto the clip in the Timeline. This will apply a blur effect to the entire frame.
Next, we need to mask the face we want to blur. Go to the Effects Controls panel and enable the Mask option. Using the shape tools, draw a mask loosely around the face. Make sure to leave some margin around the face. Now the blur will only be applied within the masked area.
Step 3. Using Keyframes for Moving Faces
As the face moves in the video, we need to track the mask. This is where keyframes come in handy. Set a starting keyframe on the mask path then move the play head to a later frame where the face position shifts. Adjust the mask to fit the face in the new position and set another keyframe. This will make the mask automatically track and fit the face across frames.
Use multiple keyframes whenever the face changes position significantly. Review the footage and adjust keyframes and mask position as needed to accurately blur the moving face.
Step 4. Adjusting Blur Intensity and Area
Under Effect Controls, you can tweak the Gaussian Blur effect for optimal results. Increase the Blurriness setting to intensify the blur or reduce it if the blurring is too strong.
Also ensure the mask fits the face accurately in all keyframes. You may need to pan and scale the mask in the Position settings to perfectly overlay on the intended face. Use feathering to soften the edges of the mask for a more natural effect.
Review and preview the results before finalizing. The steps may need to be repeated for other faces in the footage as well.
Part 2: 4 Best Alternatives for Blurring Faces in Video
1. HitPaw Univd (HitPaw Video Converter) AI Face Blur (Windows & Mac)
If you are searching for a near perfect alternative for blurring faces in videos, you should consider getting HitPaw AI Face Blur. It is one of the most versatile video converter and download applications available. With few simple steps, you can add your videos into HitPaw and use it to blur the faces as well. It also provides some additional features such as changing the intensity of the blur and even saving your files in another format.
Video Guide for Blurring Face with HitPaw AI
Key Features of HitPaw Univd
HitPaw Univd - All-in-one Video Solutions for Win & Mac
Secure Verified. 254,145 people have downloaded it.
- 120X AI Video Converter: HitPaw Univd supports converting videos, music, DVDs, and images at 120X faster speed. It can convert media files into 1000+ formats including MP4, MOV, AVI, MKV etc. The AI-powered engine optimizes conversions for any device like smartphones, tablets, and supports NVIDIA/AMD graphics cards.
- Lossless Music Converter: The tool allows converting songs from streaming platforms like Spotify, YouTube Music, Apple Music etc. without losing sound quality. Support for removing DRM and output formats like MP3, M4A, FLAC, WAV ensures you can enjoy music freely across devices, retaining metadata and ID3 tags.
- Robust Video Downloader: Download videos, audio, and subtitles from 10,000+ websites and convert them to MP4, WebM up to 8K resolution. Smart download manager feature enables easy batch downloading of videos, playlists, channels with just the links. Latest update expands support to download videos from Netflix, Hulu and Disney+.
- Built-in Smart AI Tools: HitPaw Univd comes loaded with intuitive AI tools to unlock creative possibilities for your media easy and quick. Key highlights include vocal removal, speech-to-text, AI art generator, noise reduction and face blur to protect privacy.
- Burn Videos to Blu-ray: Now you can back up large media files like videos, movies to Blu-ray discs without compromising visual quality. The DVD burner supports ripping content from Blu-rays, and burning more than 300 formats to customized Blu-ray ISO, folder or disc using menu templates. Ensure all your data is safe for decades.
Secure Verified. 254,145 people have downloaded it.
How to blur video with HitPaw Univd?
Step 1: Launch HitPaw UnivdOpen HitPaw Univd and go to the Edit tab. Click on the AI Face Blur option to launch the intelligent face tracking and blurring tool. This provides options to accurately identify faces and blur them.

Step 2: Add the Video File
In the AI Face Blur window, click +Video button or directly drag and drop the video containing faces you want to blur from your computer. The video gets imported instantly for editing.
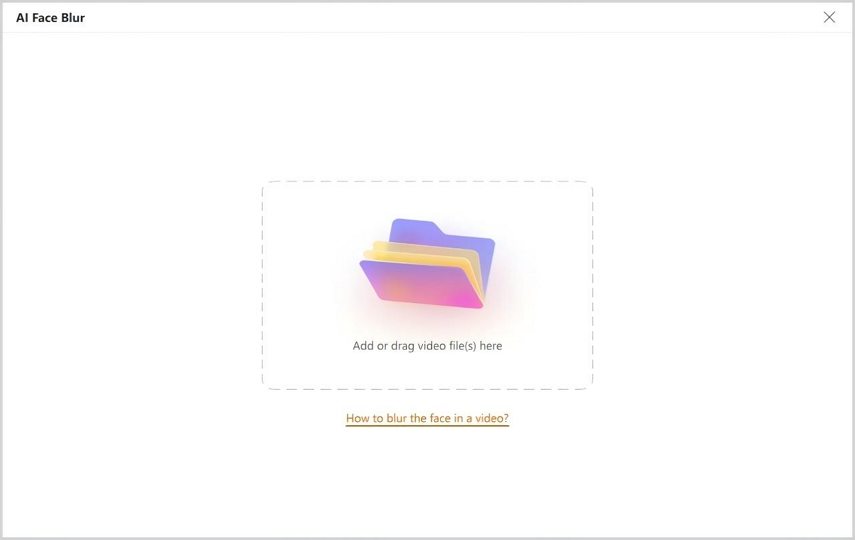
Step 3: Detect and Select Face
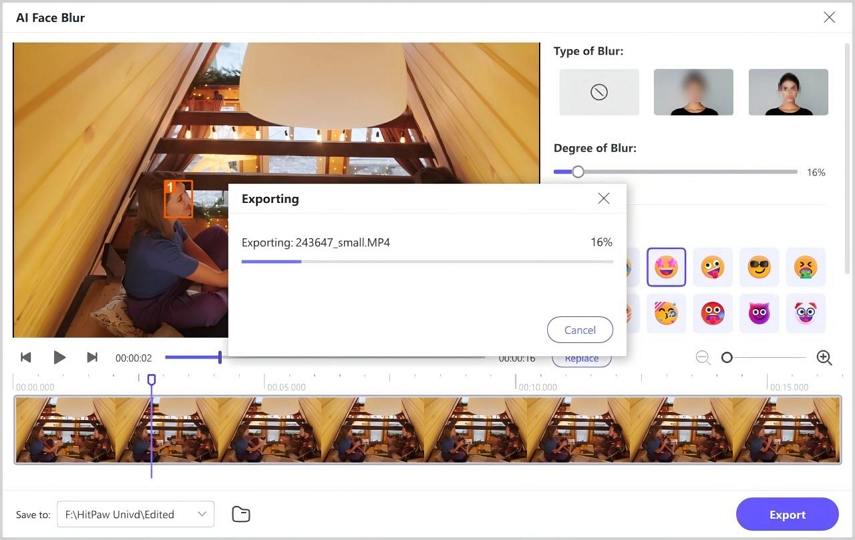
As soon as the video is added, HitPaw will automatically detect all recognizable faces. Faces are marked with numbers for easy identification. Select the intended face to be blurred by clicking on it.
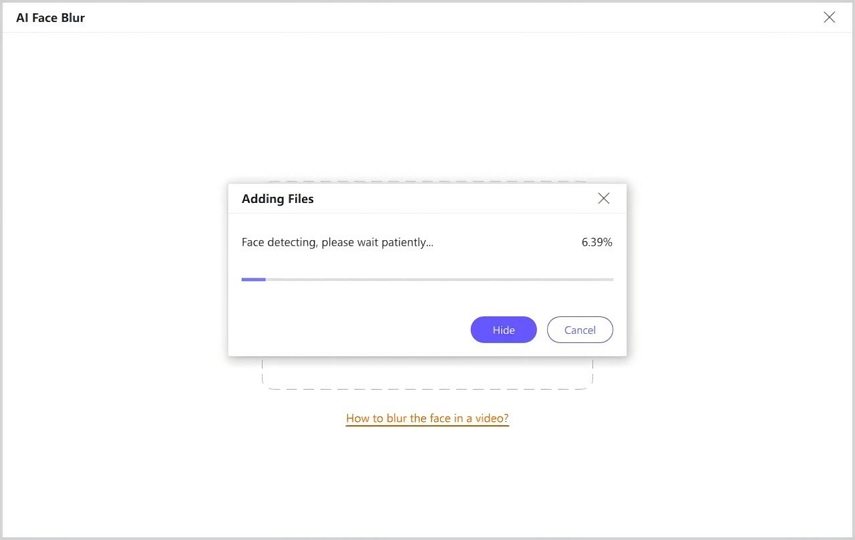
Step 4: Adjust Blur Intensity
Toggle the blur button for the chosen face. This activates blurring. Set the intensity using the slider from 0 to 100% based on how much blur is needed. Preview in real-time to finalize the optimal blur intensity.
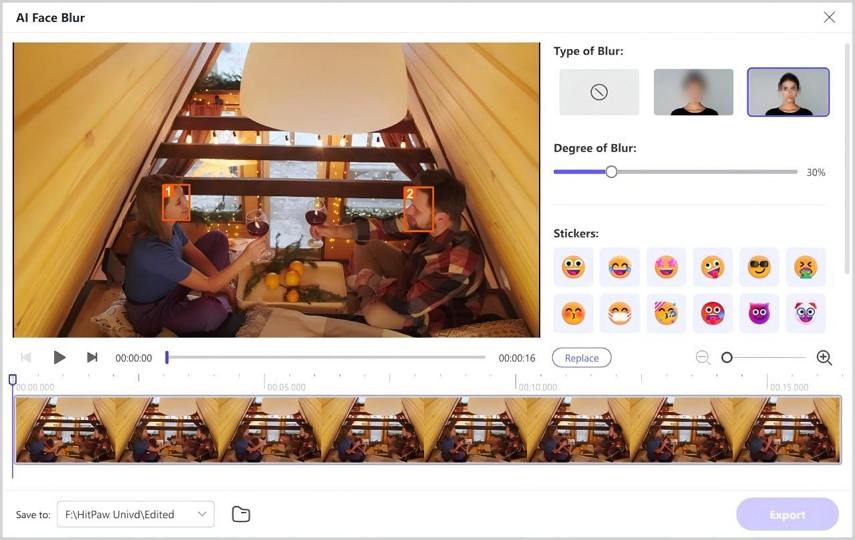
Step 5: Add Stickers (Optional)
Personalize further by adding funny stickers over the blurred face. Click Stickers tab and drag any sticker over the face. Move or resize stickers as needed. Click again to remove stickers anytime.
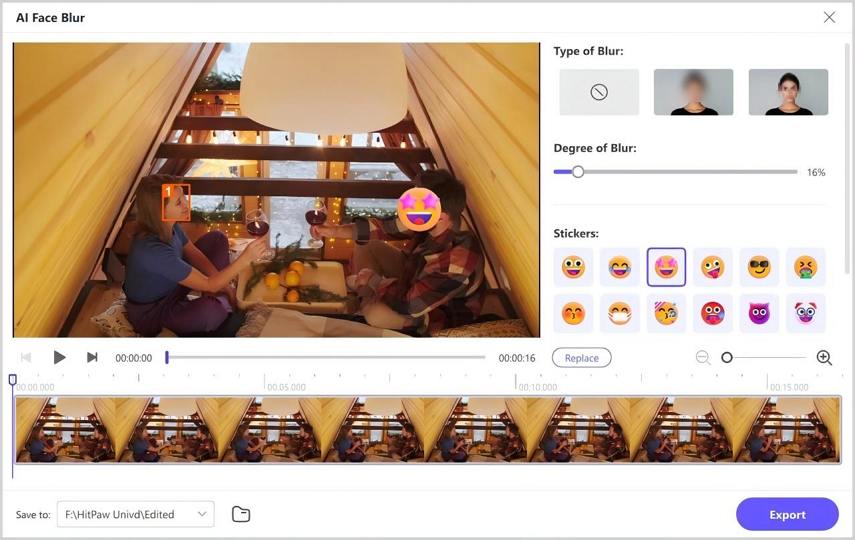
Step 6: Export Blurred Video
Finally, click the Convert button to export and save the video with blurred faces. The video file with animated sticker effects will be ready with a few clicks.
2. Final Cut Pro (MacOS)
Final Cut Pro is a professional video editing software for Mac. It offers precise tools to blur out faces and other sensitive areas of a video. To get started, import your clip onto the timeline and go to the Effects browser. Search for and add the Mask effect to the video clip. Draw a custom mask around the face and adjust points to match the shape. Next, click on the Effects tab, select Blur and apply Gaussian Blur inside the mask. You can control the amount of blurring under Inspector.
Pros
- Custom and precise masking with easy adjustment
- Real-time preview when editing
- Advanced color correction and audio editing capabilities
Cons
- Available only on Mac
- Expensive as part of Final Cut Studio bundle
3. Kapwing (Online)
Kapwing is a popular online video editing platform with face blurring options. Simply go to the Kapwing studio, upload your video and look for the censor tool with a mosaic-like icon. Now select or draw over the part you want to censor in the video. Slide the intensity bar to adjust the blur amount. Finally, download the blurred video from Kapwing.
Pros
- Easy drag and drop face blurring
- Intuitive interface and controls
- Browser-based so works on any device
Cons
- Need to upload videos which affects quality
- Limited advanced editing functionalities
4. Clideo (Online)
Clideo is another online video editor that lets you blur footage easily. You can pixelate faces via its intuitive face detection feature. Once the video upload is complete, click on the Face Blur tool which auto-highlights detected faces. Check the faces you intend to obscure and adjust the blur strength if needed. Save the edits and export the final pixelated video to your device.
Pros
- Hassle-free face recognition
- Good selection of overlays and stickers
- Decent video stabilization algorithms
Cons
- Video compression affects output quality
- Laggy performance at times
- Cannot reorder filters or undo multiple steps
FAQs about Blur Faces in Premiere Pro
Q1. What is Gaussian Blur in Premiere Pro?
A1. Gaussian Blur is a commonly used blurring effect in Premiere Pro. It blurs details in your video footage by applying a normal distribution graphical curve. The curve defines how pixels in the images will be distributed to blur or "feather" the edges. Higher the curve value, the more intensive the blurring effect would be. Gaussian blur smooths rough edges of masked areas for a more natural, less distracting effect.
Q2. How to blur a moving object in Premiere Pro?
A2. Use the tracker tool to track the moving object across the video frames. Create a mask accurately around the moving object. Then apply the Gaussian Blur effect within this masked area. Use keyframes on the mask path to match the object movement so that the blur stays stuck to it across the frames. Adjust the mask area and add keyframes whenever the object moves to ensure the blur follows it realistically.
Conclusion
Blurring faces or moving objects while preserving the background footage can be easily achieved using Premiere Pro's motion tracking capabilities and the effective Gaussian Blur effect. With precise masks and keyframes, the selected area can be accurately blurred irrespective of movement across video frames. For privacy protection or highlighting certain elements, Premiere Pro provides the robust toolset to control and apply blurring creatively. Readers are encouraged to try out the HitPaw Univd as well which automates motion tracking to conveniently detect, and blur faces with built-in face recognition intelligence.


 HitPaw VoicePea
  HitPaw VikPea (Video Enhancer)
 HitPaw FotorPea

Share this article:
Select the product rating:
Daniel Walker
Editor-in-Chief
My passion lies in bridging the gap between cutting-edge technology and everyday creativity. With years of hands-on experience, I create content that not only informs but inspires our audience to embrace digital tools confidently.
View all ArticlesLeave a Comment
Create your review for HitPaw articles