How to Compress PowerPoint Images without Quality Loss
Need to compress images in PPT but worried about losing quality? When you have a too-large PowerPoint file, or even worse, when your images end up looking blurry, it's super frustrating. You badly want to make your presentation easy to share, but you don't want to ruin the visuals.
Well, the good news is that you can reduce the file size without necessarily having to sacrifice the quality of an image. This guide will walk you through some simple steps to keep your images clear and make your PowerPoint more manageable.
Part 1: How to Compress Images in PowerPoint Directly?
Compression of images directly in PowerPoint is one of the painless ways to reduce your presentation file size without affecting the quality of your visuals.
Here's how to compress images in PowerPoint:
Step 1: Open Your PowerPoint Presentation
Open the PowerPoint presentation that contains the images to be compressed.
Step 2: Select the Image You Want to Compress
Click on an image you want to compress. If there is more than one, repeat this process for every one of them.
Step 3: Go to the "Picture Format" Tab
Once the image is selected, click on the "Picture Format" tab at the top of the screen.
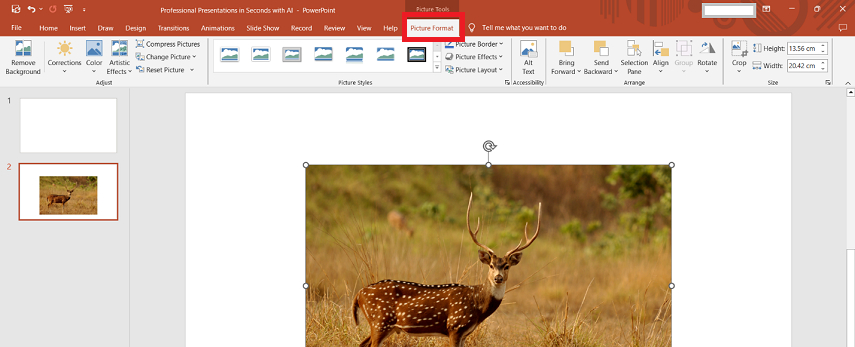
Step 4: Click on "Compress Pictures"
In the "Picture Format" tab, select "Compress Pictures", which is usually found in the "Adjust" group. Click on it to open its settings for compression.

Step 5: Choose Your Compression Options
A dialog box opens, displaying the various compression options. You can compress only the selected picture or all the pictures in the presentation. You then select the intended resolution you want to use, selecting "E-mail (96 ppi)" for the smallest file size, all the way up to "Print (220 ppi)" for a higher quality.
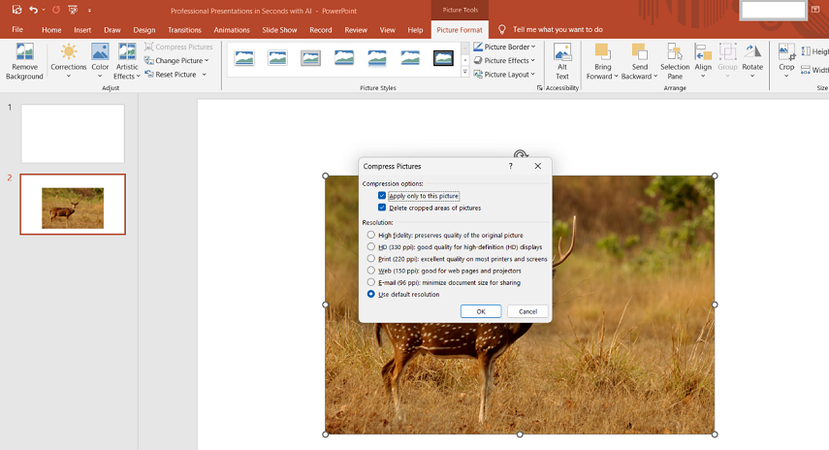
Step 6: Apply the Compression
Click "OK" once you have a setting you like. PowerPoint now compresses the picture(s) based on your selected options automatically.
Step 7: Save Your Presentation
Finally, save your presentation to save the changes. You'll find that the file size is now smaller without a lot of loss in image quality.
By following these steps, you will get to know how to compress an image in PowerPoint, making it easier to share without compromising the quality of your visuals.
Part 2: The Best Image Compressor for PPT Image Compression
If you do not want to use the method above, then HitPaw Univd (HitPaw Video Converter) is a good media tool to compress images for your PowerPoint presentation without the loss of quality. It's fast and efficient in processing. Although mostly known for video conversion, HitPaw brings in extremely powerful features of image compression, making it really easy to reduce the size of your images while retaining clarity.
It's a rather handy tool when you want some reliable and easy ways of compressing images before you insert them in your PPT. This will help in ensuring your presentations remain of a high quality but also easy to share with others.
Features of HitPaw Univd
HitPaw Univd - All-in-one Video Solutions for Win & Mac
Secure Verified. 254,145 people have downloaded it.
- High-Quality Compression: Maintains the clarity and resolution of images while significantly reducing file size.
- Batch Processing: Compress multiple images together for easier working.
- User-Friendly Interface: The interface is user-friendly and easy to use, targeted at users at all levels.
- Support for Multiple Formats: It supports the compression of images in several formats such as PNG, JPG, and many others.
- High-Speed Processing: Compresses images in a very short duration of time, but never compromises quality and performance.
Secure Verified. 254,145 people have downloaded it.
How to Compress Images for PowerPoint?
Here's how to compress images PowerPoint using HitPaw Univd:
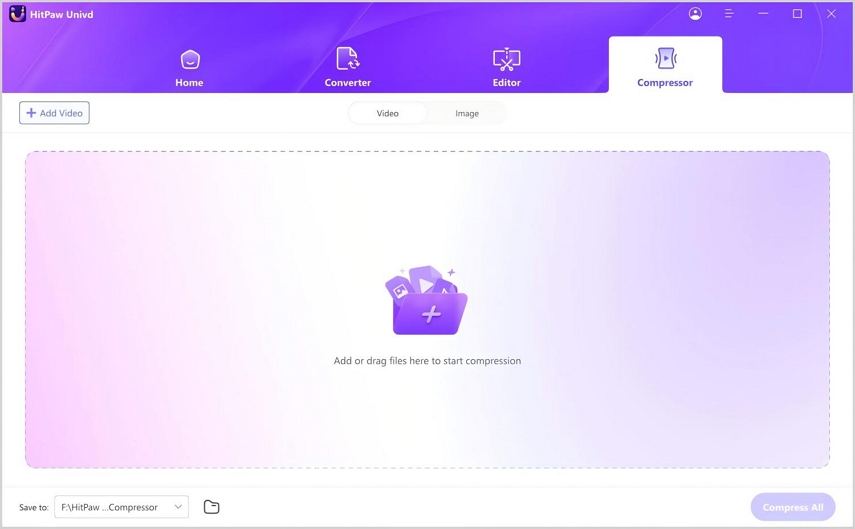
Step 1.Launch HitPaw Univd and go to ToolBox > Video/Image Compressor.

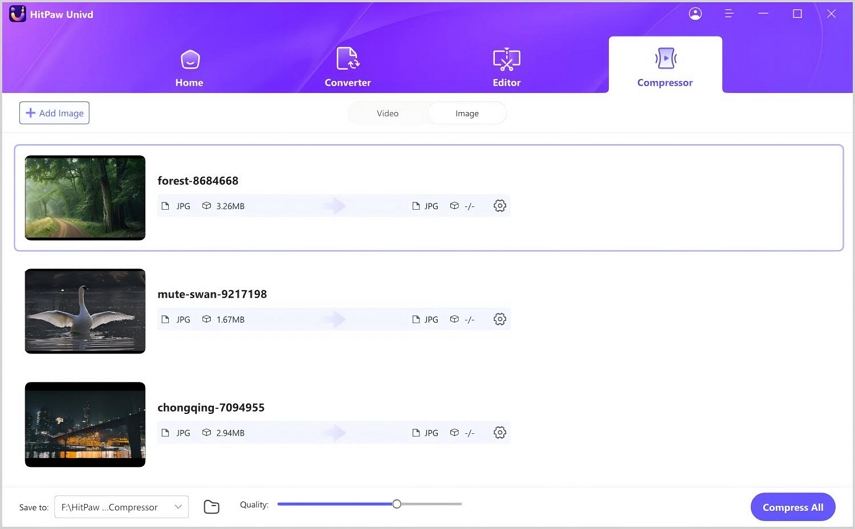
Step 2.Now go to the Image tab and hit the +Add Image button to upload all the images that you want to compress for your PPT.

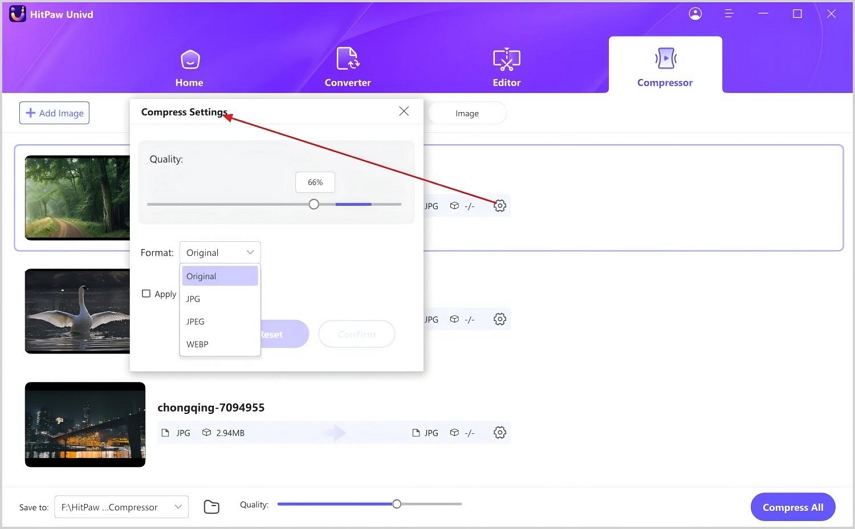
Step 3.Once the images are uploaded, you can click on the gear icon and set the Quality and Format according to your needs. After that, select the location where you want compressed images to be saved on your device and hit the Compress All button.

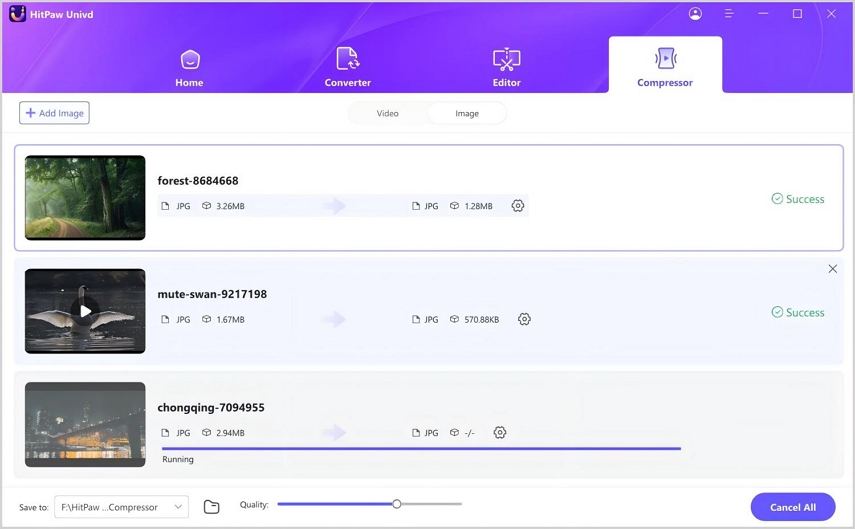
Step 4.The image compression process will take a few seconds and all the compressed images will be automatically saved on your computer.

Part 3: Other Built-In Microsoft Office Tools to Compress PPT Images
You can also compress images with special help or already integrated Microsoft Office software like Microsoft Photos and Microsoft Paint besides using the just-mentioned concept of compression through PowerPoint and external tools like HitPaw Univd.
These utilities are all easily accessible under Windows and provide quick ways of reducing the file size of images.
1. Microsoft Photos
Microsoft Photos is the default image viewer and editor in Windows. It provides you a chance to view, organize, and do basic editing with regard to your photos, including compressing and resizing them.
Here's how to compress image size in PPT:
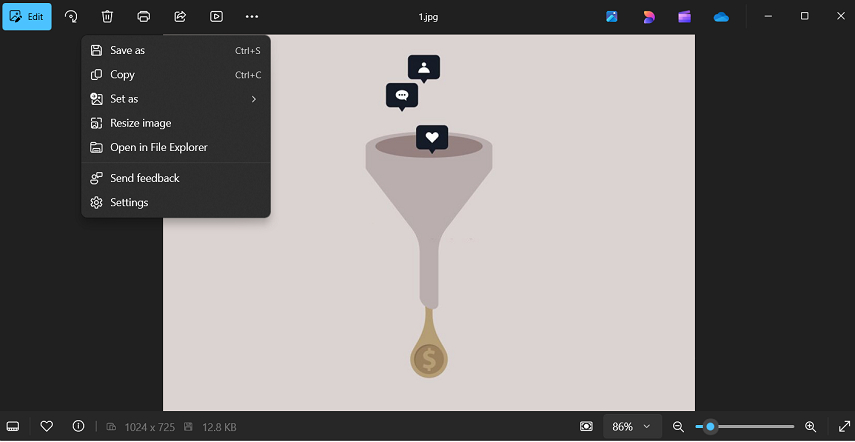
1.Right click on any image you wish to compress, and select "Open with"> "Photos".
2.Now, click the "Edit & Create" button on the top right and select "Resize" from its drop-down menu.

3.Microsoft Photos will give you choices depending on the size. For example, "S" for smaller or "M" for medium. Choose which one you need best.
4.When you have selected your size, click "Save As" to save the compressed image onto your computer.
2. Microsoft Paint
Microsoft Paint is a simple graphics editor that comes not only with the latest operating systems but has been included in all versions of Microsoft Windows. It allows basic image customization or editing such as resizing and compressing images.
Here's how to compress images PowerPoint using Microsoft Paint:
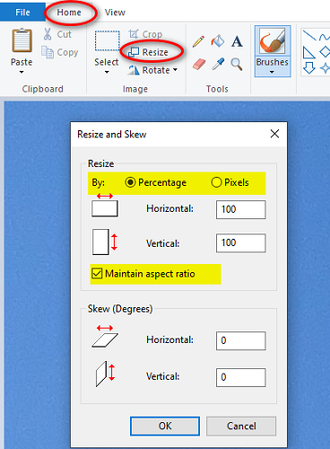
1.Right-click an image and select "Open with" > "Paint".
2.Click the "Resize" button on the toolbar. A dialogue box opens in which you can adjust the size by percentage or pixel size.

3.Make sure the "Maintain aspect ratio" box is checked so your image does not distort in size. Change the percentage or pixel dimension to a smaller size.
4.Once resized, click "File" > "Save As" to save the compressed image. Choose the format you want the file to be saved as (e.g., JPEG) and where you want it located.
You can also always compress images with Microsoft Photos and Microsoft Paint before inserting them into your PowerPoint presentation, which would go a great way in having a manageable file size without affecting the visual quality of your slides.
FAQs about PPT Image Compression
Q1. Why can't I compress images in PowerPoint?
A1. There could be a few reasons for not being able to compress images in PowerPoint. Perhaps the most common reason is that the image in its original form is too compressed or too small, hence there is little left to compress. Or maybe the picture format isn't supported by PowerPoint for compression, like certain web images or screenshots. Make sure the picture is in a file format compatible with your software, such as JPG or PNG, then take the appropriate steps.
Q2. Can I compress pictures in PowerPoint on both Windows and Mac?
A2. Yes, you can compress pictures in both Windows and Mac in PowerPoint. Steps are somewhat similar in both. You'll find the "Compress Pictures" option under the "Picture Format" tab. While it may look a little different between Windows and Mac, the process for reducing image size is basically the same.
Q3. Why should I compress images in PowerPoint?
A3. Image compression in PowerPoint is important for several reasons. First and foremost, it reduces the size of your presentation file; hence, sharing via email or uploading on the web becomes easier. Second, this helps your presentation to function more smoothly, even on those devices that are slower. Last but not least, during a live presentation, this helps switch between the slides much more smooth, keeping your audience engaged.
Conclusion
Compressing images in PowerPoint is a good way to keep your presentations clear and easy to share. You can compress images in PPT in PowerPoint or in other Microsoft programs like Photos and Paint, which allow you to decrease the file size without losing its quality.
If you are looking for something simpler and really powerful, HitPaw Univd will definitely be your go-to companion. It easily compresses images in a very quick and effortless manner so that your presentations look fantastic and stay well-organized. Give HitPaw Univd a try today and see the difference it can make.




 HitPaw VoicePea
  HitPaw VikPea (Video Enhancer)
 HitPaw FotorPea


Share this article:
Select the product rating:
Daniel Walker
Editor-in-Chief
My passion lies in bridging the gap between cutting-edge technology and everyday creativity. With years of hands-on experience, I create content that not only informs but inspires our audience to embrace digital tools confidently.
View all ArticlesLeave a Comment
Create your review for HitPaw articles