2025 Full Guide to Replace Sky in Photoshop with Easy Methods
Sky replacement in photography is getting great hype because of its ability to transform ordinary photos into visually stunning images. So, if you have also captured a photo of the sky but it looks quite dull or boring and you want to change it, Photoshop is here to rescue. The famous Photoshop software provides you with the powerful tools to replace the sky seamlessly and elevate the atmosphere.
Wondering how? Well, in this article, we'll dive deep into the step-by-step process to change the sky in Photoshop using easy-to-follow methods. Besides this, we'll also explore Photoshop's sky replacement tool, share useful techniques, and a bonus tip to change sky in one click.
Part 1: Why Change the Sky in Photoshop?
Enhance the mood and ambience
Rescue Weather-Spoiled Shots
Match the sky to the subject
Fix lighting imbalance
Sometimes, the eye of the camera cannot capture the true moment, and as a result, you get a dull or overcast sky. However, in Photoshop, you can swap it with clear skies or dramatic sunsets, and this will enhance the emotional impact of the sky. A warm, vibrant sky adds positivity, while stormy clouds can give a more intense or moody feel.
I am sure you have been through this. You've planned the perfect outdoor shoot, but Mother Nature had other ideas. Maybe it was an overcast wedding day or a family vacation where the sky just wouldn't cooperate, resulting in dull photos. Replacing the sky in Photoshop would help correct this issue and give you the perfect shot.
In landscape or architectural photography, mismatched skies can make the photo feel disconnected. By replacing the sky in Photoshop, you can align the background to fit the subject and create a harmonious composition.
Lighting in a photo change throughout the day. Imagine you have taken a shot in the late afternoon with a cloudy sky and the color of the images is washed out. This truly disturbs the perfect image. However, a sky swap in Photoshop can fix this by introducing a bright sky and balancing light and contrast.
Part 2: Step-by-Step Guide to Edit Sky in Photoshop
Here is a step-by-step guide to replace sky in Photoshop.
Step 1: Open Your Image
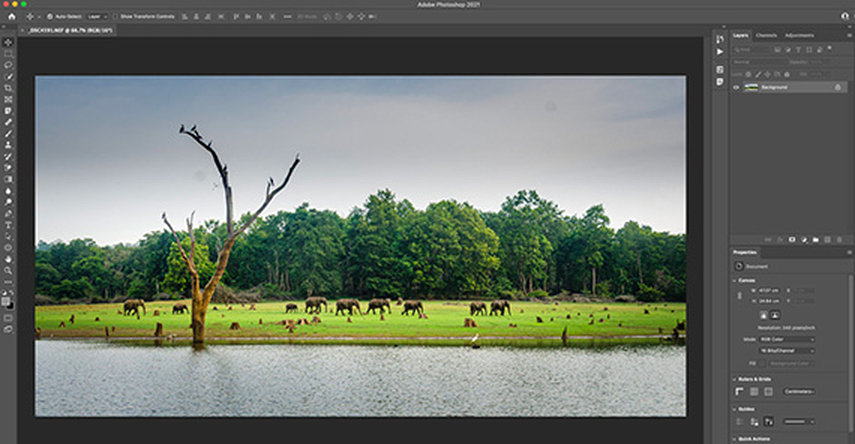
First, open your image in Adobe Photoshop that you want to edit. Make sure it has the sky in it to replace.
Step 2: Access Sky Replacement
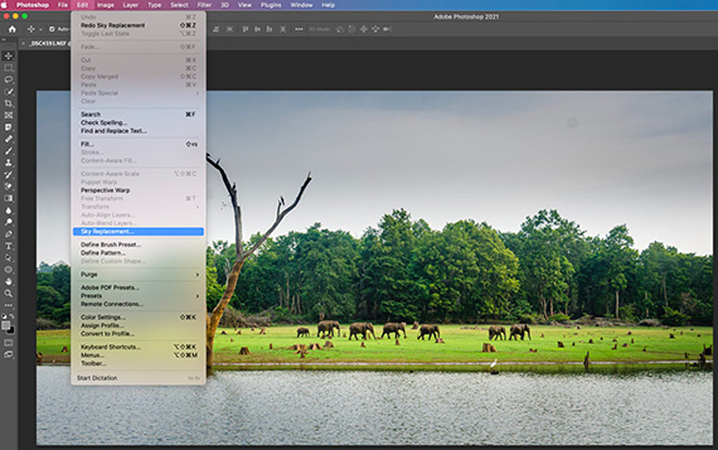
Go to the Edit menu, then select "Sky Replacement" from the dropdown menu.
Step 3: Sky Replacement Panel
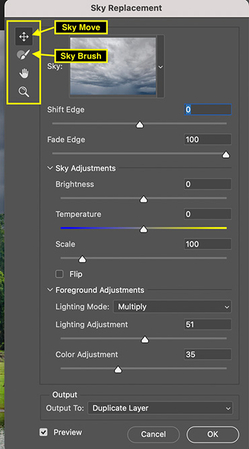
In the sky replacement menu, you'll see options like Sky Move and Sky Brush for adjusting and selecting your sky.
Step 4: Choose Your Sky
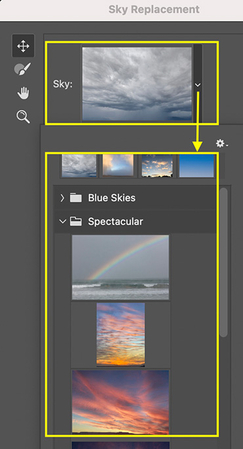
Besides the image preview, click on the drop-down menu, and you will see multiple default options. However, you can also add your own sky image as per your preference.
Step 5: Refine the Sky's Edge
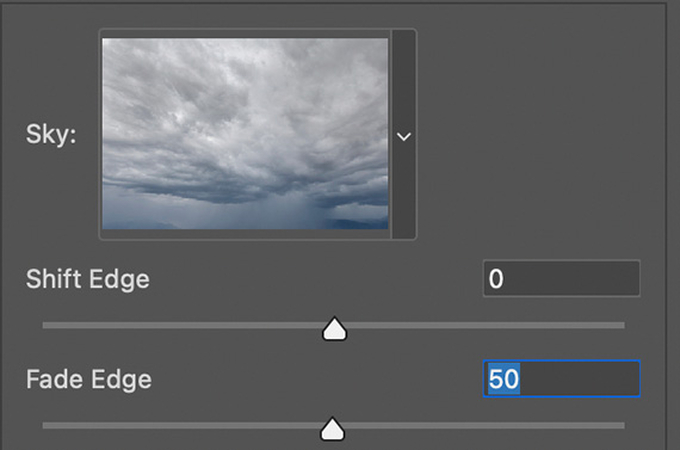
Adjust the "Shift Edge" slider to blend the sky with the foreground. (Moving it left will push the sky away from the foreground, while moving it right will bring the sky closer to it.) You can also use the "Fade Edge" slider to create a smoother transition between sky and foreground.
Step 6: Adjust Sky Brightness and Temperature
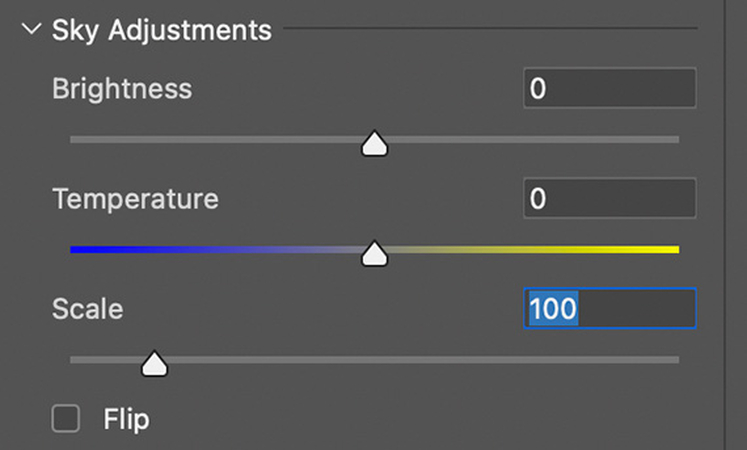
In "Sky Adjustments", use the "Brightness" slider to control the sky's brightness level. The "Temperature" slider can make the sky warmer (more yellow) or cooler (more blue). Whereas the "Scale" slider lets you resize the sky, and the "Flip" option mirrors it horizontally if needed.
Step 8: Adjust Foreground Lighting and Color
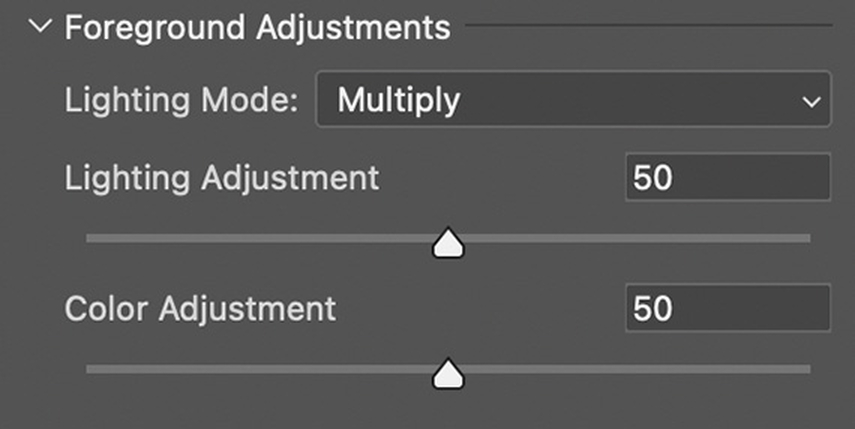
Next, look at "Foreground Adjustments." These settings let you adjust lighting and color in the foreground to help it match the new sky.
Step 9: Output Options

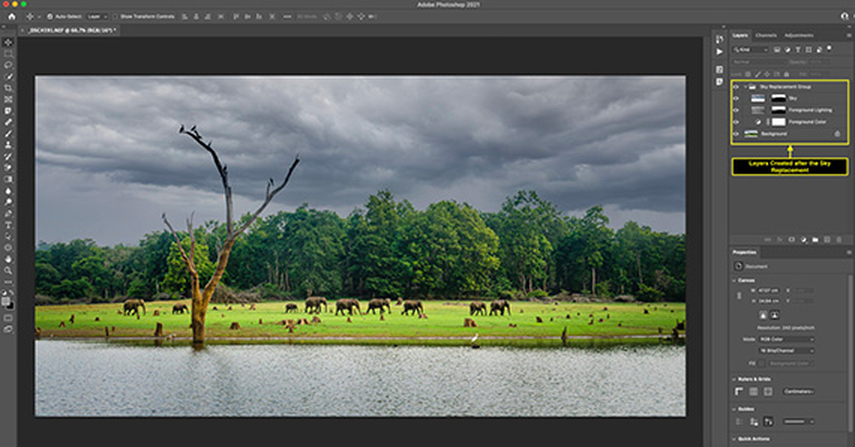
Finally, choose your output preference. Here, "Output to New Layers" is recommended because it lets you keep each adjustment on a separate layer, so you can fine-tune them later if needed. Alternatively, "Duplicate Layers* will merge everything into one single layer.
Step 10: Review the Results
Now compare your original and edited images to see the transformation.
Part 3: Techniques for Sky Replacement Tool in Photoshop
1. Blending Tips for a Natural Look
When you are about to change the sky in photoshop, always consider where the light sources are in your original photo. It is important because your new sky should match this lighting direction; otherwise, shadows and highlights will look unnatural. To do this, use the Color Match tool under Image > Adjustments.
If the new sky is bright, increase exposure to foreground elements to create consistency. And when dealing with the complex landscape, apply subtle gradients to the layer mask to blend the sky smoothly.
2. Common Mistakes to Avoid
To replace sky in photoshop effectively, there are certain things that you should avoid. Such as;
- Avoid Oversaturation: Avoid making the sky too vibrant, as it can make the photo look unnatural.
- Avoid Inconsistent Shadows: If the sky has sunlight, ensure shadows on the ground align with the light source.
- Forgotten Reflections: If your scene includes water or reflective surfaces, remember to adjust these to match your new sky.
- Visible Artifacts: Always zoom in to check if there's any leftover pixels from the original sky. This can happen especially around objects that are intricate, such as trees or buildings.
Part 4: AI Tool for Sky Change with One Click
Now that you are aware of how to replace Sky in photoshop, However, if you are a complete beginner, using this software can be quite overwhelming. If that's the case, HitPaw FotorPea can come in handy. Powered by AI, this software offers quick solutions in the simplest possible way.
Some of the key features of HitPaw FotorPea include.
HitPaw FotorPea - All-in-one Photo Editing Tool for Win & Mac
Secure Verified. 212,820 people have downloaded it.
- AI photo enhancement to improve photo quality
- Flawless background removal to change sky background
- Automatic sky background detection and AI generation
- Real-time preview with the results
Secure Verified. 212,820 people have downloaded it.
Wondering how to change the sky using HitPaw FotorPea?
Step 1: Download and Install HitPaw FotorPea
Visit the official website of HitPaw FotorPea and download the software for your Window or Mac. Then Install it.
Step 2: Select Background Remover
Now, launch the software and from the main menu click on “Background Remover”.

Now, click on “upload” and select the photo you want to edit. After selecting, click on “Open”.
Step 3: Let the AI process the photo
Ai will take few seconds to process the photo and upload.

Step 4: Photo with transparent background
After analyzing the photo, hitpaw will automatically remove the background, giving you the photo with transparent background.
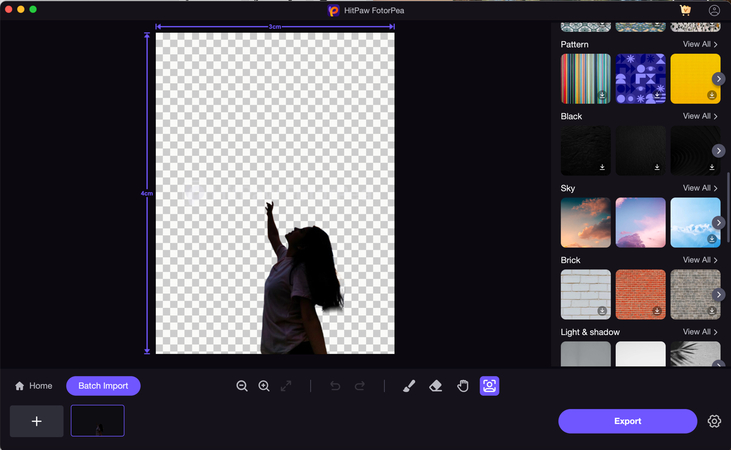
Step 5: Select the New background
Now scroll down and choose a new sky background from a collection.

Step 6: Export
Once satisfied, export your image with a new sky in the background.
This is the ultimate guide of HitPaw FotorPea
Conclusion
Replacing the sky is a great way to add new life to your photo. However, remember that the best sky replacement is one that the viewer doesn't notice. So, using Photoshop's sky replacement tool, take your time and pay attention to the detail. With practice, you will be able to replace sky in photoshop with ease that look highly realistic.
However, as already stated, getting to know Photoshop can be quite overwhelming for a beginner. So, if you are looking for a quick solution for sky replacement, HitPaw FotorPea can be a perfect option. This AI-powered tool can make the process faster and more accessible.


 HitPaw Univd (Video Converter)
 HitPaw VoicePea
  HitPaw VikPea (Video Enhancer)

Share this article:
Select the product rating:
Daniel Walker
Editor-in-Chief
My passion lies in bridging the gap between cutting-edge technology and everyday creativity. With years of hands-on experience, I create content that not only informs but inspires our audience to embrace digital tools confidently.
View all ArticlesLeave a Comment
Create your review for HitPaw articles