How to Make an Animated GIF in Photoshop
Have you ever wanted to create your own GIF? Many people on Reddit and Quora are asking how to make an animated gif in Photoshop. Users are curious about creating GIFs from videos or images. GIFs are popular because they are short, fun, and easy to share online. This article will explain how you can make a GIF using Photoshop. You'll find all the steps here if you want to create a gif in Photoshop from a series of images or a video. Learn how to make a GIF in Photoshop.
Part 1: Why Create a GIF from Videos or Images?
A GIF is a file format that deals with images and animation works that include images. It is highly utilized since the file size is relatively small, and its sharing is convenient. This guide will explain how to make a moving gif in Photoshop. There are many ways by which GIFs can be shared and consumed. These apply to social media, blogs, instant messaging, and more. They are often used for:
- Sharing reactions and emotions.
- Creating short tutorials or animations.
- Promoting products in a simple format.
Pros
- Easy to share and quick to load.
- Supported on many platforms.
- Engages viewers with short animations.
Cons
- Limited color options (only 256 colors).
- There is no sound support.
- Large file sizes compared to static images.
Part 2: How to Make an Animated GIF in Photoshop from an Image Sequence
When you have a series of images that you want to make into a GIF, Photoshop makes the task easy. Learn how to make a GIF in Photoshop:
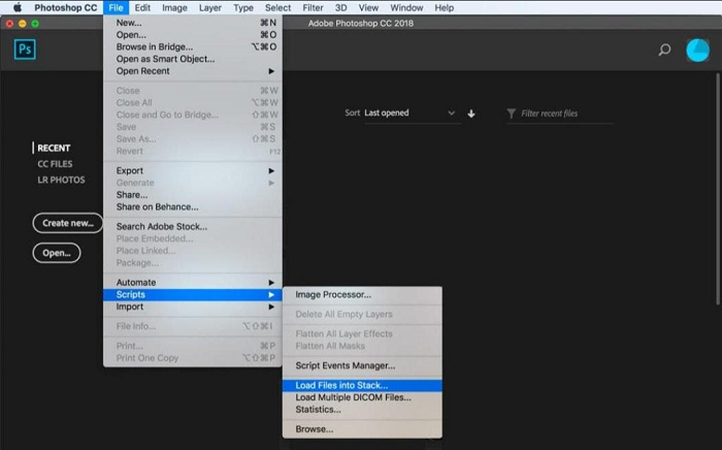
Step 1: Open Photoshop and Load Your Images
Start by opening Photoshop. Go to File > Scripts > Load Files into Stack. This lets you load all the images you want to use. Select the images and click "OK".
Step 2: Open the Timeline Panel
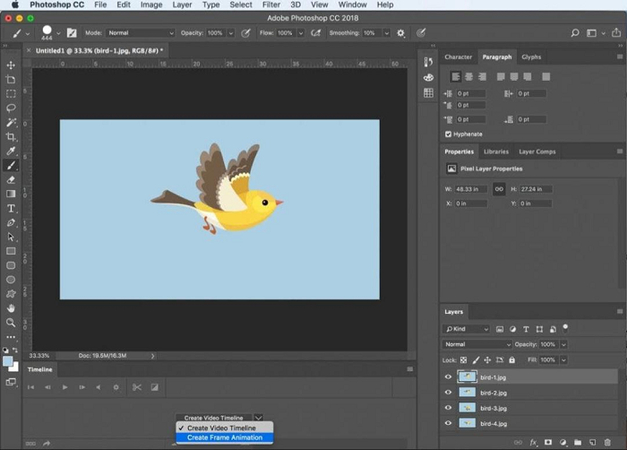
Next, go to Window > Timeline. This will open the Timeline panel, where you can build your GIF. Click Create Frame Animation.
Step 3: Convert Layers to Frames
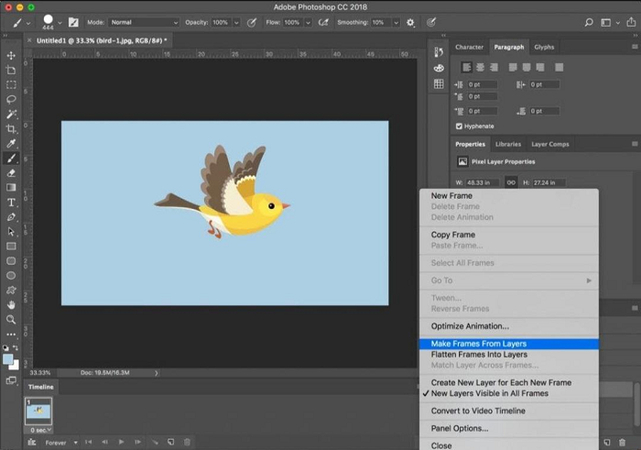
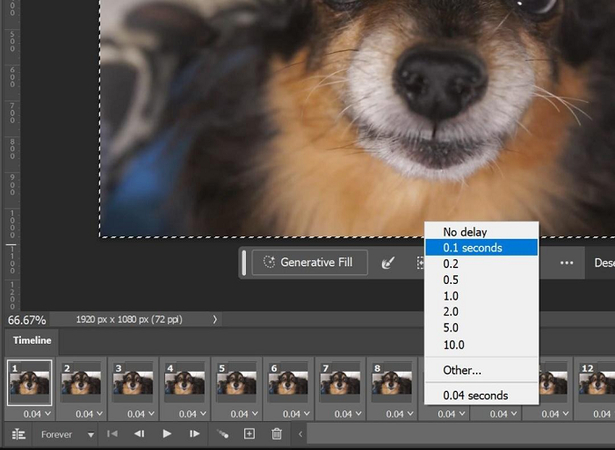
Click the small menu icon in the Timeline panel, then choose Make Frames from Layers. This will turn each image into a frame in your GIF. Select all the frames in the Timeline. Click the arrow under each frame to set how long it will display. For a fast animation, you can set each frame's time to 0.1 seconds.
Step 4: Make the GIF Loop
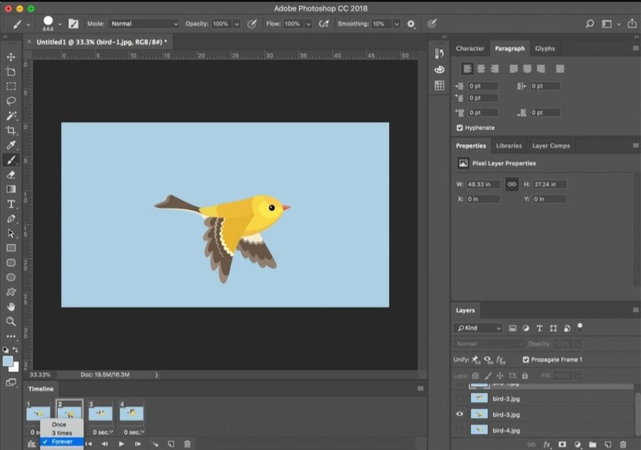
To make your GIF loop, click the Looping Options at the bottom of the Timeline window. Choose Forever so the GIF will play over and over.
Step 5: Preview and Save Your GIF
Press the Play button to see how your GIF looks. Look at how to export a GIF in Photoshop. If everything is fine, go to File > Export > Save for Web (Legacy). Choose GIF as the file format, then adjust the settings if needed. Click Save to finish.
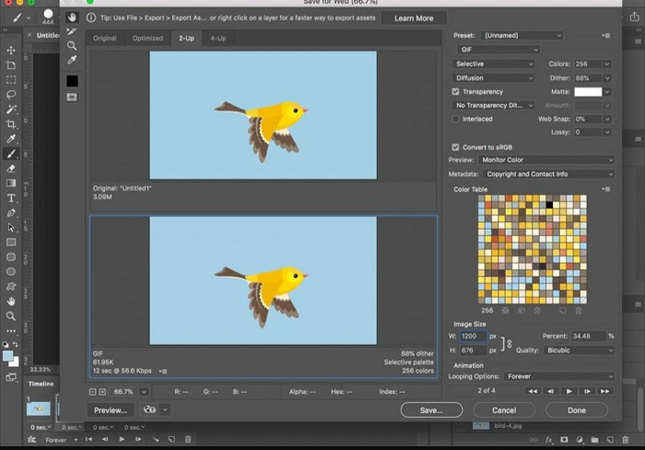
Pros and Cons of Creating GIFs from Image Sequences
Pros
- You can control each frame.
- It allows you to edit gifs in Photoshop in detail.
Cons
- Takes more time to create since each image needs to be edited.
- The file size can become large if there are many frames.
Part 3: How to Make a GIF in Photoshop from a Video
Converting a video into a GIF is another fast process in Photoshop. Here's how to make a gif from a video in Photoshop:
Step 1: Open the Video in Photoshop
Go to File > Import > Video Frames to Layers. Select the video file you want to use. Photoshop will split the video into layers, which can then be turned into GIF frames.
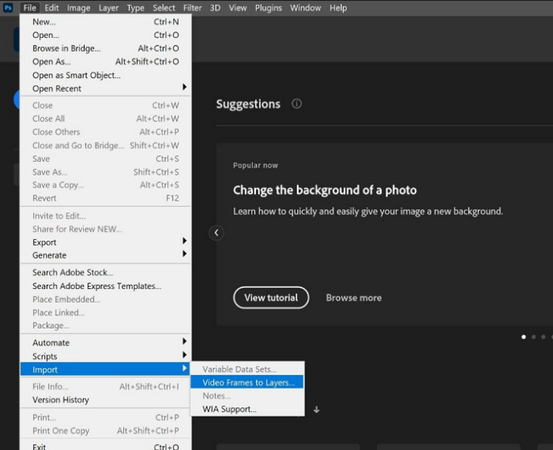
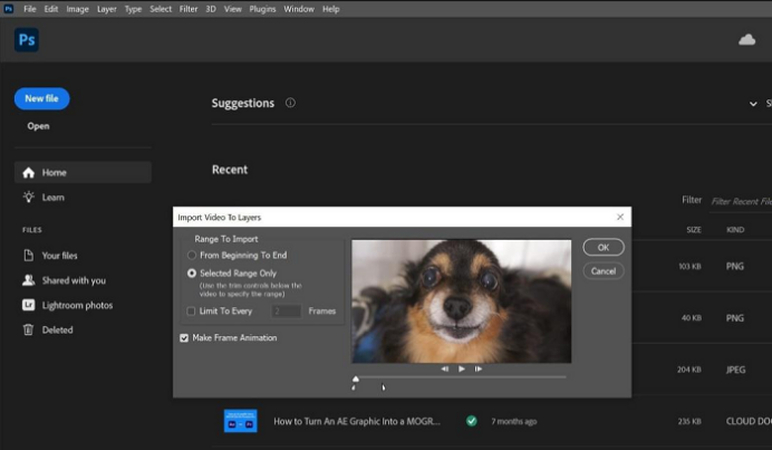
Step 2: Trim the Video (Optional)
If you want to create a shorter video, you can trim it easily in such cases. The Start and End points should be set to select which part should be used.
Step 3: Frame to Time Conversion
Once your video frames are ready, you must click Window > Timeline to have the Timeline panel loaded. Choose Create Frame Animation to transform your video frames into an animation. Select all the frames in the Timeline, and, using the frame duration box, modify the frame's duration. You can make each frame, whether the cartoon frame or any other frame, stay for as long as you wish, depending on the speeds at which you want your GIF to move.
Step 4: Set the GIF to Loop
At the bottom of the Timeline window, you will have Looping options. Select Forever at the bottom so the animated GIF starts to loop over independently.
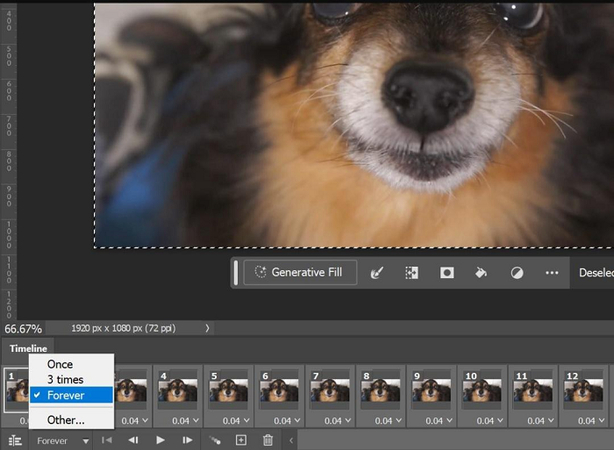
Step 5: Preview and Save the GIF
Press the Play button to see what has been created with your GIF. Go to File > Export > Save for Web (Legacy) when finished. Select GIF as the format and tweak any settings as desired. After that, click the Save button to finish the procedure. This is how to make a GIF in Photoshop from a video.
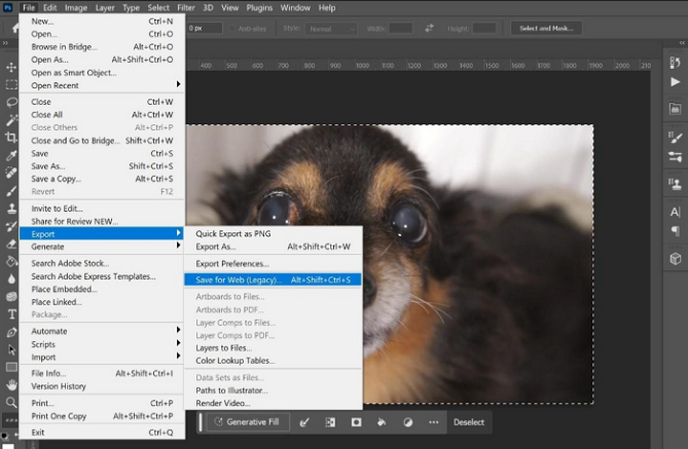
Pros and Cons of Creating GIFs from Videos
Pros
- Quick and simple process.
- Ideal for short video clips.
Cons
- Large video files can make the GIF too big.
- The quality may drop due to color and frame limitations.
Part 4: Best Alternative to Photoshop for Creating GIFs from Videos
If you want an easy and fast way to convert videos into GIFs, use the HitPaw Video to GIF Converter. While you can get specific control over the images, it takes much more time to master Photoshop, for example, as compared to GIMP. Thanks to HitPaw Univd (HitPaw Video Converter), the task is easy. It takes little time to convert videos to GIFs, and there are a few steps to follow. It is suitable for anyone who needs to get results fast without spending much time working on the program.
HitPaw Univd - All-in-one Video Solutions for Win & Mac
Secure Verified. 254,145 people have downloaded it.
- Converts videos to GIFs quickly and easily.
- Supports many video formats for conversion.
- Allows you to trim video clips before making GIFs.
- It lets you adjust frame rates and resolution settings.
- Simple interface, ideal for beginners.
Secure Verified. 254,145 people have downloaded it.
Guide to Make a Moving GIF from Video with HitPaw
Follow these steps to convert a video to a GIF using the HitPaw Univd.
Step 1: Access to HitPaw Video to GIF Feature
After you install the HitPaw Univd, open the program on your computer. Click on the Toolbox tab at the top. Select the Video to GIF option, then import the video file you want to convert.

Step 2: Configure GIF Output Settings
You can change the GIF's resolution, frame rate, and size in the Settings section. Use the preview window to drag the matrix diagram and adjust the aspect ratio. The output size will show on the right side.
For the Frame Rate, you can pick your preferred setting. The default is set at 10 frames per second (fps). You can also choose the size from the options in the Size drop-down menu.
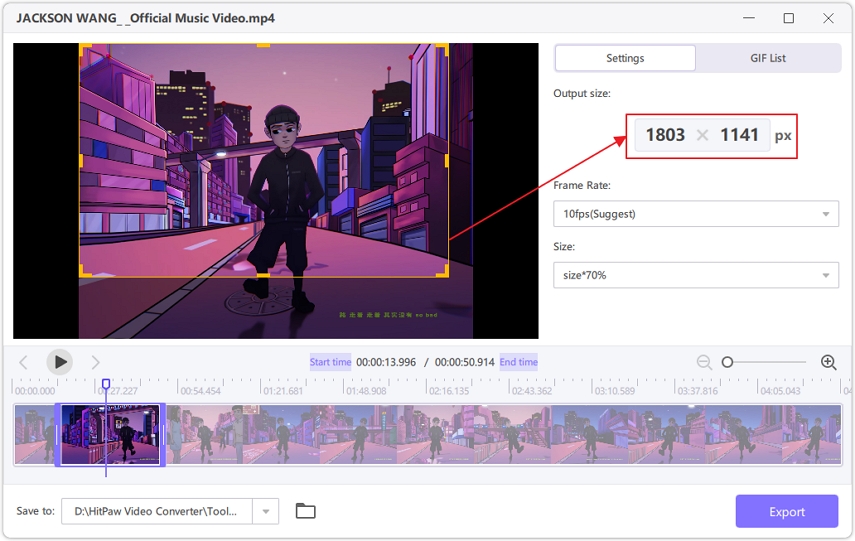
Step 3: Create GIF from Videos
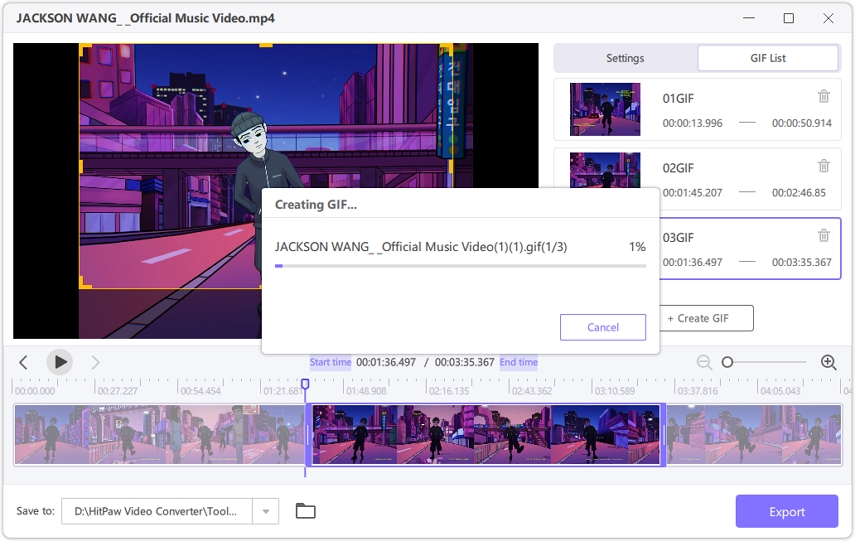
On the timeline, you will see two sliders. Move the left slider to set where the GIF starts and the right slider to set where it ends. You can click the play button to preview the selected part. When you are satisfied, click the Create GIF button to make the GIF from the chosen clip.
HitPaw Univd lets you create multiple GIFs at the same time. Select a new segment and click Create GIF to make another GIF.
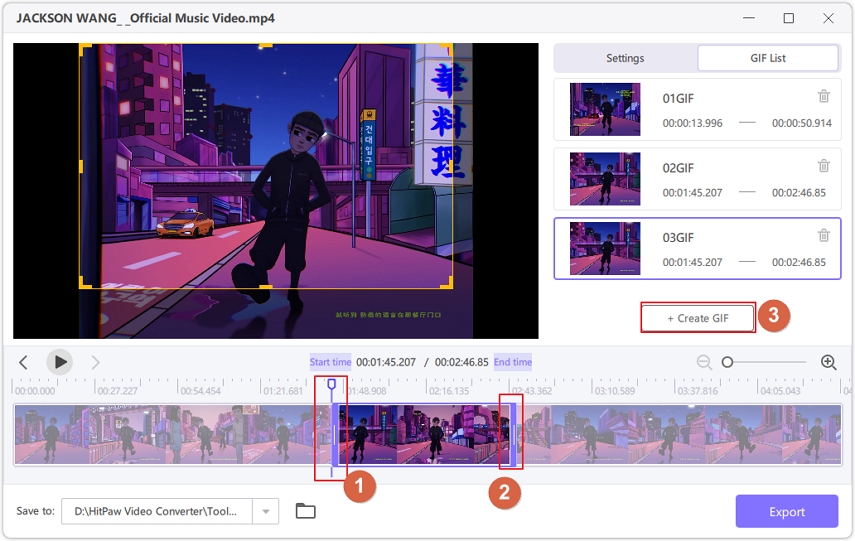
Step 4: Save the GIFs
Once you have created all the GIFs you want, click the Export button in the lower right corner to save your GIF files.
FAQs About Making a GIF in Photoshop
Q1. How to export a GIF in Photoshop?
A1. Go to File > Export > Save for Web (Legacy) and choose the GIF format. Adjust the settings and save the file.
Q2. What is the best setting for GIFs in Photoshop?
A2. A frame rate of 0.1 seconds and the Forever looping option work best for smooth playback.
Q3. How to edit GIFs in Photoshop?
A3. Open the GIF in Photoshop and use the Timeline panel to adjust frames and layers.
Q4. Can I paste a GIF in Photoshop?
A4. You can copy and paste a GIF as a new layer or within an existing project.
Conclusion
Both Photoshop and HitPaw Univd are good tools for creating GIFs, but HitPaw is easier for beginners. It makes the process simple. You can create high-quality GIFs from videos in just a few clicks. We recommend trying HitPaw if you want a quicker solution without losing quality.


 HitPaw VoicePea
  HitPaw VikPea (Video Enhancer)
 HitPaw FotorPea
Share this article:
Select the product rating:
Daniel Walker
Editor-in-Chief
My passion lies in bridging the gap between cutting-edge technology and everyday creativity. With years of hands-on experience, I create content that not only informs but inspires our audience to embrace digital tools confidently.
View all ArticlesLeave a Comment
Create your review for HitPaw articles