The Ultimate Guide of How to Make a GIF Move in PowerPoint
Adding movement to your PowerPoint presentations can significantly enhance engagement, and one effective way to achieve this is by incorporating animated GIFs. GIFs provide a dynamic visual element that captures attention and conveys information effectively. In this guide, we'll explore expert tips and tricks on how to make a GIF move in PowerPoint. Whether you're aiming to illustrate a concept, highlight a process, or simply add humor, mastering GIF animation in PowerPoint will make your presentations more compelling and interactive.
Part 1. Understanding the Basics of GIFs
What is a GIF?
A GIF (Graphics Interchange Format) is a type of image file that supports both static and animated images. Unlike JPEG or PNG formats, GIFs can contain multiple frames, allowing for short animations or sequences.
Uses in Presentations
- Visual Engagement: GIFs capture attention and make presentations more dynamic.
- Process Illustration: Use GIFs to visually demonstrate workflows or processes.
- Product Showcase: Highlight product features with animated examples.
- Instructional Aid: Simplify complex concepts with animated explanations.
- Humor and Engagement: Inject humor or evoke emotion to keep the audience engaged.
Introduction to Animated GIFs:
Animated GIFs, short for Graphics Interchange Format, are image files that support animation by combining multiple frames into a single file. Unlike static images, which display a fixed picture, animated GIFs loop through a sequence of frames, creating the illusion of movement. They are widely used across digital platforms for various purposes, from expressing emotions and humor to demonstrating processes and showcasing product features. In presentations, animated GIFs can make content more engaging by visually illustrating concepts, capturing attention, and adding a dynamic element to slides.
Importance of Adding Movement to Engage the Audience:
- Visual Appeal: Movement attracts and maintains audience attention more effectively than static visuals.
- Enhanced Understanding: Animated elements can clarify complex concepts or processes by demonstrating them visually.
- Emotional Impact: Motion can evoke emotions and create a more immersive experience for viewers.
- Memorability: Dynamic content tends to be more memorable, aiding retention of key messages.
- Interactive Engagement: Movement encourages interaction and keeps the audience actively involved in the presentation.
Part 2. Converting Videos to GIFs with HitPaw Univd (HitPaw Video Converter)
HitPaw Univd is a versatile tool designed to enhance your multimedia experience. It offers comprehensive solutions for video processing needs, ensuring seamless conversions and optimizations. Whether you're a professional editor or a casual user, HitPaw Univd provides intuitive functionalities to simplify tasks and elevate your video content effortlessly. With its user-friendly interface and robust performance, it's an ideal choice for anyone looking to streamline their video conversion and editing workflows.
Features
- Format Conversion: Convert between various video and audio formats.
- Video Download: Download videos from over 10,000 websites.
- Audio Extraction: Extract audio tracks from videos.
- Video Editing: Trim, crop, add watermarks, apply effects, and more.
- Image Compression: Compress images without losing quality.
- Screen Recording: Capture screen activities with audio.
- 2D to 3D Conversion: Convert standard 2D videos to 3D.
- Batch Processing: Handle multiple files simultaneously.
Steps
Step 1. Launch HitPaw Univd: Open the program and switch to the Toolbox tab.
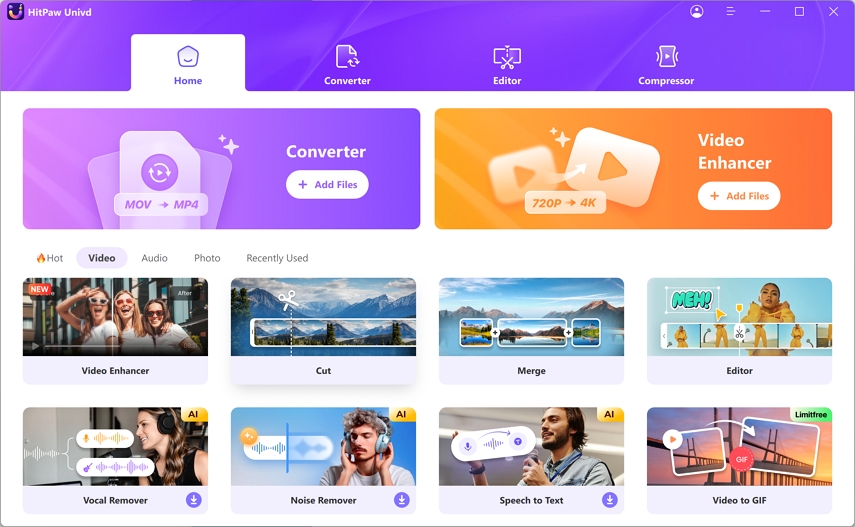
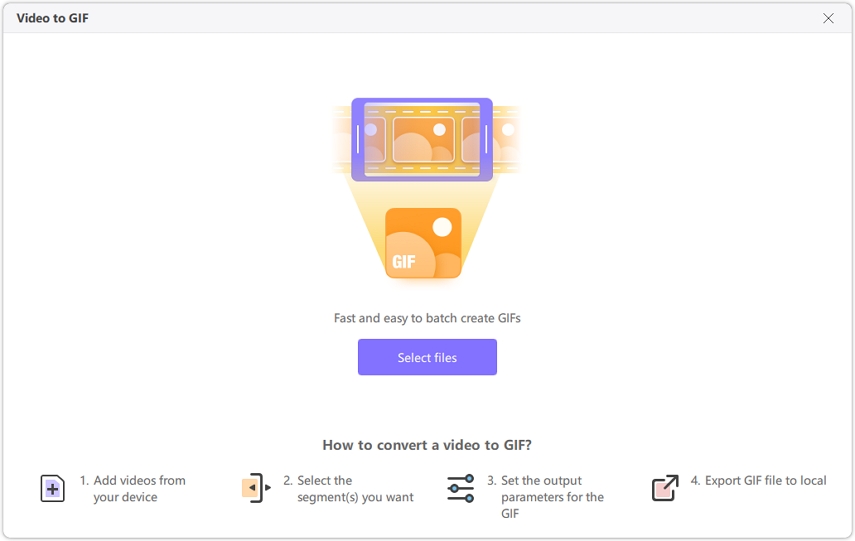
Step 2. Add Video: Import your video file into the program. Preview it using the play button.
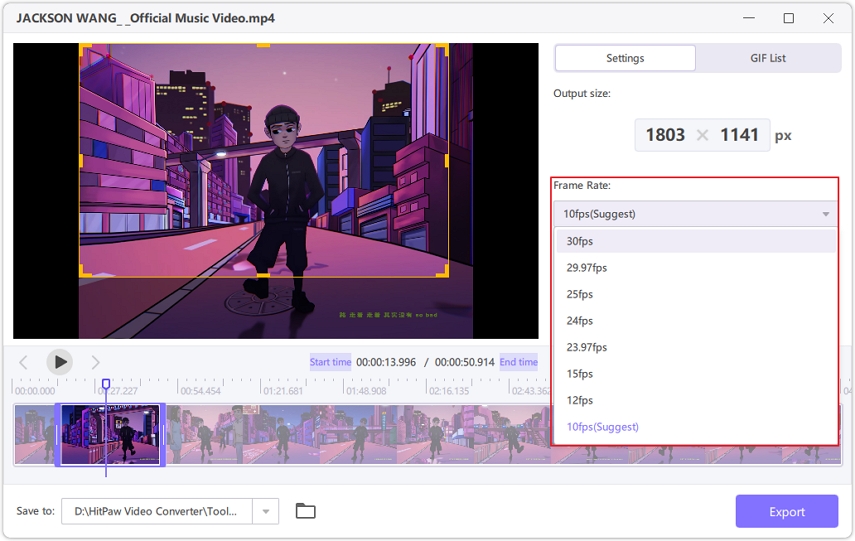
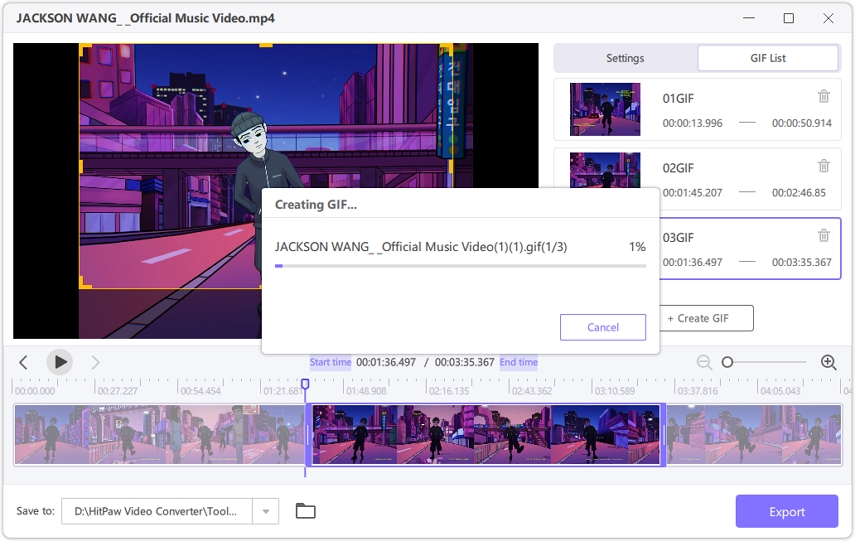
Step 3. Set GIF Parameters: In the Settings tab, adjust resolution, frame rate, and size.
Step 4. Create GIF: Use the timeline to select the start and end times for your GIF. Click "Create GIF" to generate.
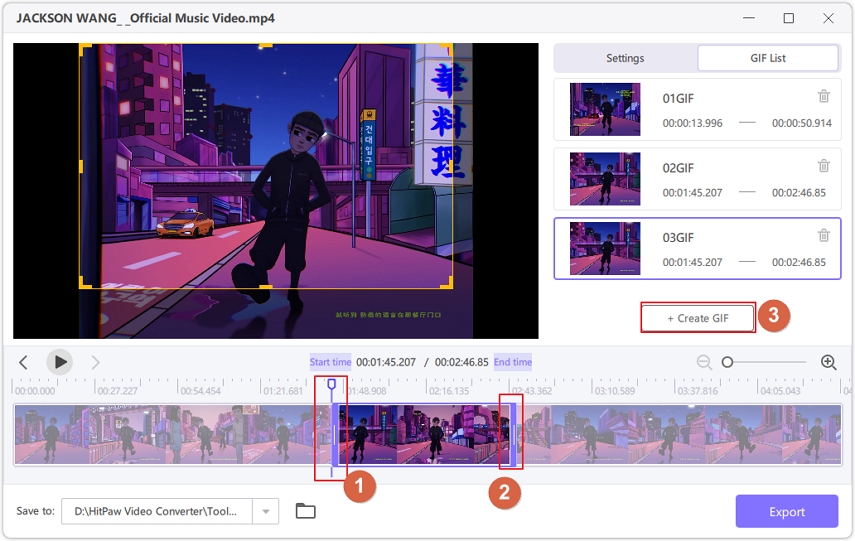
Step 5. Export GIF: Once created, export your GIF file by clicking the Export button.
Watch the following video to learn more details:
Part 3. Adding the GIF to PowerPoint
Step-by-Step Guide to Add GIF to PowerPoint:
Here is how to make a GIF move in PowerPoint:
1. Insert GIF into PowerPoint:
- Open your PowerPoint presentation and navigate to the slide where you want to insert the GIF.
- Go to the Insert tab on the ribbon.
- Click on the Pictures or Images button (depending on your PowerPoint version).
- Navigate to the location where your GIF file is saved, select it, and click Insert.
2. Adjust Size and Position:
- Once inserted, click on the GIF to select it.
- Use the resizing handles (corners and sides) to adjust the size as needed.
- Drag the GIF to reposition it on the slide.
3. Set Timing for GIF:
- Select the GIF image on your slide.
- Go to the Animations tab on the ribbon.
- Click on the Animation Pane to open it (if it's not already visible).
- In the Animation Pane, find the entry for your GIF (usually named as Picture or Image).
- Right-click on the animation entry and choose Timing.
- Adjust the Start options to "Start With Previous" or "Start After Previous" for automatic playback.
4. Play GIF Automatically:
To ensure the GIF plays automatically during the presentation:
- Set the animation to "Start With Previous" or adjust the delay timing as desired.
- Optionally, you can set the GIF to loop until stopped under the Timing tab.
5. Preview and Finalize:
- Preview your slide to ensure the GIF behaves as expected.
- Save your PowerPoint presentation to preserve these settings.
Tips for Maximum Impact:
- Size and Clarity: Ensure the GIF is clear and appropriately sized for visibility.
- Timing: Adjust the GIF's playback timing to sync with your presentation flow.
- Looping: Set the GIF to loop if it enhances the message or emphasizes a point.
Part 4. FAQs of How to Make a GIF Move in PowerPoint
Q1. How do I animate a GIF in PowerPoint 2016?
A1. To animate a GIF in PowerPoint 2016, insert the GIF and select it. Then, go to the Animations tab, choose an animation effect from the Animation gallery, and customize the animation options as needed.
Q2. Can you loop a GIF in PowerPoint?
A2. Yes, you can loop a GIF in PowerPoint by setting the animation to loop until stopped. Right-click on the GIF animation in the Animation Pane, select Timing, and choose to loop until stopped under the Repeat dropdown.
Q3. How do I control the speed of a GIF in PowerPoint?
A3. Adjusting the speed of a GIF in PowerPoint involves modifying its animation settings. Select the GIF, go to the Animation Pane, right-click on the animation entry, choose Timing, and adjust the duration or speed options to control how quickly the GIF animates.
Bottom Line
In conclusion, incorporating animated GIFs into PowerPoint presentations can significantly enhance engagement and visual appeal. By following simple steps to insert, animate, and control GIFs in PowerPoint, you can effectively communicate ideas and capture audience attention. For seamless creation of GIFs from videos and other multimedia needs, consider trying out HitPaw Univd. It offers powerful tools to convert, edit, and optimize multimedia content effortlessly, making your presentations more dynamic and impactful.


 HitPaw Edimakor
 HitPaw Watermark Remover
  HitPaw VikPea (Video Enhancer)


Share this article:
Select the product rating:
Daniel Walker
Editor-in-Chief
My passion lies in bridging the gap between cutting-edge technology and everyday creativity. With years of hands-on experience, I create content that not only informs but inspires our audience to embrace digital tools confidently.
View all ArticlesLeave a Comment
Create your review for HitPaw articles