[5 Methods] How To Remove JPEG Artifacts in Photoshop?
JPEG compression lowers the file size of images, which makes it easy to store and share. Prominent artifacts such as blockiness can happen due to this compression, which can degrade the quality of the picture. Images can look unprofessional and low in quality due to the loss of fine details and grainy noise, especially when you make excessive compression on them.
With the help of suitable tools, you can fix this issue in photos and enhance their clarity. One of the well-known tools is Adobe Photoshop, which is a powerhouse in picture editing and provides multiple ways to extract blurriness from the photo. To learn more about it, this guide will introduce you to JPEG artifact removal Photoshop process. Besides, if you think Photoshop is too complex, we’ll provide you with a better alternative.
Part 1. What Are JPEG Artifacts and How Do They Occur?
The visual imperfection that occurs in an image after the compression or decompression is known as JPEG Artifact. These imperfections can have a prominent effect on picture quality, which makes it look blocky and blurry. Before you learn to remove JPEG artifacts in Photoshop, know that there are many types of artifacts that can happen, and some of them are given below:
1. Macro-blocking: Visible square-shaped blocks appear due to heavy compression that is most noticeable in areas with smooth gradients.
2. Color Banding: Instead of a soft transition, gradients appear in distinct bands of color, which is common in skies and shadows.
3. Noise and Graininess: Compression can introduce random particles or grainy texture, which makes the image look rough or less detailed.
4. Halo Effect: A faint outline or halo appears around objects, especially near high-contrast edges, which is caused by aggressive compression.
5. Mosquito Noise: Small, fuzzy distortion appears around the edges, often resembling the tiny waves or dost, which makes the image sharp and appear distorted.
Part 2. 5 Effective Methods to Remove JPEG Artifacts in Photoshop
To know how to fix JPEG artifacts in Photoshop, it is essential to learn all the methods and filters this software provides. For your better understanding, we have listed a few methods of Photoshop below to fix this issue:
1. Reduce Noise Filter
The first method to remove the artifact from your picture is by using the Reduce Noise filter. It uses AI-powered technology and detects the blurriness from the picture to automatically remove it. So, if you want to know how to do this, the following steps can help with that:
Step 1. Open the tool and import your target picture, then choose the “Filter” tab. There, select the “Noise” option and press the “Reduce Noise” filter from the new dialog box.
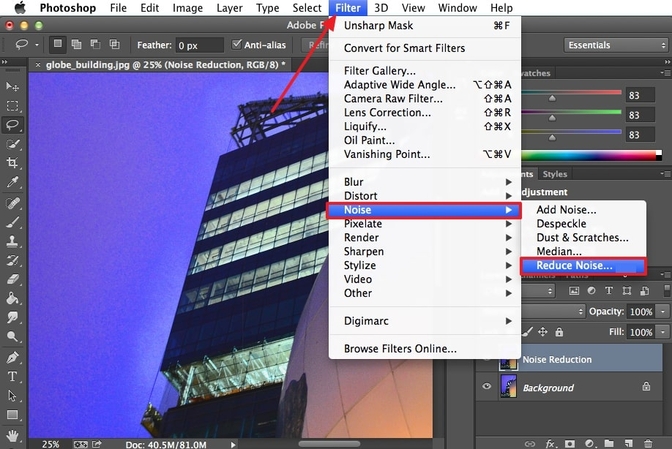
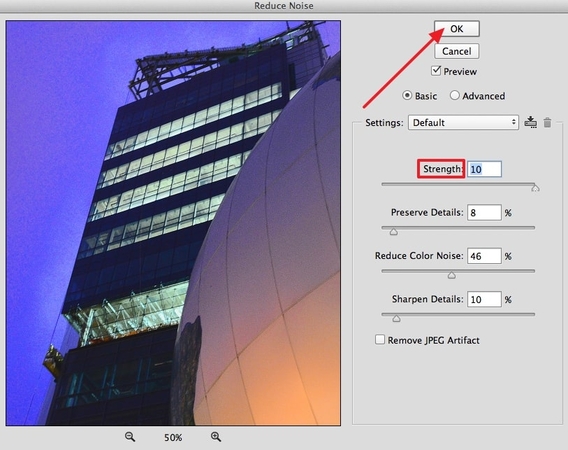
Step 2. Afterward, adjust the “Strength” tool and other features according to your desired need. Once you are done, hit the “OK” button to apply the filter finally.
2. Dust & Scratches Filter
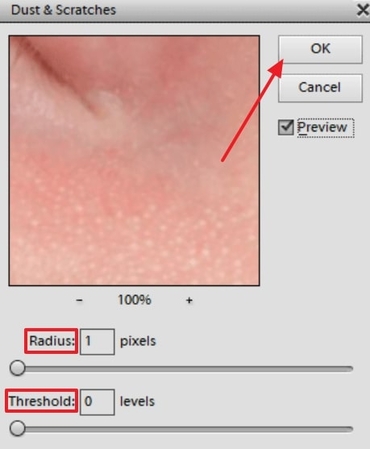
If your image has particles or scratches due to the camera, you can fix JPEG compression artifacts Photoshop by using its Dust and Scratches Filter. This helps you reduce unwanted noise by allowing you to adjust the Radius and Threshold. For your better understanding, we have provided a stepwise guide on how to use it:
Step 1. After importing the picture, choose the “Filter” tab and select the “Noise” option. Next, another dialogue box will appear, where you need to select the “Dust Scratch” filter.
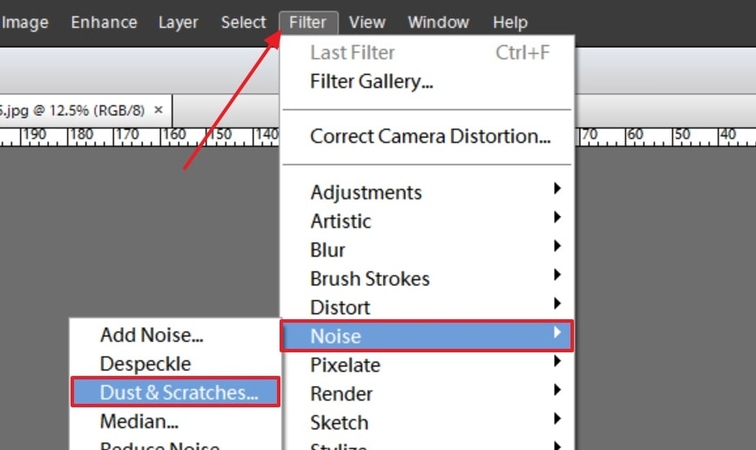
Step 2. Following this, adjust the “Radius” and “Threshold” with the toolbar, and once you are satisfied, press the “Ok” button to remove the dust particles from your image.
3. Surface Blur Filter
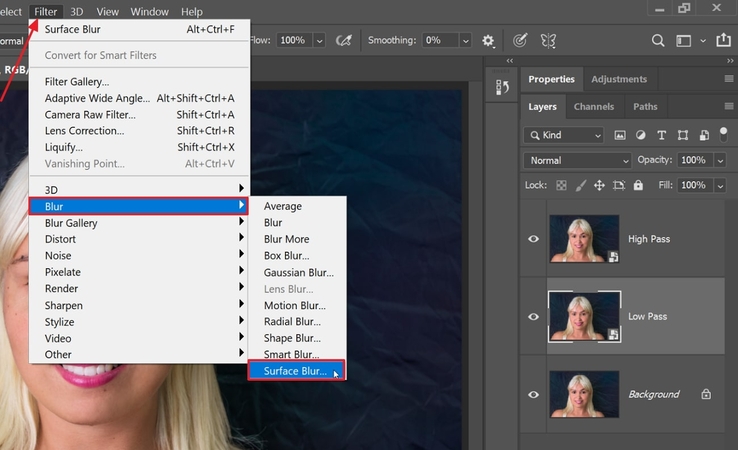
For models and influencers, when makeup looks textured, they can use this filter to soften imperfections by blurring areas. It chooses a similar color and smooths out the affected area to make it ideal for refining the skin texture without losing facial features. Before you get started, take a look at this stepwise guide to ensure smooth application:
Step 1. After pressing the “Filter” tab, select the “Blur” option from the pop-up menu. Then, another dialogue box will appear where you choose the “Surface Blur” filter.
4. Clone Stamp Tools
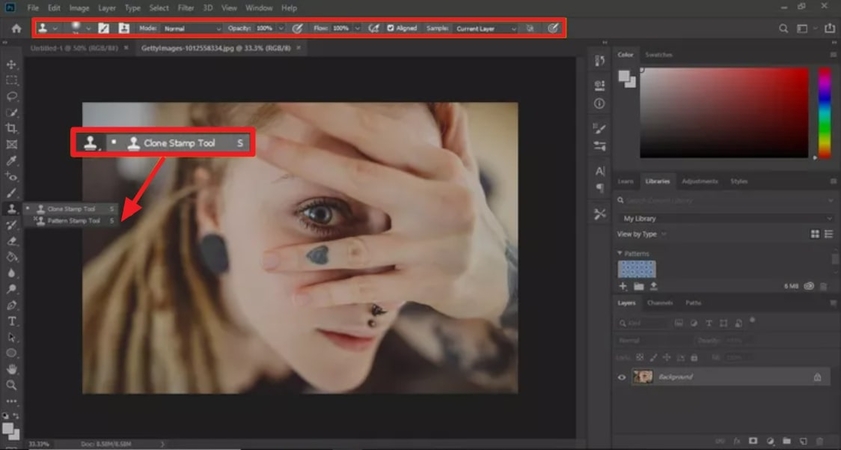
This feature is not used to remove JPEG artifacts in Photoshop, but extracts unwanted objects, repair damaged areas, etc. It works by sampling a specific part of an image and painting it over another area to make it useful for retouching images. To simplify the process, here is a breakdown of each stepwise guide to ensure smooth application:
Step 1. Upon importing the picture, press and hold the “Rubber Stamp” icon in the toolbox and choose the “Clone Stamp” tool.
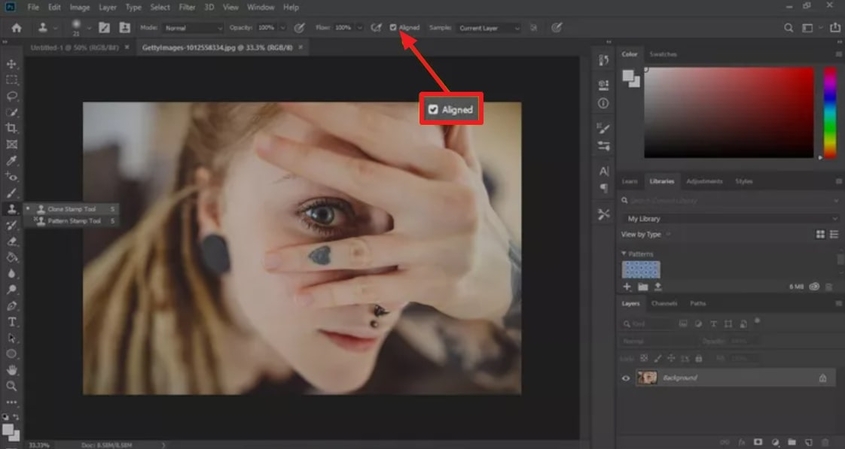
Step 2. Next, press the “Aligned” button to check it to get seamless blending and uncheck it to keep the target stationary for precise cloning.
5. Smart Sharpen
This tool in Photoshop enhances image clarity by reducing the blur and refining details. Unlike basic sharpening tools, it offers advanced control adjustments such as amount, radius, and noise reduction, ensuring precise sharpening without creating unwanted artifacts. For better understanding, go through the following steps carefully:
Step 1. Once you import the picture, press the “Layer” tab and then select the “Covert to Smart Object” option.
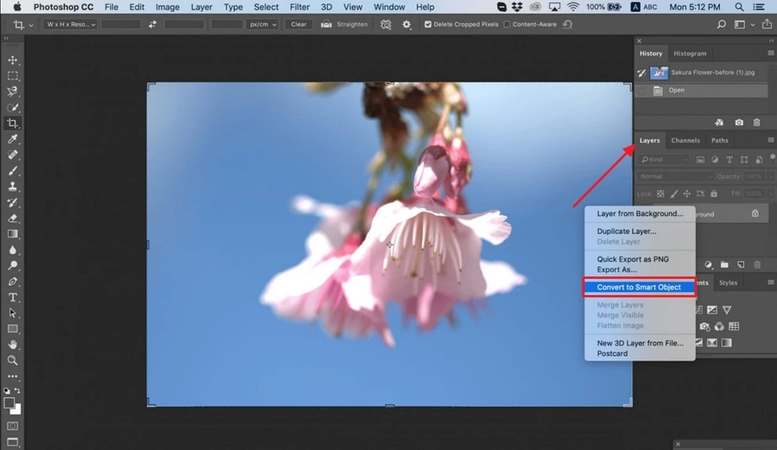
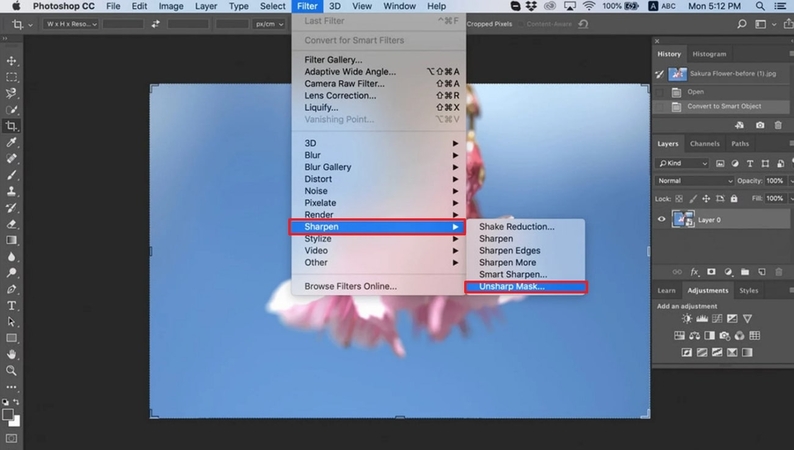
Step 2. Now, press the “Filter” tab to select the “Sharpen” option from the list. Afterward, another flyout will open, and there, choose the “Unsharp Mask” option to get a clear image.
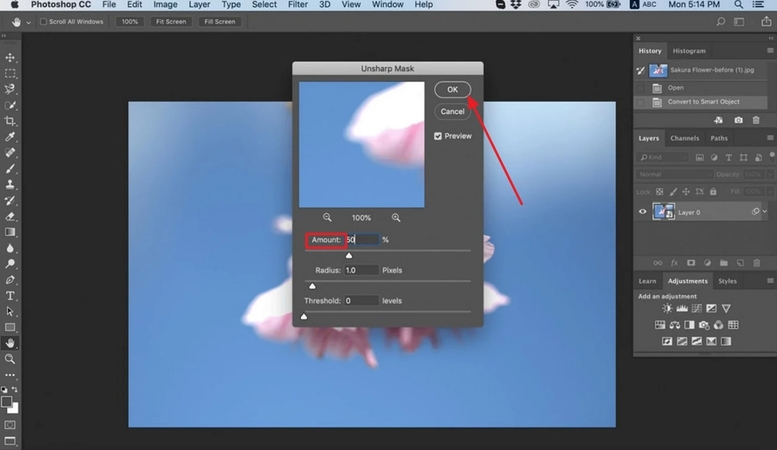
Step 3. Moving forward, adjust the filter’s capacity by choosing the “Amount” and “Radius,” and hit the “OK” button to achieve the desired effect on the photo.
Part 3. Best Practices for Preventing JPEG Artifacts
When maintaining high-quality images and preventing unwanted objects, it is crucial to follow the best practices. By implementing these strategies, you can decrease the need for JPEG artifact removal Photoshop:
1. Quality Compression Settings: When saving pictures, choose the quality settings of 80% or higher to reduce artifacts and keep their size manageable.
2. Lossless Formats: Edit images in formats like PNG or RAW before you convert them to JPEG to prevent repeated quality loss.
3. Avoid Multiple Saves: Downloading the image undergoes compression, which loses its detail, so instead, you can copy in lossless format and export JPEG only when necessary.
4. Resize Images: You should scale images before saving them as JPEG after compression since it will help you maintain sharpness and prevent additional distortion.
Part 4. [Alternative] Generate Finer Results By Removing JPEG Artifacts Instantly
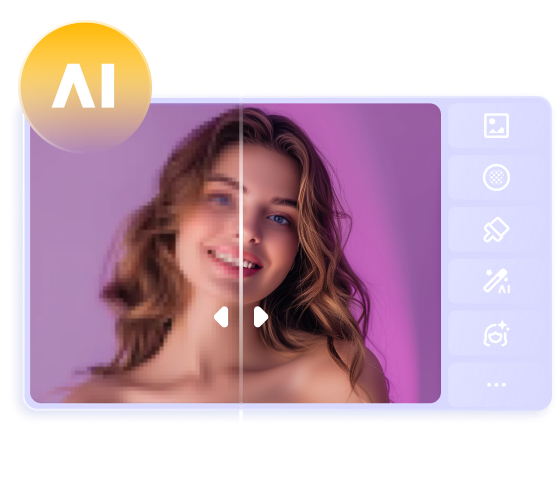
As it is quite a tricky and complex task to perform JPEG artifact removal Photoshop procedure, you can use a better alternative, which is HitPaw FotorPea. This tool uses advanced AI technology and offers tools like AI Enhancer, which allows you to refine your artifact images. With its various AI models, you can choose the Upscale model to get images with high resolution.

Moreover, if you’re working on a large project, instead of editing pictured separately, it allows you to use its batch processor that enhances multiple pictures simultaneously. To remove the blurriness from your photos, you can use its Denoise Model, which detects your photos and removes grainy effects from them. To help you fine-tune the adjustment with precision, it comes with a preview feature that lets you see its before and after results.
Key Features
1. Aspect Ratio: To post edited pictures on social media such as Instagram, it allows you to change the size of images.
2. Face model: This model recognizes the facial features in images and improves or sharpens them.
3. Picture Format: Before downloading the picture, you can choose the various formats from its settings.
Detailed Guideline to Use HitPaw FotorPea to Get Sharp Images
After learning how to remove JPEG artifacts in Photoshop without losing quality, if you want to know how to use this tool, consider the below stepwise guide:
Step 1. Install the FotorPea and Select AI Enhancer
Launch the HitPaw FotorPea and proceed with the AI Enhancer tool by clicking the “Enhance Photos Now” tab.

Step 2. Import the Target Photo and Choose the AI Model
Upon seeing a new interface, press the “+” button to import the compressed image. Now, from the “AI Model” section, toggle the “Compression Artifact Model” and click the “Preview” button.
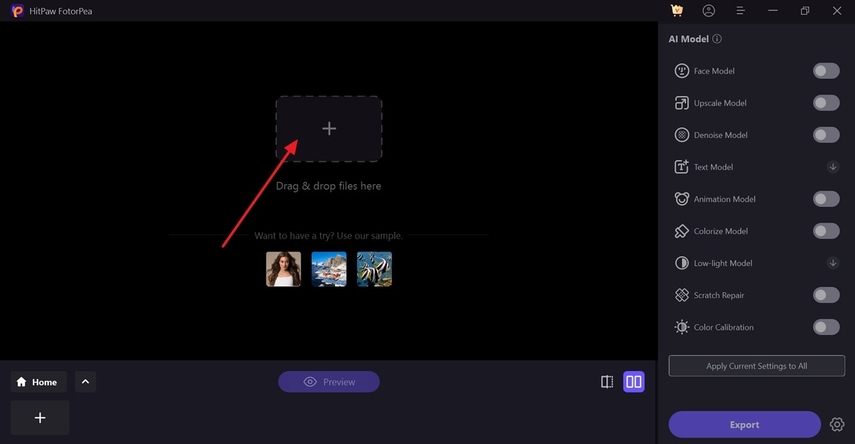
Step 3. Compare Results and Save It
Afterward, check the before and after results of the edited photo, and if you are satisfied, hit the “Export” button to download it.

Conclusion
In conclusion, Photoshop offers one of the best Photoshop tools for JPEG artifact removal, such as Smart Sharpen Dust and more. However, these methods can be complex and require expertise to achieve professional results. Therefore, this guide has provided you with a better alternative to HitPaw FotorPea that facilitates AI Models to remove artifacts and restore your photos.


 HitPaw Edimakor
 HitPaw VikPea (Video Enhancer)
 HitPaw Univd (Video Converter)
Share this article:
Select the product rating:
Daniel Walker
Editor-in-Chief
My passion lies in bridging the gap between cutting-edge technology and everyday creativity. With years of hands-on experience, I create content that not only informs but inspires our audience to embrace digital tools confidently.
View all ArticlesLeave a Comment
Create your review for HitPaw articles