How to Add Frame to Photo: Easy Tools and Tips to Customize Your Images
Frames enhance the visual appeal of photos, which makes them more captivating for social media posts or professional designs. A carefully chosen frame draws attention and creates a polished look to highlight the subject. From personal memories to marketing materials, you get to achieve a complete and final look with the help of enhanced photo editors.
This article explores simple techniques and tools to add frames to photos, with a special focus on HitPaw FotorPea. This user-friendly interface offers different styles that allow you to enhance the pictures quickly for a faster workflow. For both new and experienced designers, the tips and tools discussed will help you create a stunning visual that will leave a lasting impression on your viewers.

Part 1. Why Do You Need to Add Borders to Photos?
Adding frames to images provides several aesthetic and practical benefits, enhancing appeal and functionality. For a detailed overview of the advantages of borders on pictures, read the points below:
1. Visual Appeal: By drawing focus on the central subject of the image, frames help direct the viewer's eye. Besides, they give the image a polished and professional look, making it more refined.
2. Personalization: Photo frames make you stand out from the crowd by allowing you to add a personal touch to the image. Adding borders to pictures reflects your aesthetic sense and provides you with a creative boost.
3. Brand Consistency: If you represent a brand, you can use uniform frames for all photos and maintain brand consistency. Using your company’s custom logo as a frame will help you build a visual identity.
4. Event-Specific: To include yourself in the bandwagon of posting event-specific content, you must use custom frames. This act helps your followers know that you are also celebrating the event.
5. Versatility: When you use different frames for every image, your social media feed gets diversity in style. Dynamic customizing of each border can also help you add variations in visuals.
Part 2. Best Tools to Add Frames to Photos
Now that we are clear on why people add frames to the images, let us jump into the best photo border tools we can opt for. These tools provide various features to help you enhance your photos with ease and precise borders:
1. Canva
Canva is an advanced and popular photo editor tool that is widely used across various devices due to its high compatibility. It allows users to apply different shapes and styles of frames that can enhance the image and its overall visual appearance. With the help of its opacity feature, you can adjust the frame visibility. Moreover, change the color of the frame as per the picture to make sure it blends well.

Key Features
1. Users can apply animations to the frames in different styles to further enhance the project they are working on.
2. Canva adds borders to pictures and then allows you to adjust its positioning to ensure accuracy.
3. It can also be adjusted through height and width to ensure the frame and image are accurately aligned.
2. Adobe Photoshop
This comprehensive image editor allows users to professionally perform extensive edits to their images. Adobe Photoshop ensures that you are provided with various types of editing features, like adding layers. However, Photoshop doesn't have a direct frame feature, which is why you can create one by adding a background layer and making adjustments accordingly.
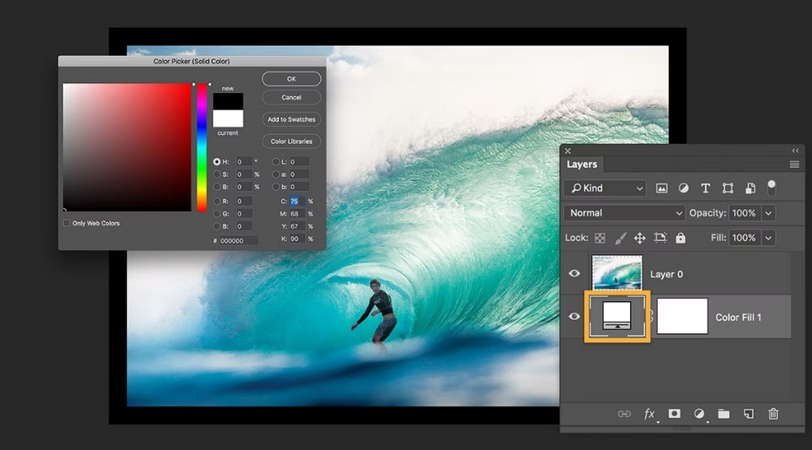
Key Features
1. Users can try different border looks by adjusting the layers to an appropriate ratio size.
2. Adobe Photoshop can set the border color to create a pattern, gradient, or solid color style that matches the user's requirements.
3. This photo border tool adjusts the canvas size so that it gets a better printable output.
3. Fotor
Fotor offers an easy-to-use online photo editor with a variety of tools to add stylish borders to images. With numerous pre-designed border templates, Fotor allows users to enhance their photos quickly. Moreover, this online solution to add frame to photo offers a range of customization options, including color and opacity adjustments, ensuring that each border complements the photo's overall aesthetic.
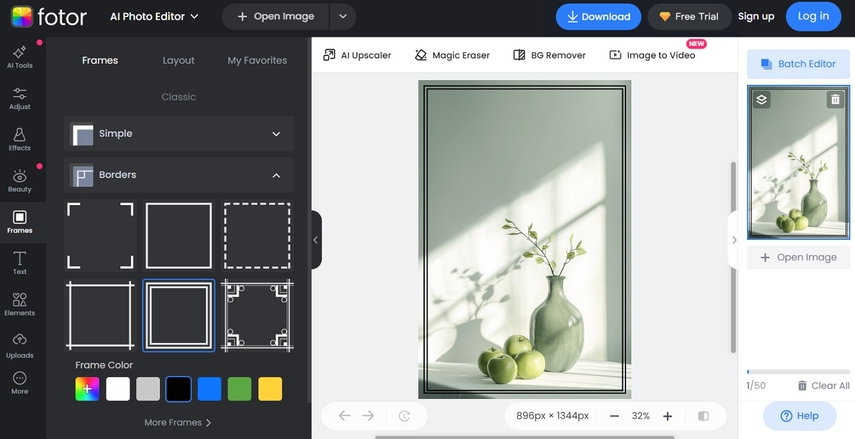
Key Features
1. There are different frame sizes and aspect ratios readily available for use.
2. To further enhance the image, users can add different elements or other effects to the picture.
3. With its various editing features, you get the ability to crop, resize, or rotate them accordingly.
4. BeFunky
With a vast collection of border styles and shapes, BeFunky allows users to add the perfect frame to their photos, whether they want something bold or subtle. This tool to add borders to pictures combines ease of use with powerful editing features, making it perfect for adding borders to images. You can adjust the border's thickness, color, and style and even add unique textures or patterns for a distinctive look.
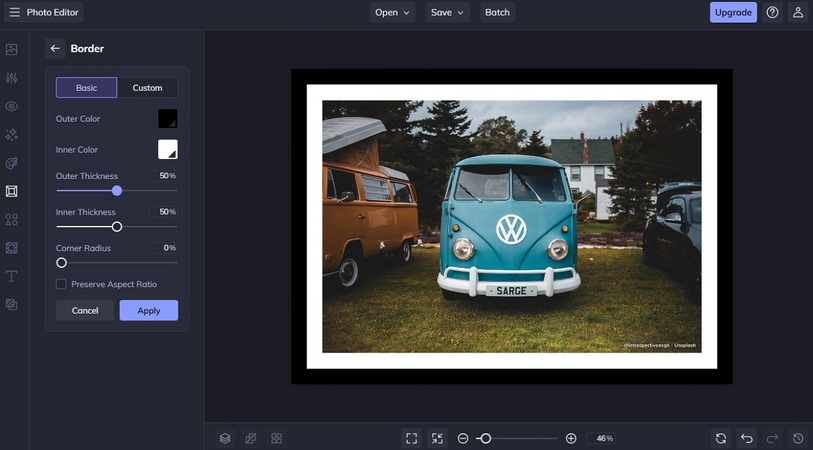
Key Features
1. Users can adjust the outer and inner thickness of the added border according to their preferences.
2. BeFunky allows you to adjust the ratio of the border manually to see which matches the picture better.
3. The tool has touch-up features that allow you to enhance your self-portraits further.
Part 3. How to Enhance Images After Adding Border Using HitPaw FotorPea
Apart from the above-discussed tools, you can utilize HitPaw FotorPea to enhance the images further after adding borders to them. Users can use the integrated AI technology of FotorPea to improve their image quality. With the help of this tool's AI model, you can enhance an image’s resolution to 16K through a single click. After you add frame to photos, you can shift to HitPaw and remove noise from them.
Moreover, it is compatible with Windows and Mac devices to ensure all users have access to the interface. With the user-friendly interface, users with fewer technical skills can easily navigate through the tool. Track the walkthrough below to get a better understanding of how to enhance images with borders:
Step 1. Download and Shift to the Enhance Photos Now Tab
Start the process by downloading HitPaw FotorPea to your desktop device and launching it. As you access the main interface, click on the “Enhance Photos Now” button.

Step 2. Apply the AI Upscale Model to the Border Image
Once the image you created with a frame is added, locate the "Upscale Model" from the right side of the AI Model panel and turn on its toggle.
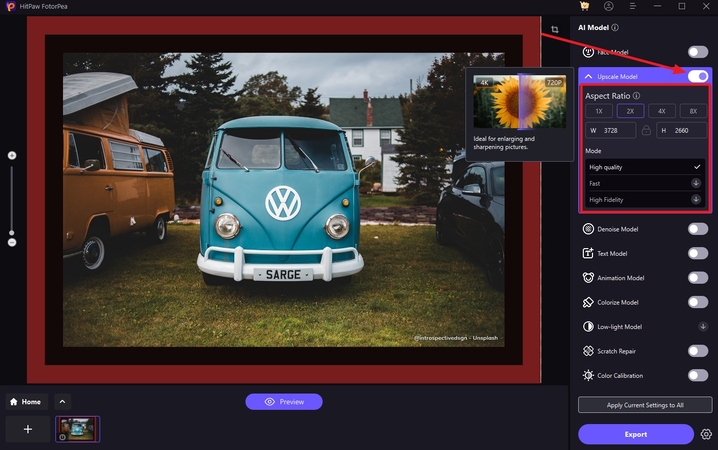
Step 3. Apply Different AI Models for Further Enhancement
Moving on, if you want to apply further enhancement to your image, you can turn on the toggle for the "Denoise Model." To move to the next step, hit the "Preview" button to allow FotorPea’s AI to generate the results.

Step 4. Preview the Results and Export the Image to Your Device
Finally, once you review the results, hit the "Export" button at the bottom right corner to save them.

Part 4. Tips for Adding Borders to Photos
Additionally, while you add borders to pictures, you must keep the following tips in mind to ensure you follow the procedure accurately:
1. Match the Theme: Choose a border style that aligns with the photo's purpose or theme for a cohesive look.
2. Use Subtle Borders: Thin or neutral-colored borders maintain focus on the subject, and you must avoid using bold or thick borders to maintain focus on the subject.
3. Balance the Design: The size of the border should enhance the photo without overwhelming it. A balanced border ensures the composition feels polished and proportional.
4. Experiment with Styles: Test different shapes, colors, and textures to find the best fit for your photo. Unique photo-to-border tools that have frame choices can transform a simple image into something striking.
5. Optimize for Social Media: Adjust borders to fit the dimensions of specific platforms like Instagram and Facebook. Proper sizing prevents cropping and ensures the image looks its best.
Conclusion
In conclusion, adding frames to photos elevates aesthetic appeal and allows for greater personalization. Frames help highlight the subject and give pictures a polished and professional finish. Tools like HitPaw FotorPea make it easy to create customized borders, providing users with endless creative possibilities. It stands out as an intuitive and powerful platform for enhancing photos with custom borders.
The user-friendly interface and variety of features of this tool make it accessible to both beginners and experienced designers. So, explore HitPaw FotorPea today to give your photos the perfect finishing touch after applying creative frames.


 HitPaw Edimakor
 HitPaw VikPea (Video Enhancer)
 HitPaw Univd (Video Converter)

Share this article:
Select the product rating:
Daniel Walker
Editor-in-Chief
This post was written by Editor Daniel Walker whose passion lies in bridging the gap between cutting-edge technology and everyday creativity. The content he created inspires the audience to embrace digital tools confidently.
View all ArticlesLeave a Comment
Create your review for HitPaw articles