How to Generate AI Images with Microsoft Copilot: A Step-by-Step Guide
Artificial intelligence has brought automation to many areas to make task execution faster. Beyond handling repetitive tasks, AI is now enhancing creativity in exciting ways. One such AI advancement has been introduced by Microsoft. It now offers a Microsoft Copilot AI image generator that allows users to create images simply by typing in text prompts.
This feature motivates users to effortlessly turn their ideas into visuals to make creative processes more streamlined for everyone. This article will discuss Copilot's image generation feature, providing step-by-step guides on how to use it effectively.
Part 1. Advanced Capabilities of Microsoft Copilot’s AI Image Generator
Before moving ahead, discussing the features and availability of Microsoft's image generation utility is essential. Microsoft's AI image generator is powered by GPT-4 and DALL.E 3 to enable advanced text-to-image generation. This advanced technology allows users to create high-quality visuals by simply providing text descriptions of their thoughts. Additionally, users can tailor the image size, style, and other attributes by specifying their prompt for Copilot.
This feature is available within all the subscription plans of Microsoft 365 Copilot. Other than that, users can download the Copilot app for free on Windows and Mac. For image generation on the go, Copilot is also available for iOS and Android. After signing in to their Microsoft account, users can easily try the image generation feature. They can also access this feature for free during the one-month trial to learn how to use the Copilot image generator.
Use Case Scenarios
1. Creating Social Media Posts: Content creators can utilize the Microsoft Copilot AI image generator to generate eye-catching visuals for their posts and stories.
2. Marketing Material: Using this text-to-image functionality, users get the chance to craft marketing or promotional visuals for advertisements.
3. Professional Presentations: If the Copilot is integrated within your PowerPoint application, you can incorporate images complementary to the content of your PPT into the slides.
4. Design Ideas: Graphic designers can experiment with different ideas in their minds by simply typing our descriptions, allowing them to see the representation of their ideas.
Part 2. Walkthrough Guide to Use Microsoft Copilot AI Image Generator
Having understood the image generation capabilities of Microsoft Copilot AI image generator, you must be curious about how to use this tool effectively. To help you get started, we've outlined a simple guide that will take you through the process of generating images from text prompts. Before practically performing the following steps, ensure that you have a Microsoft account:
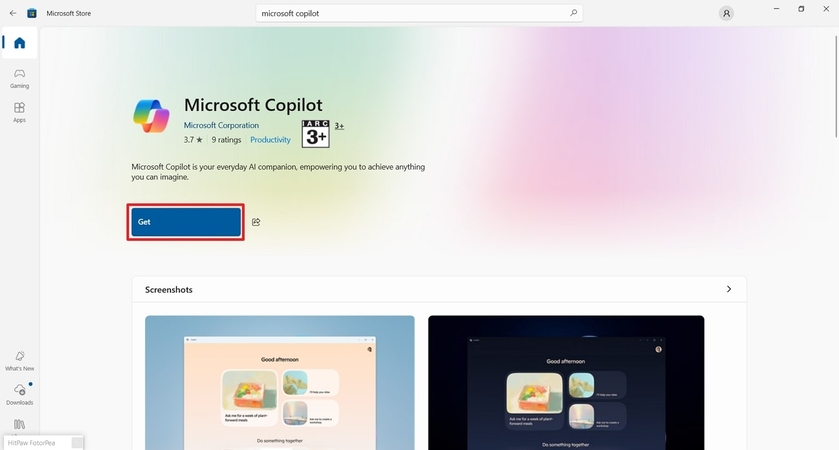
Step 1. On your computer, search for “Microsoft Store” within the start menu and tap on it to launch it. When you’ve accessed the store, type “Microsoft Copilot” on the top search bar and click the app to open its homepage. Afterward, hit the “Get” button to begin the installation procedure of Microsoft Copilot.
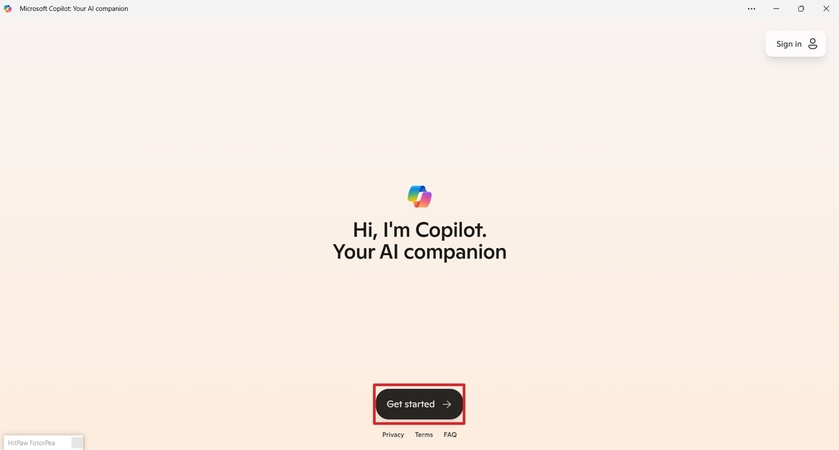
Step 2. Once you have successfully installed the app, tap the "Get Started" button from the newly appeared window to enter the Copilot's interface.
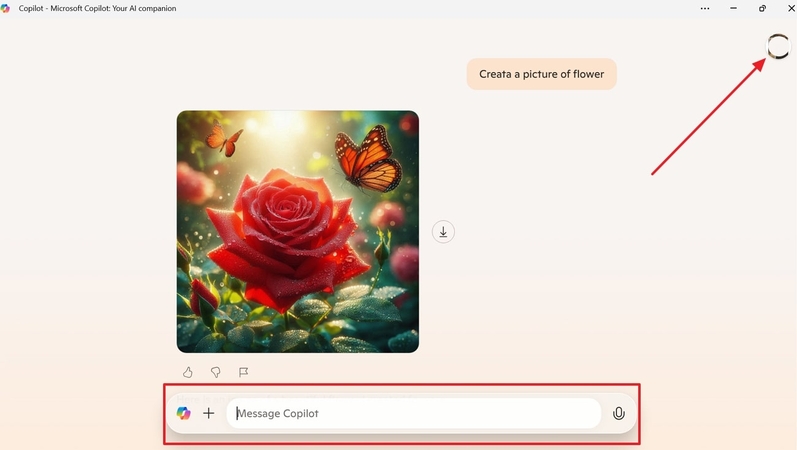
Step 3. Moving forward, click on the “Sign in” icon at the top-right of the Copilot interface and enter your account credentials. After signing in, write your description for the image within the provided “Prompt Field” to get the output.
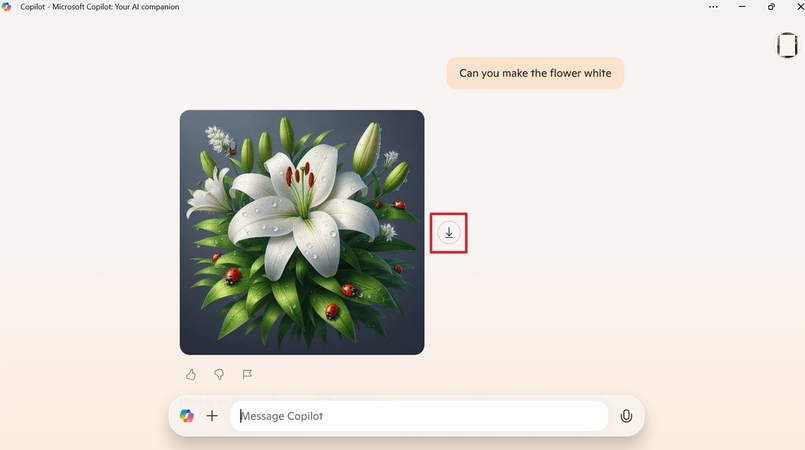
Step 4. You can input your desired modification through the text prompt to customize or edit the output image. When you are content with the results, hit the "Download" icon next to the image to store it on your device.
Examples of Effective Prompts
1. “Generate an image with a 9:16 aspect ratio, featuring a sunset over a calm ocean with soft pastel colors.”
2. "Generate an image of a cozy living room with a fireplace, a plush couch, and a warm ambiance, perfect for a winter evening."
3. "Create a high-resolution image of a modern office workspace, with a minimalistic design, large windows, and natural light."
4. "Design an image of a fantasy forest with glowing trees, misty air, and mystical creatures in the background."
Part 3. Exploring the Strengths and Limitations of Microsoft Copilot AI Image Generator
After learning how to use the Copilot image generator, you must know its potential advantages and weaknesses. Carefully reading this section will help you assess how well the tool fits your needs while creating a project:
Strengths
1. Microsoft Copilot AI Image Generator is free, allowing users to explore it before committing to a paid subscription.
2. You can create customized images by typing your preferences into the prompt box.
3. Integrating within Microsoft applications can help users generate engaging visuals for presentations, documents, or spreadsheet data.
Limitations
1. Microsoft offers an AI image generation feature in its free trial, but users can only generate 15 images per day.
2. Copilot does not provide ready-made templates or style options, meaning users must rely only on text prompts for customization.
3. Using Microsoft's image generation tool, you can create lower-quality visuals and resolutions compared to specialized design software.
From the above discussion, it is evident that the Microsoft Copilot AI image generator is not suitable for professional use due to its low quality and limited customization options. However, this tool is a reliable choice for users looking for a simple, easy-to-use image generation feature with basic functionalities.
Part 4. Your Ultimate AI Image Generator: HitPaw FotorPea
As we've seen, while useful, the Microsoft Copilot AI image generator has some limitations in terms of quality and customization. For users seeking a more powerful and flexible solution, HitPaw FotorPea offers a much more advanced image generation experience. It includes an AI-powered text-to-image functionality with various styles, including fitness, weddings, and movies.
By selecting a style, the tool automatically generates a prompt, making it even easier for users to get started with their image creation process without needing to craft a prompt from scratch. In addition to that, you can even upload a reference image to further guide the AI in generating visuals that resonate more closely with your desired outcome.
Core Features
1. High-Resolution Export: Before generating the output, you are allowed to choose the quality and DPI to ensure the images meet our specific needs. By adjusting these parameters beforehand, you can make your final images clearer and sharper.
2. AI Retouch: With this feature, users can erase or remove unwanted elements from their images without leaving any blurriness on the targeted spot. After removing the objects, you can compare the before and after versions in real time to assess the changes.
3. AI Enhancer: This tool includes seven different models to improve the quality of your images. Among these, the Face Model enhances the subject's facial features, while the Denoise Model removes blurriness from images, resulting in a cleaner view.
4. Magic Upscaler: If the quality of your existing or generated image doesn't meet your expectations, the Magic Upscaler tool can help enhance it. With options to upscale images by 200% or 400%, this feature increases the resolution of your photos without losing quality.
Guide on How to Use HitPaw FotorPea For Image Generation
After exploring HitPaw FotorPea’s amazing image generation feature, let’s look at how you can create unique, high-quality images using this tool. The provided guideline will let you understand its features more clearly while effectively performing the image generation process:
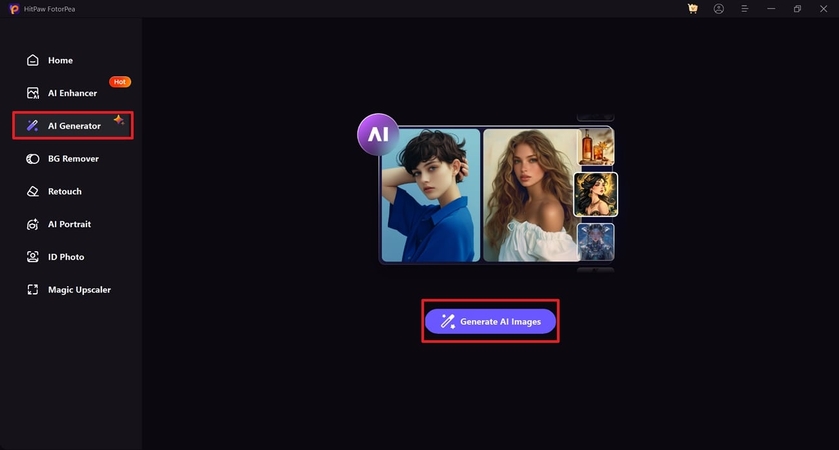
Step 1. Open the AI Image Generator Tool
After downloading the latest version of HitPaw FotorPea on your computer, launch the software to enter its homepage. Select the "AI Generator" tool from the left side and tap "Generate AI Images" to enter the image generation interface.
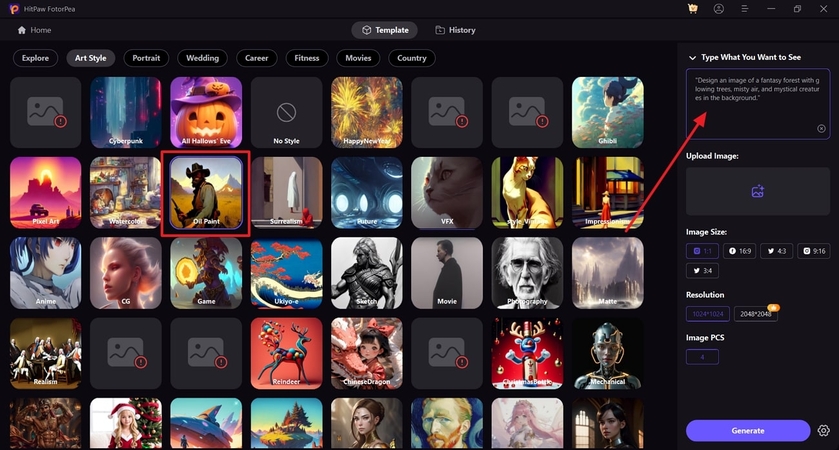
Step 2. Enter Description For Output Image
Next, choose a suitable "Art Style" from the available options if you want, and enter a description within the "Prompt box" to guide AI for your output visuals.
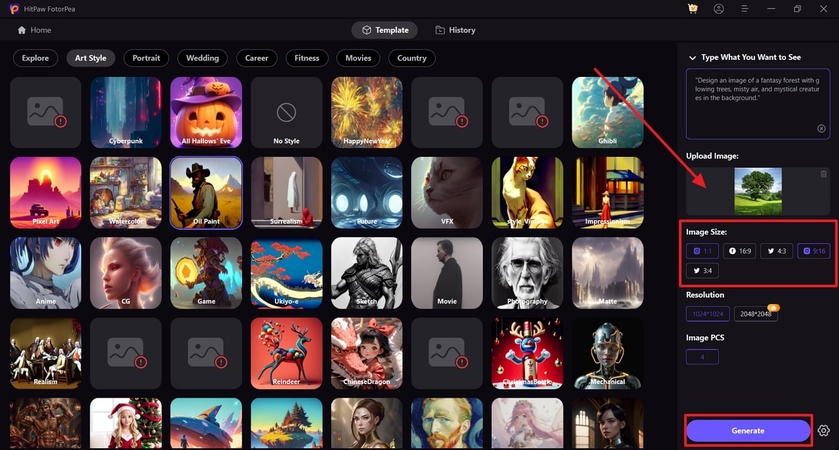
Step 3. Upload a Reference Image and Generate
After typing a prompt, tap within the “Upload Image” section to add the reference image. Once you’ve added the image, choose your desired “Image Size” from the available aspect ratios. At last, press the “Generate” button to begin the image generation process.
Conclusion
In essence, Microsoft Copilot AI Image generator is a reliable tool for beginners with its basic text-to-image generation functionality. This article explored this tool in detail, highlighting its strengths and weaknesses to let you make an optimal choice about whether it aligns with your needs. After going through the entire discussion, we can conclude that HitPaw FotorPea is a much better option due to its advanced customization and feature-rich rice experience.


 HitPaw Edimakor
 HitPaw VikPea (Video Enhancer)
 HitPaw VoicePea

Share this article:
Select the product rating:
Daniel Walker
Editor-in-Chief
My passion lies in bridging the gap between cutting-edge technology and everyday creativity. With years of hands-on experience, I create content that not only informs but inspires our audience to embrace digital tools confidently.
View all ArticlesLeave a Comment
Create your review for HitPaw articles