Unleashing the Power of FFmpeg WebM
Mastering ffmpeg to webm: A Guide for Video Optimization offers invaluable insights into leveraging FFmpeg, a robust multimedia framework, to optimize WebM video files.

Whether you're a seasoned video professional or a novice enthusiast, this guide equips you with the knowledge and skills needed to master FFmpeg for WebM video optimization, unlocking new levels of efficiency and creativity in your multimedia projects.
In this comprehensive guide, we delve into the intricacies of FFmpeg's capabilities, providing practical tips and techniques for enhancing video quality, reducing file size, and improving playback performance.
Part 1. What is FFmpeg?

FFmpeg is a robust multimedia framework that provides a set of libraries and tools for encoding, decoding, transcoding, and streaming audio and video files. It supports various multimedia formats and codecs, making it a versatile solution for various multimedia tasks.
Explanation of FFmpeg and its features:
FFmpeg is a command-line tool that enables users to manipulate multimedia files precisely and flexibly. Its features include
- Encoding and decoding of audio and video streams.
- Transcoding between different multimedia formats and codecs.
- Filtering and processing audio and video streams with various filters and effects.
- Streaming of multimedia content over networks using multiple protocols.
How to install FFmpeg on different operating systems:
Installing FFmpeg varies depending on the operating system:
- On Windows: Users can download pre-built binaries from the official FFmpeg website or use package managers like Chocolatey or Scoop.
- On macOS: FFmpeg can be installed via package managers like Homebrew or MacPorts, or users can compile it from the source.
- On Linux: FFmpeg can be installed using package managers like apt-get, yum, or dnf, or users can compile it from source.
Basic commands for video conversion using FFmpeg:
FFmpeg offers a wide range of commands for video conversion, including:
- Converting video formats: ffmpeg -i input.mp4 output.webm
- Adjusting video bitrate: ffmpeg -i input.mp4 -b:v 1000k output.mp4
- Resizing videos: ffmpeg -i input.mp4 -vf scale=640:360 output.mp4
- Extracting audio from video: ffmpeg -i input.mp4 -vn -acodec copy output.mp3
By mastering FFmpeg and its commands, users can efficiently manipulate multimedia files and optimize their video content for various purposes.
Part 2. How to Convert Videos to WebM with FFmpeg
Converting videos to the powershell ffmpeg to webm is a straightforward process that allows users to optimize video quality and file size efficiently. Here's a step-by-step guide:
Install FFmpeg: Ensure FFmpeg is installed on your system by following the installation instructions for your operating system.
1. Convert Videos to WebM:
- Open a terminal or command prompt window.
- Navigate to the directory containing the video file you want to convert.
- Replace "input.mp4" with the name of your input video file and "output.webm" with the desired name for the WebM output file.
2. Adjust Parameters:
- "-c:v libvpx": Specifies the video codec to use (libvpx for WebM).
- "-crf 10": Sets the Constant Rate Factor (CRF) for video quality. Lower values result in higher quality but larger file sizes.
- "-b:v 1M": Sets the video bitrate. Adjust as needed to balance between quality and file size.
- "-c:a libvorbis": Specifies the audio codec to use (libvorbis for WebM).
3. Execute the Command: Press Enter to execute the command and begin the conversion process.
4. Monitor Progress: FFmpeg will display progress information as the conversion progresses, including the time remaining and file size.
5. Verify Output: Once the conversion is complete, verify the output WebM file to ensure the quality and format meet your requirements.
Following this step-by-step guide, users can leverage ffmpeg convert webm to efficiently convert various video formats to WebM while optimizing video quality and file size according to their preferences and requirements. Experimenting with different parameters allows fine-tuning to achieve the desired balance between quality and file size.
Part 3. Advanced Techniques with FFmpeg
FFmpeg offers advanced techniques for optimizing video content and enhancing the user experience. Explore these advanced techniques to leverage the capabilities of FFmpeg further:
1. Converting videos to ffmpeg to webm format:
- FFmpeg supports the VP8 codec for encoding video in the WebM format. Use the following command to convert videos to WebM with VP8 codec:
ffmpeg -i input.mp4 -c:v libvpx -b:v 1M -c:a libvorbis output.webm
- Adjust the bitrate (-b:v) and other parameters to achieve the desired balance between video quality and file size.
2. Creating adaptive streaming with WebM using FFmpeg:
- Adaptive streaming allows for seamless playback across devices with varying network conditions. FFmpeg supports creating adaptive streaming content using WebM format.
- Use FFmpeg to encode multiple versions of the video at different resolutions and bitrates:
ffmpeg -i input.mp4 -c:v libvpx -b:v 1000k -c:a libvorbis -vf scale=640:360 output_360p.webm
ffmpeg -i input.mp4 -c:v libvpx -b:v 2000k -c:a libvorbis -vf scale=1280:720 output_720p.webm
- Use a streaming server like NGINX or Apache with modules like HLS or DASH to deliver adaptive streaming content.
3. Automating video conversion tasks with PowerShell and FFmpeg:
- PowerShell provides a robust scripting environment for automating repetitive tasks, including video conversion with FFmpeg.
- Write PowerShell scripts to batch process video files using FFmpeg commands:
$videos = Get-ChildItem -Path "C:\Videos\" -Filter "*.mp4"
foreach ($video in $videos) {“ffmpeg -i $video.FullName -c:v libvpx -b:v 1M -c:a libvorbis "$($video.BaseName).webm"}
- Schedule PowerShell scripts to run at specified intervals using Task Scheduler or other automation tools for seamless video conversion.
By mastering these advanced techniques with FFmpeg, users can enhance their video optimization workflow, deliver adaptive streaming content, and automate repetitive tasks efficiently. Experiment with different parameters and workflows to achieve optimal results tailored to your requirements.
Part 4. Best Alternative to FFmpeg WebM
HitPaw Univd (HitPaw Video Converter) emerges as the top choice for format conversion, offering a comprehensive suite of features tailored to meet the diverse needs of users. Highlighted by its varied and powerful functions, HitPaw Univd is a one-stop video processing solution that offers convenience, efficiency, and exceptional results.
Here's why HitPaw Univd stands out as the best alternative to webm ffmpeg conversion:
Features
- Convert photo/video formats: Seamlessly convert between various photo and video formats, ensuring compatibility across different devices and platforms.
- Download videos from 10,000+ sites: Download videos from popular streaming platforms such as YouTube, Vimeo, Facebook, and more, expanding your multimedia library.
- Download music from famous platforms: Access music from renowned platforms like Spotify, SoundCloud, and Apple Music, enriching your audio collection.
- Edit videos: Edit videos with ease using HitPaw Univd's built-in editing tools, including trimming, cropping, adding effects, and more.
- Popular tools: Explore a variety of popular tools such as image compressors, screen recording, 2D to 3D conversion, and more, enhancing your video processing capabilities.
Steps
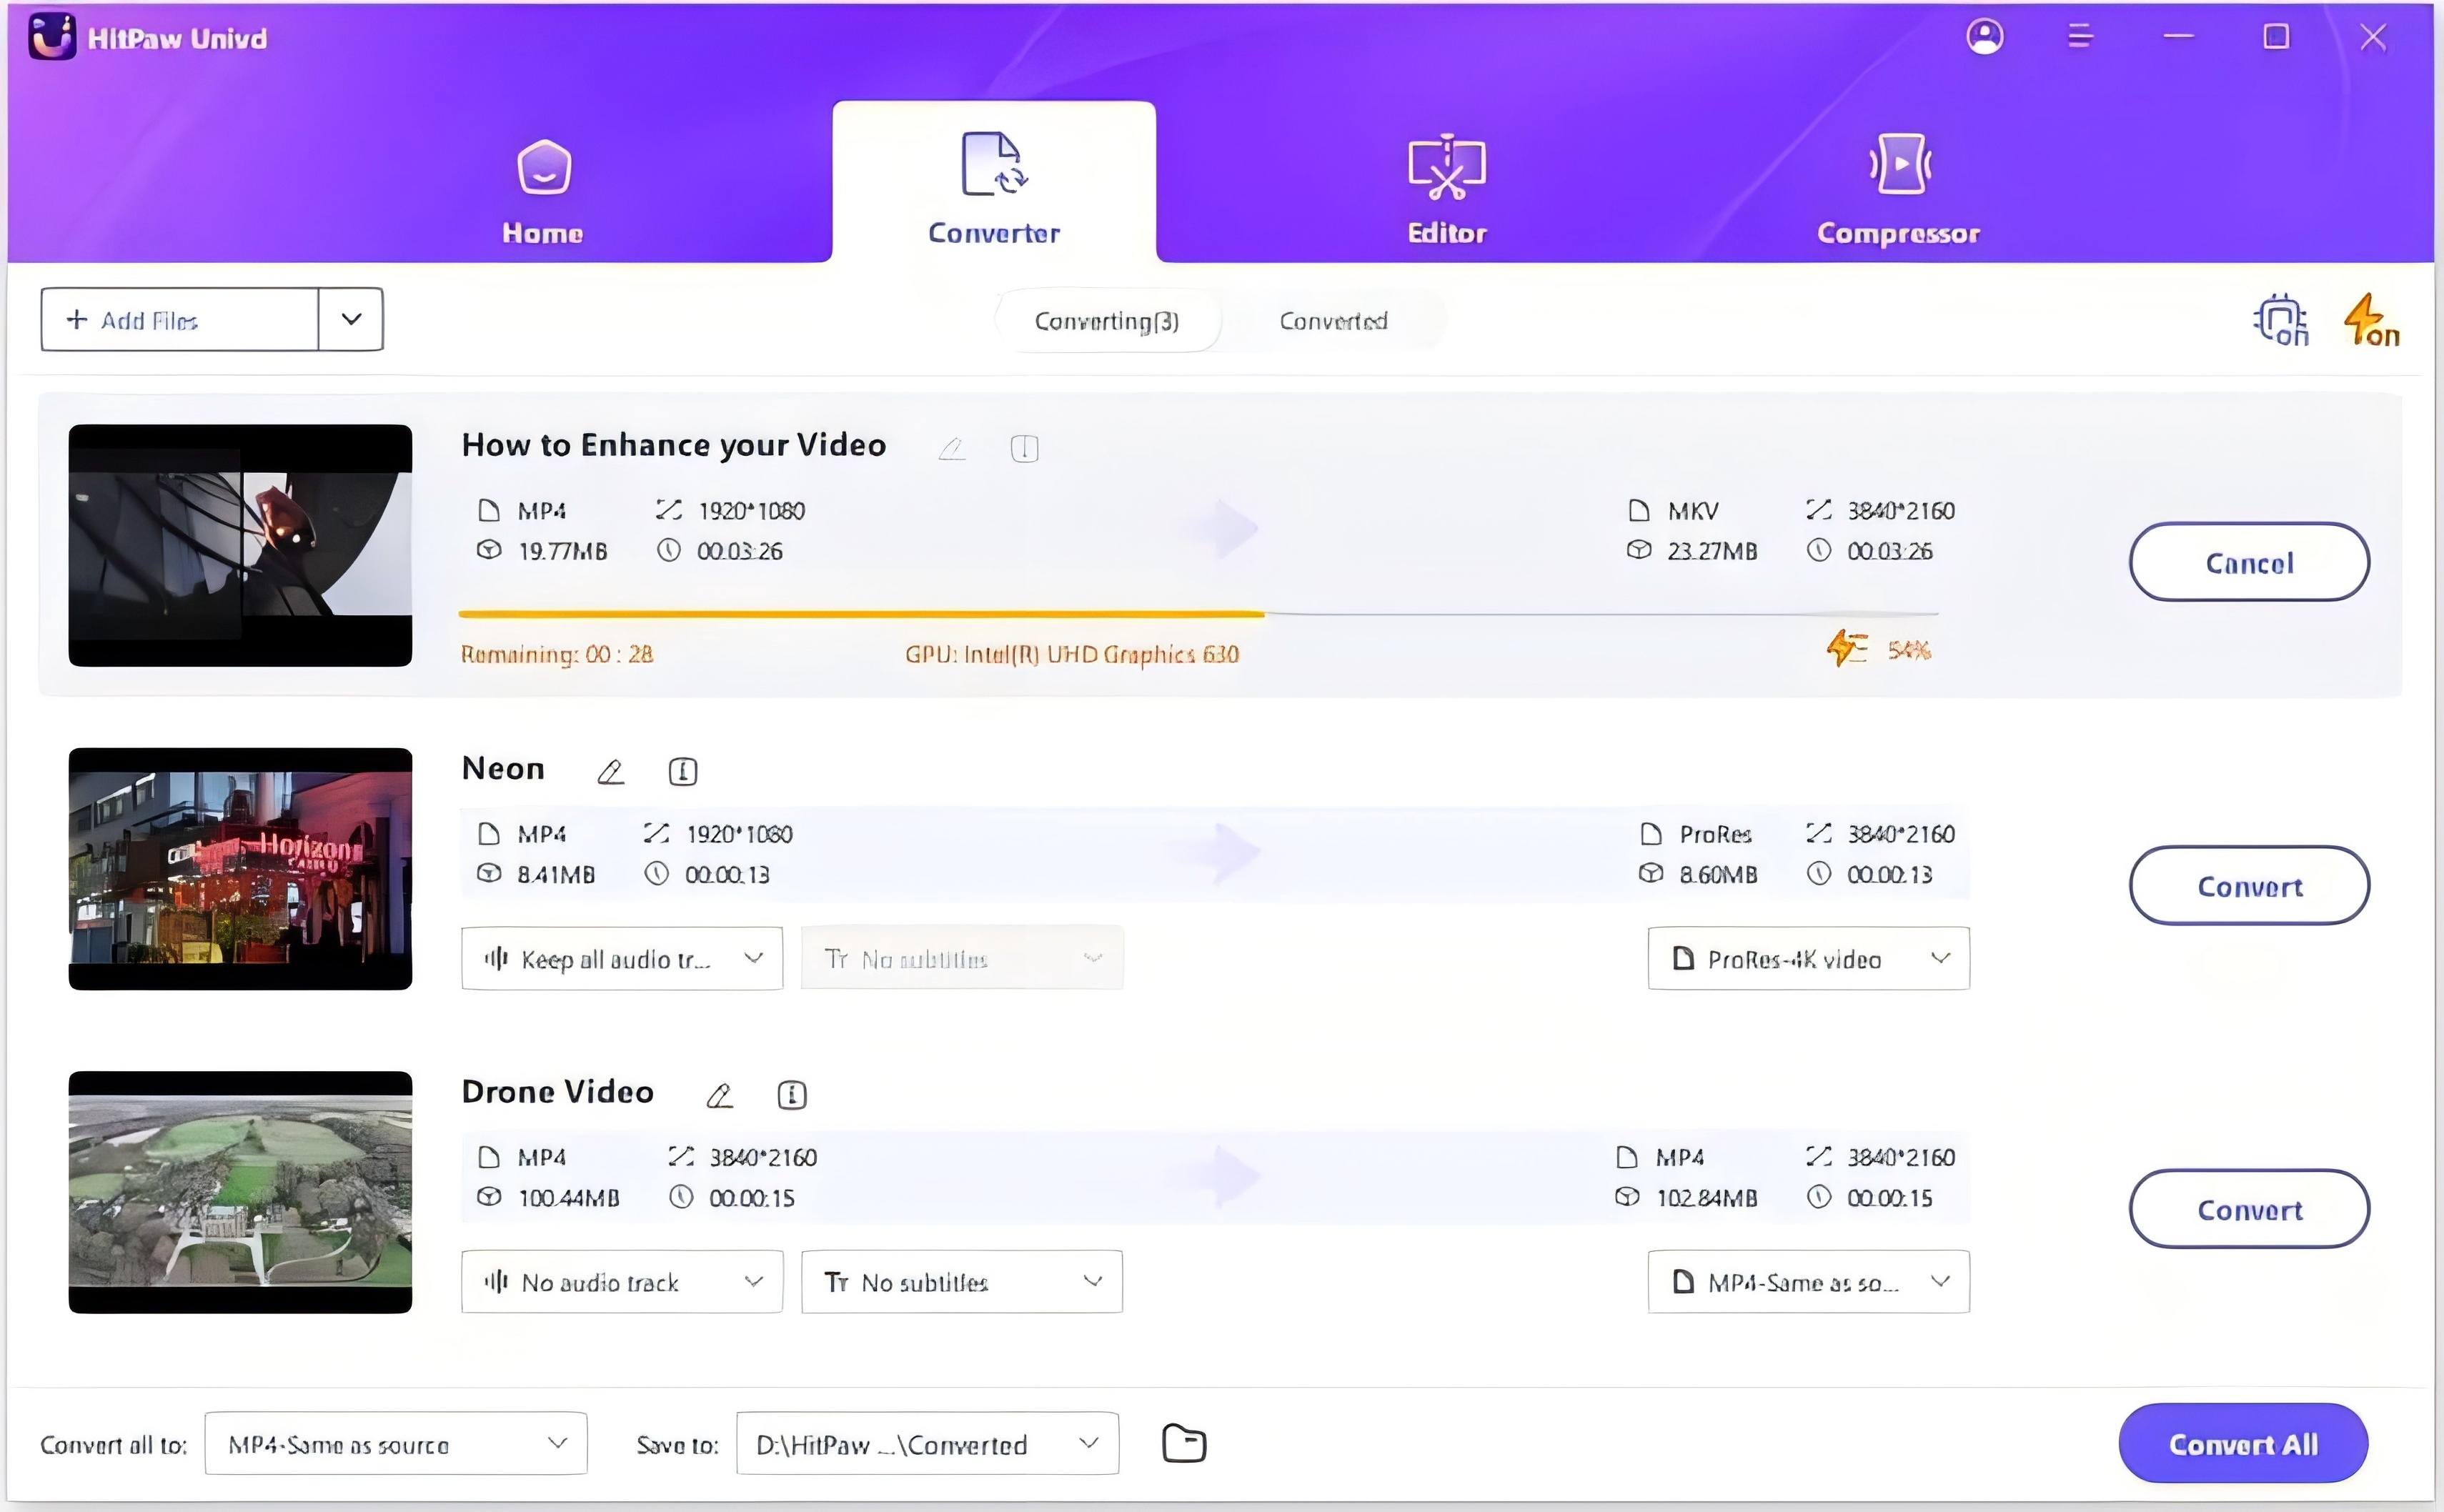
1. Launch The HitPaw Univd after downloading it from their official website.
2. Tap Add Video to import your media. Alternatively, just drag the video(s) into the program.

The program imports the video files in a queue.
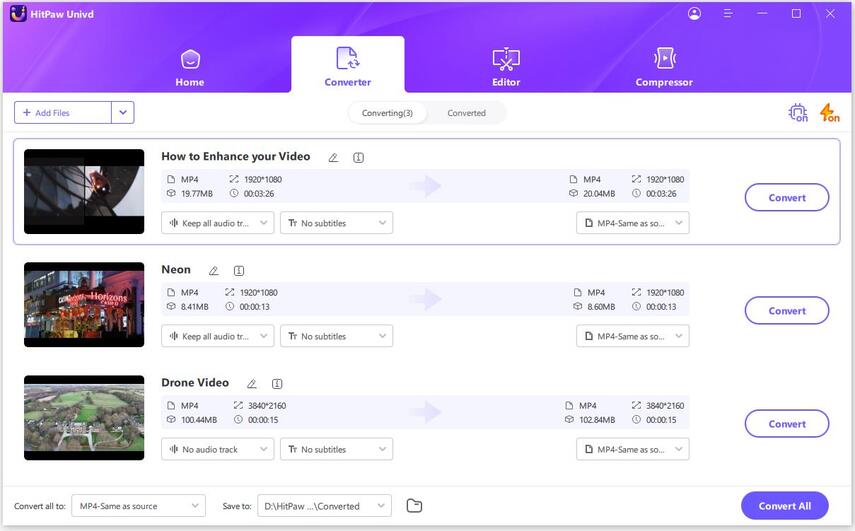
3. You may pick the output format for a specific file by clicking on the inverted triangle icon in each file's lower right corner. Click "Convert all to" in the lower-left corner to choose a standard output format for all imported files.
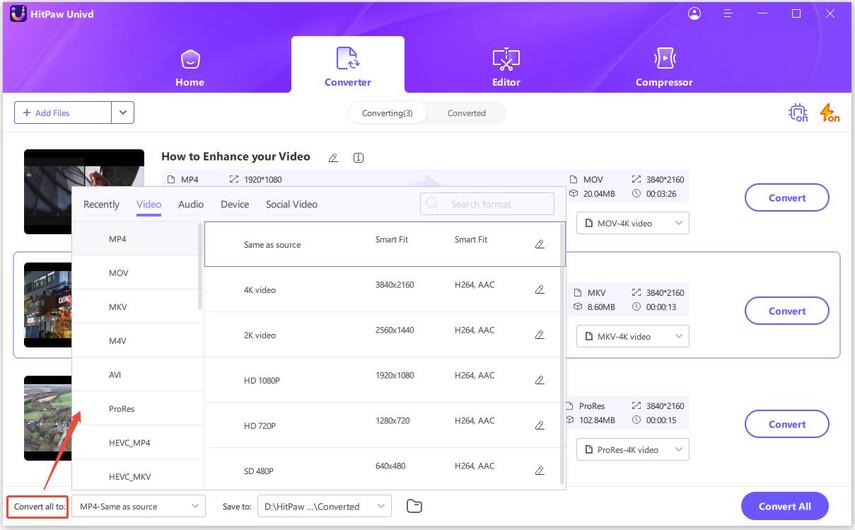
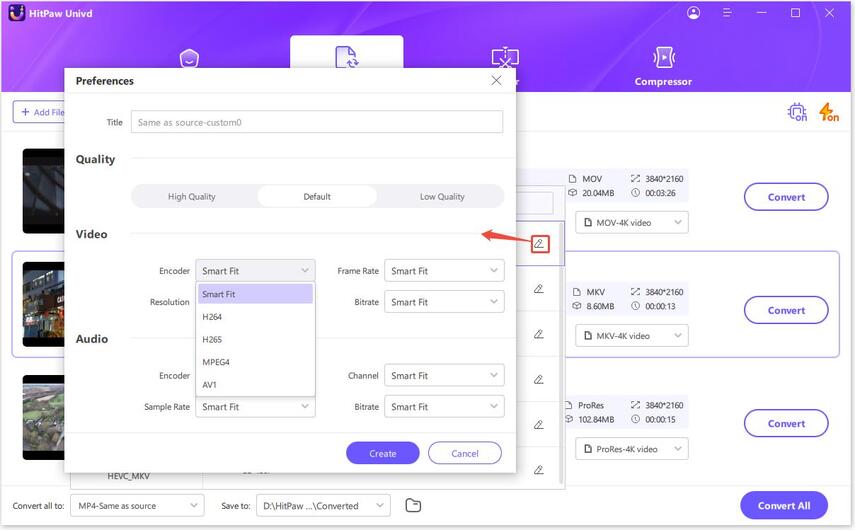
This program allows you to change the output format settings. Click the edit icon to enter the format options box and choose the format, quality, and video and audio codecs for this file.
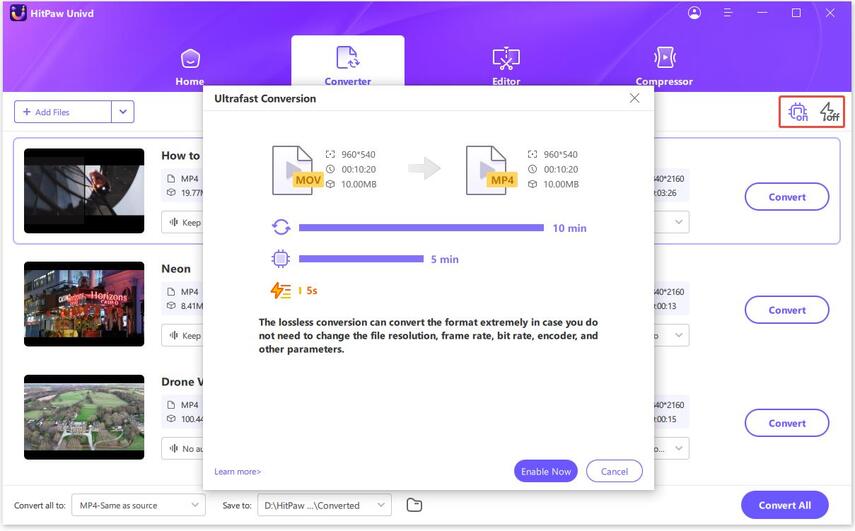
4. choose the Hardware Acceleration Detection and Lossless Conversion option in the top-right corner.
5. To convert the video to the required format, select a target folder in the interface, then click Convert (or Convert All if you have numerous files).
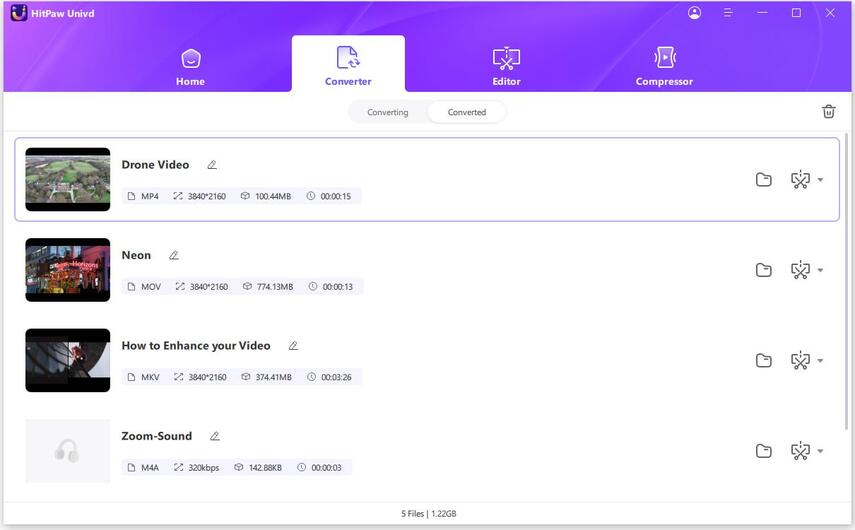
6. To view the converted files when the conversion is complete, pick the Converted tab at the top. If needed, you may inspect the finished files by choosing Open Folder or Add to the List to make changes to your movie.
Bottom Line
In conclusion, mastering ffmpeg webm optimization is essential for enhancing video quality and efficiency. While FFmpeg offers powerful capabilities, HitPaw Univd emerges as a user-friendly alternative, providing diverse features for seamless video processing.
Whether converting formats, editing videos, or downloading content, HitPaw Univd streamlines the multimedia experience.
Leap and explore the transformative potential of HitPaw Univd today. Elevate your video editing journey and unlock a world of possibilities with HitPaw Univd. Try it now and experience the difference firsthand.


 HitPaw Photo Object Remover
 HitPaw Video Object Remover
 HitPaw VikPea (Video Enhancer)


Share this article:
Select the product rating:
Daniel Walker
Editor-in-Chief
My passion lies in bridging the gap between cutting-edge technology and everyday creativity. With years of hands-on experience, I create content that not only informs but inspires our audience to embrace digital tools confidently.
View all ArticlesLeave a Comment
Create your review for HitPaw articles