How to Compress Video for YouTube without Losing Quality?
Compressing video files is necessary for hosting and uploading. If you squeeze the video files with quality loss, it will lead to more bandwidth use and buffering issues. When you compress videos, you need to ensure lossless compression. In this way, you can preserve the original data and quality. There are many popular YouTube video compressors available nowadays. You have to find the best-suited method to carry out your task. Let's explore the best compressors in 2023 to compress video for YouTube.

Part 1. Best YouTube Video Compressor in 2023
HitPaw Univd (HitPaw Video Converter) is the most suitable compressor to compress YouTube videos without losing quality. It effectively unifies the formats and improves the efficiency of your video compressing tasks. The Video Compressor feature has AI algorithms that ensure high functionality while compressing videos for YouTube, Facebook, Email, etc.
Key Features of Hitpaw Video Compressor
- Resize the file with different compression level. You can choose from Original*100%, Original*50%, Original 25%.
- You can compress videos with just one click up to 100G without losing quality.
- HitPaw Video Compressor supports over 1000 video formats, including MP4, AVI, MOV, AVI, etc.
- Batch compress videos to save time
- Real-time preview for exact compression
- Compress videos for social media sharing, discord sharing, sending emails, and storage liberation
- Available on both Windows and Mac systems
How to Compress Video for YouTube Step by Step?
This will help you use the HitPaw Video Compressor to compress videos for YouTube without losing quality.
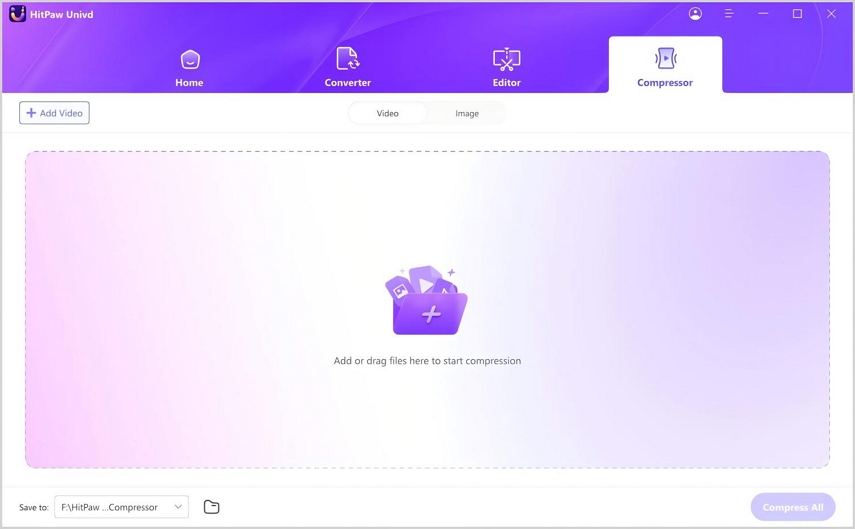
Step 1:Start with installing the HitPaw Univd on your computer. Choose the Video Compressor feature from the Toolbox.

Step 2:Then, add video(s) to the program. You will find the "Add Video" option on the Video tab to import videos.

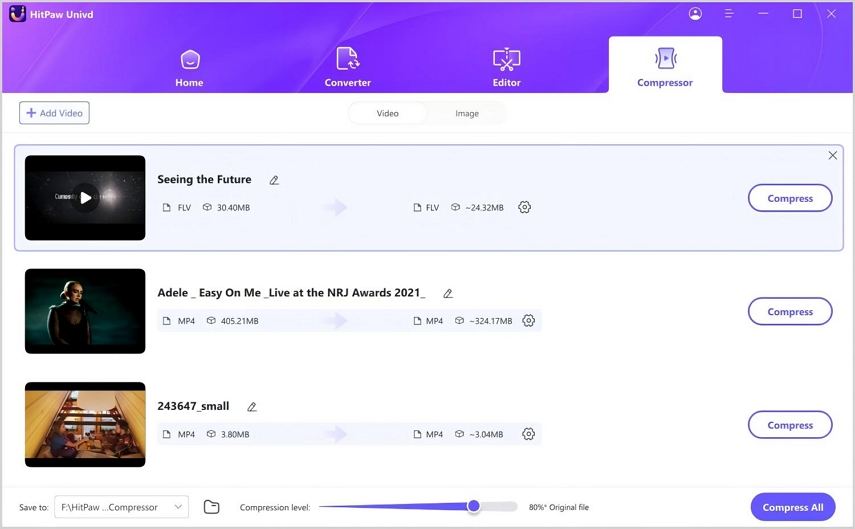
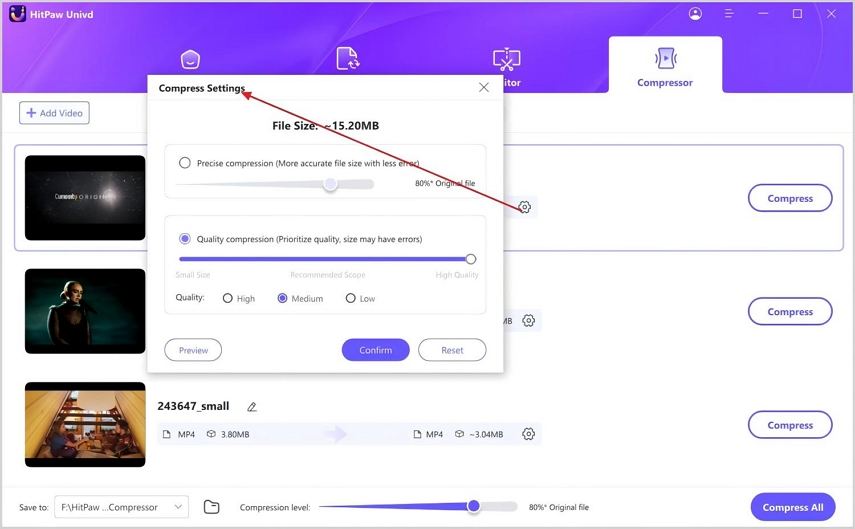
Step 3:Now click on the gear icon on a file to choose the appropriate compression level and quality you need for the file. You will find "Original" and "MP4" options in the format list.
There is a "Preview" button in the tab. Click on this option to preview the compression effects.
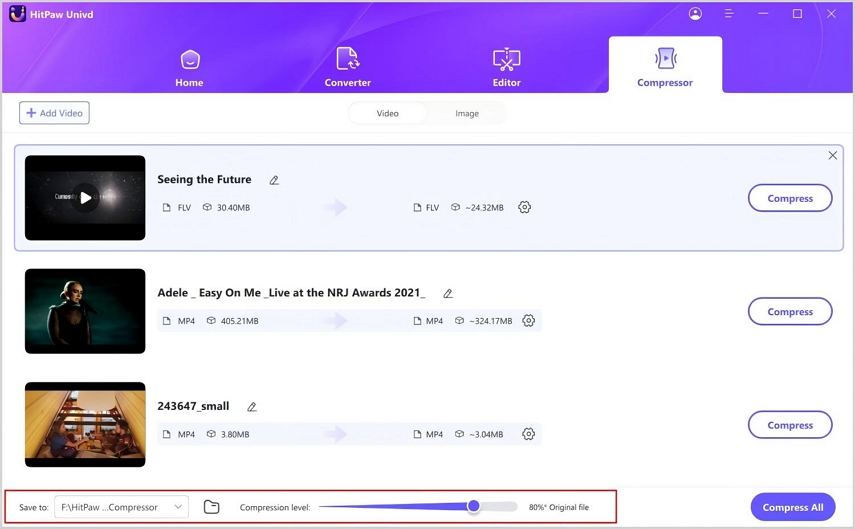
Step 4:If you choose a compression level from the bottom left, it will be applied to all the files in the list. We recommend the medium compression level. You can check the size of the video before and after compression in the file list.

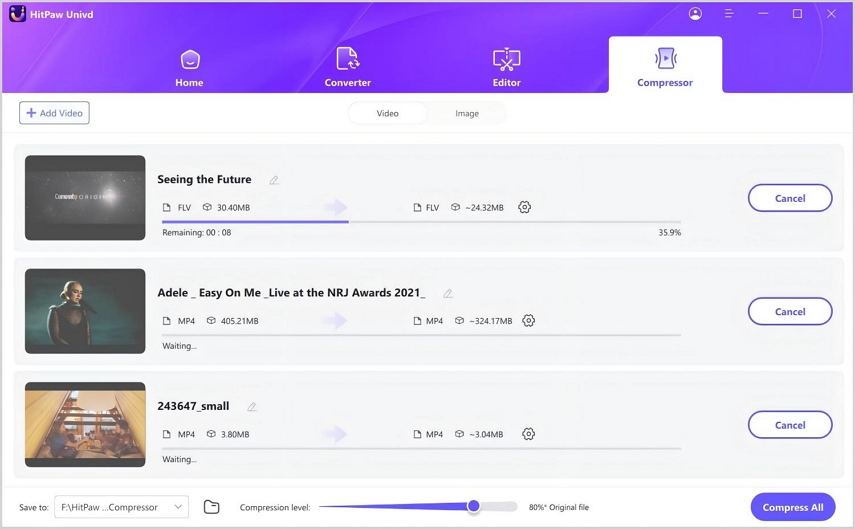
Step 5:Now, you have come to the last step of YouTube video compression. Just click on the Compress button to start compressing the target file. Also, you can click the Compress All option to compress all files at the same time. You will find the compressed video in the output folder when compression is done.

Part 2. Compress Video for YouTube using Handbrake
HandBrake is a popular open-source software with a wide range of basic and advanced tools. This easy-to-use interface helps the users get quick results for different platforms. This compressor will satisfy your demand for compressing video files.
Pros
- HandBrake is a free and open-source program.
- There are numerous YouTube video compression presets.
- There are many advanced parameters for the users.
Cons
- The interface might be a little complex for beginners to understand.
- HandBrake's preview function is not convenient enough for youtube compression.
- HandBrake is set to compress the MP4 files with .m4v extensions by default settings. You need to change it to a .mp4 extension manually.
How to Use HandBrake for YouTube Video Compression
- First, visit the HandBrake website on your browser and install the application on your system (Win, Mac, Linux).
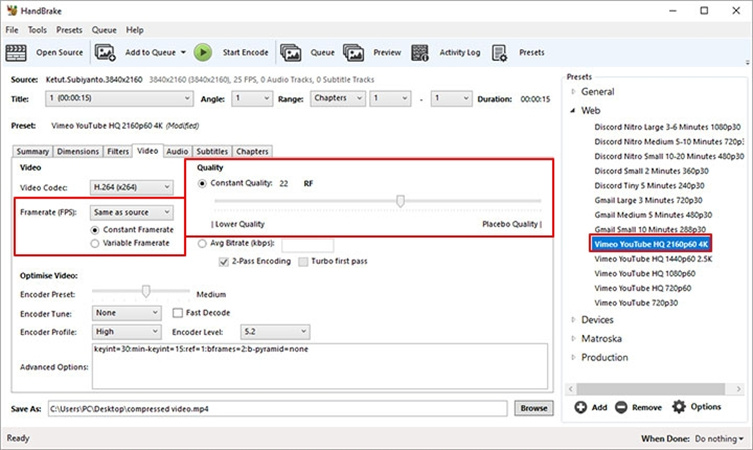
- After opening the HandBrake app, click on the Source button to load your video file. You can also select drag and drop the file into the program.
- Then, select a preset for YouTube from in the Presets section.
- Now set Framerate (FPS) as “Same as source” in the Video tab and then choose Constant Framerate.
- Adjust quality by dragging the RF slider.
- Then, set the file name and click on the Save As button.
- Finally, click on the green Start Encode icon to start compressing video for YouTube.
Part 3. Compress Video for YouTube using VLC
VLC Media Player is another great tool that works as a YouTube video compressor. It is a free and open-source video compressor with a broad range of video compression methods and file formats. You can use this platform to reduce your video file size without compromising the video quality.
Pros
- VLC supports video compressing in Windows, Mac, and Linux.
- VLC is a free video compressing tool.
- The interface of the VLC media player is convenient for new users.
Cons
- VLC Media Player does not offer unlimited video compressing features.
- VLC Media Player does not show the estimated file size.
How to Compress Video for YouTube with VLC
- First, download and install VLC Media Player on your computer.
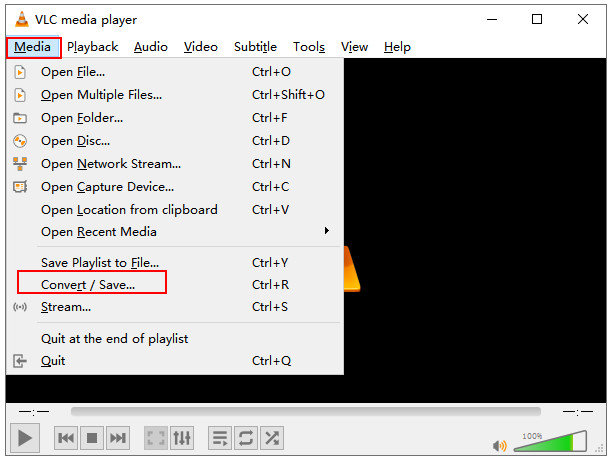
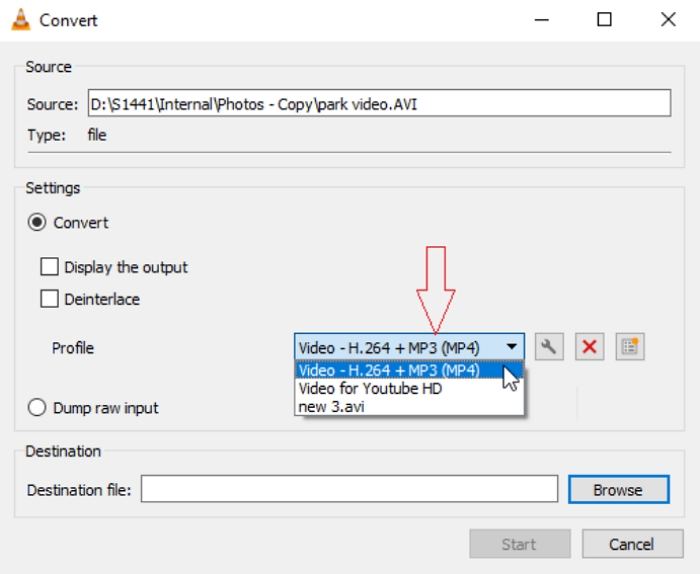
Then open the software and click on Media > Convert/Save at the top left corner.

- After that, click on the Add option to select your desired video file.
Select a profile and adjust the compression settings in the new window that appears. We recommend the H.264 + MP3 (MP4) parameter for YouTube.

- Lastly, select the destination file and click on the Start button to start video compressing.
Part 4. YouTube Video Compression Online
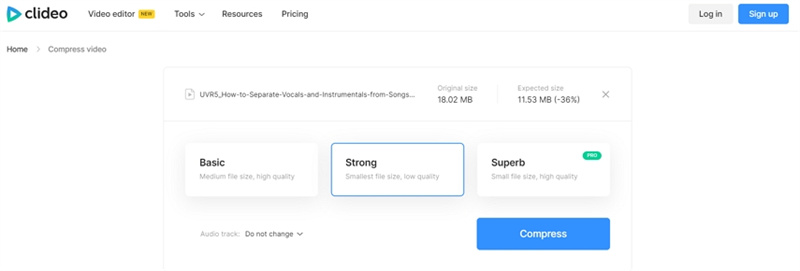
The greatest advantage of online video compression is you do not need to go through the hassle of downloading any software on your device. Clideo is such a popular online video compressing method. The users love it for its elegant interface and simple subscription service. Also, it works with popular formats like MP4, WMV, MOV, VOB, AVI, and many more. You will not be disappointed with Clideo's features for online video compression tasks.
Pros
- It's a very simple subscription option. Monthly payment plan- $9 or approx. £8 / AU$14 and the yearly payment plan- $72 or approx. £60 / AU$109.
- Easy to use interface.
- More than 20 tools are available for use.
- No tier plans.
Cons
- It is a hassle to upload media.
- There are not many editing tools available in Clideo.
- The downloading process is slow.
- The free version restricts uploading files smaller than 500MB. Also, the export will be watermarked. You need to get a paid subscription to remove all restrictions.
- Rendering simple color effects takes a lot of time.
The Bottom Line
Hopefully, the above-discussed YouTube video compression methods will come in handy for your work. Follow the provided guidelines to compress YouTube videos without losing the video quality. Just keep in mind that a proper method of video compression will save you storage and associated costs. HitPaw Video Compressor provides a fast and batch compression solution for videos. You can compress videos to different size in order to share on YouTube, Twitter, Facebook, Discord, and any other platforms.



 HitPaw Edimakor
 HitPaw Watermark Remover
  HitPaw VikPea (Video Enhancer)



Share this article:
Select the product rating:
Daniel Walker
Editor-in-Chief
My passion lies in bridging the gap between cutting-edge technology and everyday creativity. With years of hands-on experience, I create content that not only informs but inspires our audience to embrace digital tools confidently.
View all ArticlesLeave a Comment
Create your review for HitPaw articles