The Guide on How to Change Aspect Ratio in Final Cut Pro
Aspect ratio is a crucial aspect of video editing, shaping how your content is displayed across various screens and platforms. Whether you're crafting a cinematic masterpiece or creating social media videos, adjusting aspect ratios is a must-have skill. Final Cut Pro, a premier editing tool, allows users to fine-tune aspect ratios to meet specific needs.
However, the process can seem daunting for beginners. This guide simplifies the steps to change aspect ratio in Final Cut Pro and introduces a user-friendly alternative for creators of all levels.
Part 1: What is the Common Aspect Ratio of A Video?
Before diving into the process, let's understand some commonly used aspect ratios in the video industry:
- 16:9 (Widescreen): Ideal for HDTV, Widescreen SDTV, YouTube, and smartphones (Horizontal).
- 4:3 (Standard): Often used for SDTV, Video computer displays, older videos, or square-like formats.
- 3:2: Best for 35mm film, DSLR cameras, and smartphones.
- 21:9 (Cinematic): Common in films and high-end productions.
- 9:16 (Vertical): Perfect for vertical videos such as Instagram Reels, TikTok, and similar platforms.
- 1:1 (Square): Popular on Instagram and Facebook.
Different projects demand different aspect ratios, and Final Cut Pro offers a streamlined way to modify them.
Part 2: How to Change Aspect Ratio in Final Cut
Final Cut Pro is a comprehensive, professional editing software that comes up with versatile aspect ratio options, allowing users to customize video dimensions with precision. From preset options like 16:9 and 9:16 to manual input for unique ratios, it supports various creative needs. Its advanced tools, like scaling and repositioning, also ensure your content fits perfectly across platforms, enhancing visual storytelling. While it's powerful, it requires a few technical steps. So, follow this guide to change aspect ratios in Final Cut Pro.
Step 1. Install Final Cut
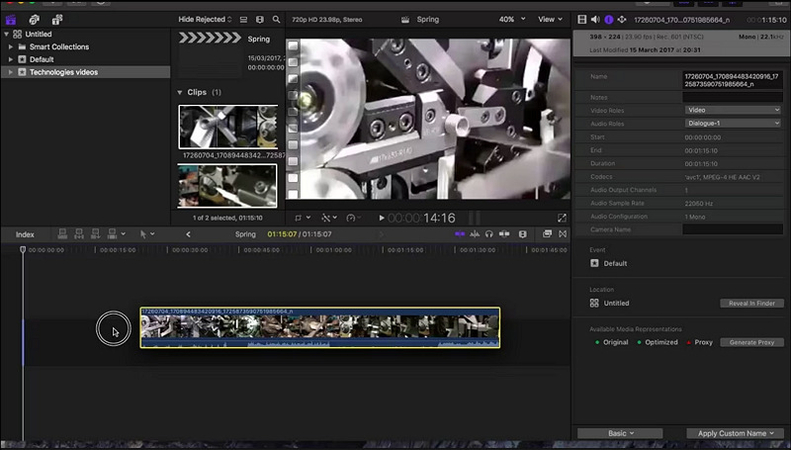
If you haven't already, download and install Final Cut Pro on your system. Now, create a new project and upload the video that requires resizing. Place the video on the timeline and move the pointer to adjust the aspect ratio.
Step 2. Modify the Values of Your Project
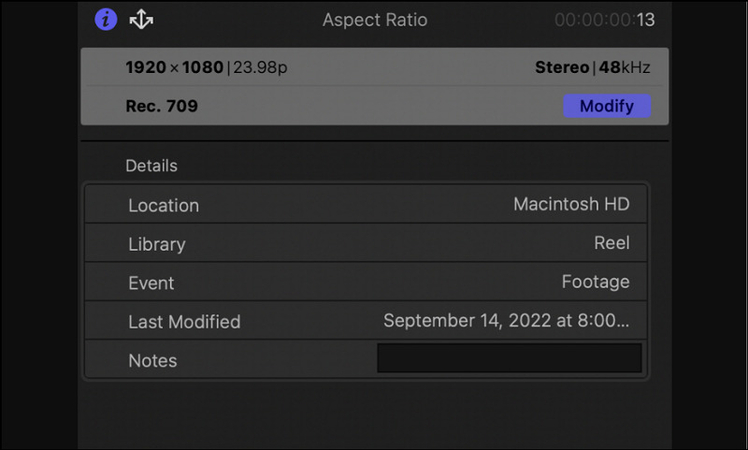
Next, you will find the property window from the top right of the screen. Press the "Modify" button to change the aspect ratio.
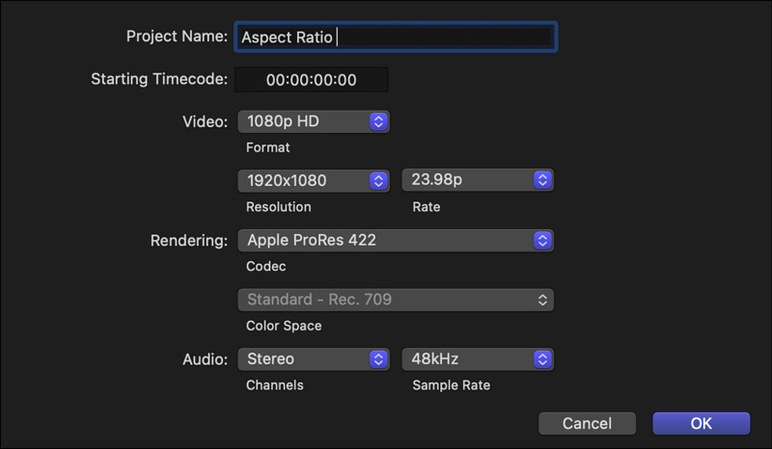
In the pop-up format, you can select the desired format and adjust the resolutions as desired. To convert the shape to "16:9," type the values like 1920 and 1080. For a square, you can enter 1080 and 1080. Also, select the frame rate and other settings. Then, hit "OK."
Step 3. Adjust Your Footage
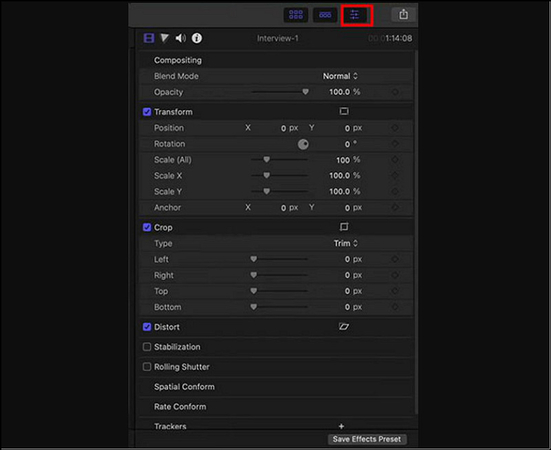
After setting the new aspect ratio, your footage might need scaling or repositioning. Click the "Adjustment" icon from the top-right side. Checkmark the "Transform" and "Crop" tools to resize or reposition the video to fit the new frame.
Step 4. Export the Video
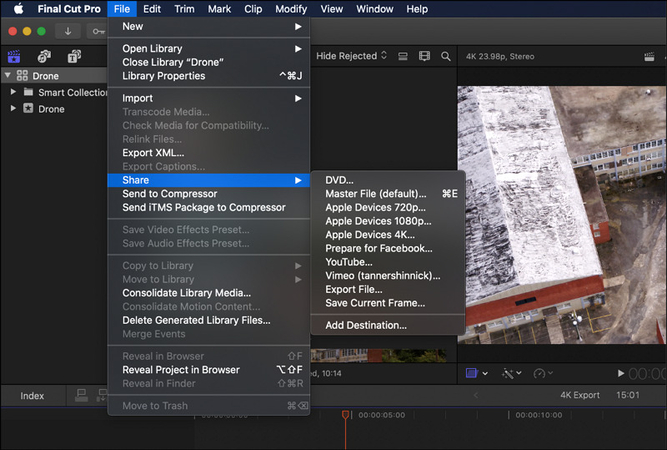
Lastly, go to "File," choose "Share"> "Export File." Now, select your preferred format and ensure the aspect ratio is applied. Save your video, and it's ready for use!
Part 3: Best Final Cut Alternative to Change Aspect Ratio
Whether you want to change the aspect ratio on Mac or simplify the process as a beginner, try HitPaw Univd (HitPaw Video Converter). This intuitive software has a range of editing tools, including the Auto Reframe feature. It not only allows choosing the desired preset but also lets you pick up the aspect ratio for different social platform options, such as Instagram, Facebook, and YouTube. You can even preview the video before exporting with its built-in media player.
Main Features:
- Offer 120x faster hardware acceleration
- Provide an intuitive interface for changing aspect ratio
- Crop and change aspect ratio with presets and customization
- Change video aspect ratio in batch to save time and effort
- No video quality loss while changing the aspect ratio
Steps for Changing Aspect Ratio using HitPaw Univd:
Step 1. Choose Auto Reframe FeatureThe first step is to launch the software and go to the "Edit" section. Now, select the "Auto Reframe" feature.

Step 2. Import Your Video
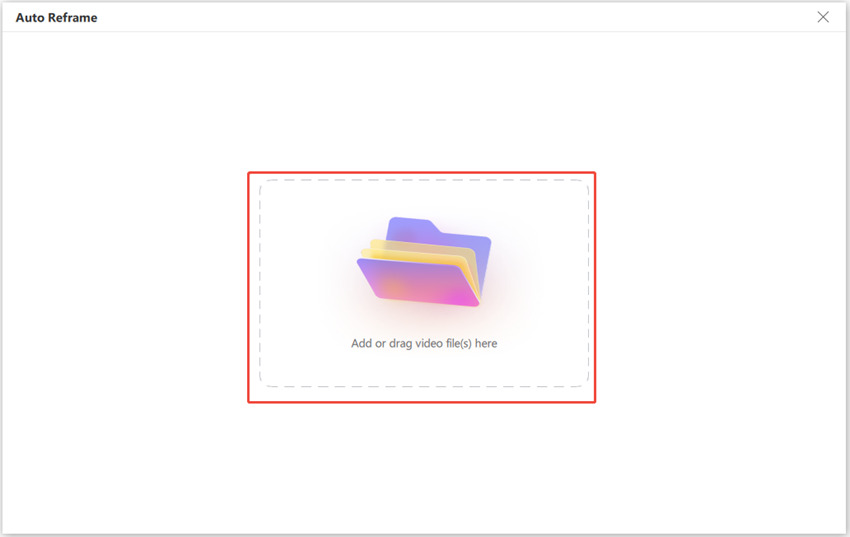
When the new window opens up, you have to click to browse and import your video file.
Step 3. Select the Aspect Ratio
Next, select the desired preset from the side column. You can either choose any option or select YouTube, Facebook, or Instagram.

Step 4. Export the Final Video
Lastly, choose the destination folder and then press the "Export" button to save the video. That's all!

Pros
- Suitable for beginners
- High conversion speed
- Support Versatile formats
Cons
- Limited features in the free version
Part 4: FAQs about Changing Aspect Ratio Final Cut
Q1. Can I use Final Cut Pro change aspect ratio?
A1. Yes, Final Cut Pro allows you to change aspect ratios using its project settings. However, manual adjustments like scaling may be required. Plus, it is only available on Apple devices and operating systems.
Q2. Why can't I change aspect ratio in Final Cut Pro?
A2. It's because you might be working in individual clip settings instead of the Project Property section. If you are still encountering problems, try restarting the software and updating it.
Conclusion
Mastering aspect ratio adjustments is essential for delivering videos tailored to specific platforms and audiences. With the above steps, you can easily change aspect ratio in Final Cut on Mac. However, if you want to achieve the perfect dimensions effortlessly, irrespective of the platform, try the HitPaw Univd. Its intuitive features ensure you can adjust the aspect ratio according to the required social platform. Try this software now to simplify your workflow and bring your creative visions to life!


 HitPaw Edimakor
 HitPaw VikPea (Video Enhancer)
 HitPaw FotorPea


Share this article:
Select the product rating:
Daniel Walker
Editor-in-Chief
My passion lies in bridging the gap between cutting-edge technology and everyday creativity. With years of hands-on experience, I create content that not only informs but inspires our audience to embrace digital tools confidently.
View all ArticlesLeave a Comment
Create your review for HitPaw articles