How to Accept a Shared Album - A Detailed Guide
We all love to document and create memories with our friends and family members through videos and photos on our iPhone devices. However, you would be wondering about the benefit of the memories when you're confined to your iOS device.
This is where iCloud shared albums feature comes in handy. You have the ability to cooperate in real time with your loved ones by sharing films and photographs through the Shared album. Upon creating the shared album, a lot of users often want to know how to accept a shared album as this phase could be a bit confusing for the various iPhone users. Luckily, this post reveals the step by step guide to help you know how to accept a shared album on iPhone.
Part 1: How to Create Shared Albums?
Before learning how to accept a shared album invite, it is compulsory to create the shared albums in the first place.
Creating the shared albums on the iOS device doesn't ask you to get any prior knowledge as only following a few simple steps will be enough to help you to create the shared albums.
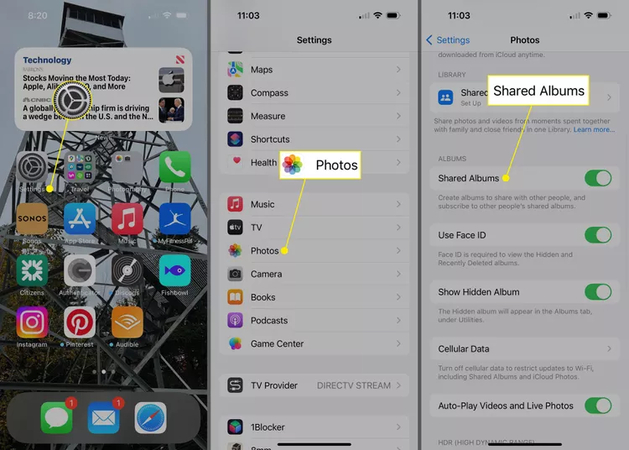
Step 1: After marching into the Albums section on the iOS device, you'll need to select the ''Add'' button afterwards.
Step 2: Enter the name of the shared album and choose the Next button afterwards. Choose the contacts you want to invite, then provide an iMessage phone number or email address. Upon hitting the Create button you'll be able to create the shared album on the iOS device.
Part 2: How to Accept a Shared Album on iPhone?
After creating the shared albums, now it's time to know how to accept a shared album invitation. Despite this process being simple to manage, a lot of users find it difficult to accept the invite to the shared albums.
Thus if you're interested in knowing how to accept an invitation to a shared album, you can look at the guide listed below to accept the shared album invite on the iOS device.
Step 1: Once the shared album's owner sends the invite of the shared album, it will appear in the Notification Center or on your iOS device screen. If you don't see the notification there, you'll need to hit the Photos app button afterwards.
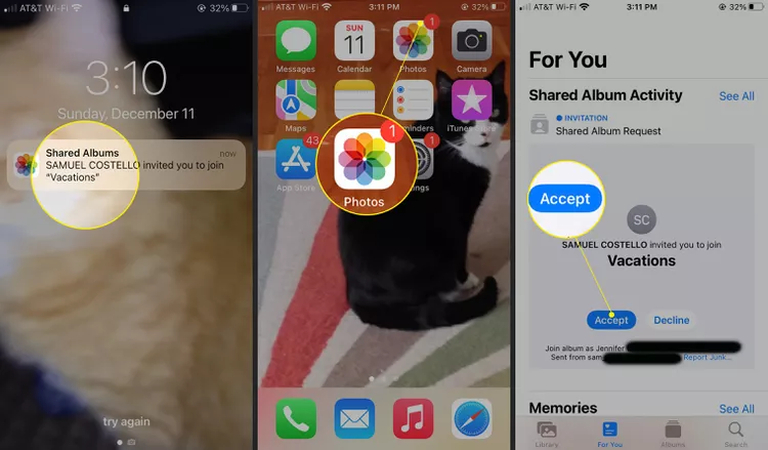
Step 2: Click on the For You button to proceed ahead. Now, you can see the shared album invitation appearing on the screen. You can then join the album by hitting the Accept button.
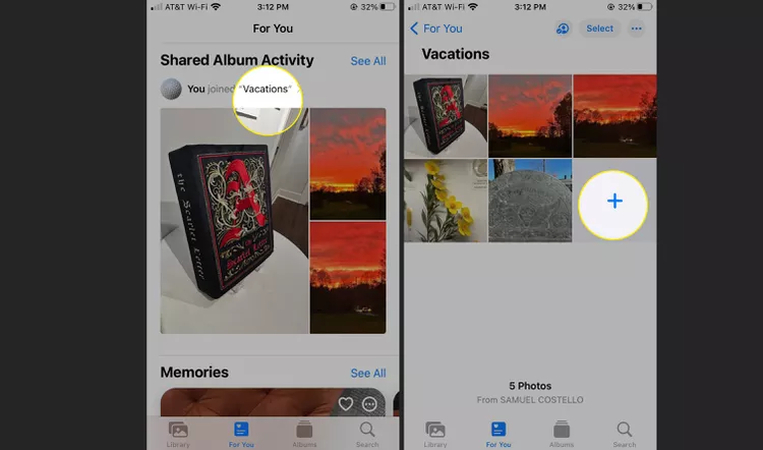
Step 3: Now, you can see the shared album added to the screen's top side. Click on the album's name to see its photos. This way you'll be able to see the album's photo on the screen. Depending upon the album's setting, you'll need to add the photos by hitting the + (Plus) sign.
Part 3: Bonus tips. Download Albums to Share Music Files Without Limits
Since Spotify does not let you download music files as local files, if you enjoy listening to music on the platform and have made Spotify albums, you will not be able to share the albums with your friends. Luckily, HitPaw Univd (HitPaw Video Converter) provides you with an opportunity to download the Spotify music files for offline listening allowing you to get the Spotify files as local files.
It tends to maintain the quality of sound and also maintains the original ID3 tags and meta information and downloading the multiple Spotify music files is also possible.
Main Feature of HitPaw Univd
- Download the Spotify albums quickly
- Prompts the simple user interface
- Download Spotify music in lossless quality
- Compatible with the multiple audio formats
- Supports the Mac and Windows
- Allows you to download multiple Spotify albums simultaneously
How to download Spotify albums with HitPaw Univd?
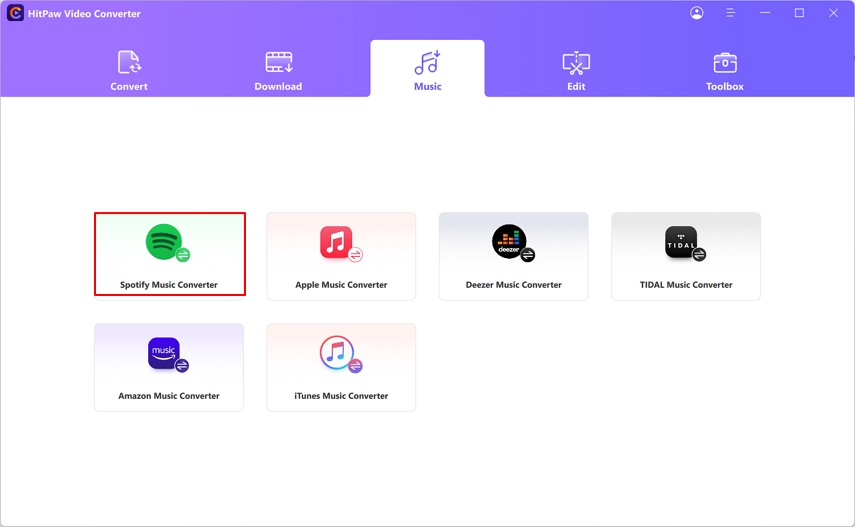
Step 1: Click Spotify Music Converter
Navigate to the HitPaw Univd's official timeline and tap the Download button to get the software downloaded on the computer. The next step is to install the tool, start the software, select the Toolbox option, and then use the Spotify music converter.
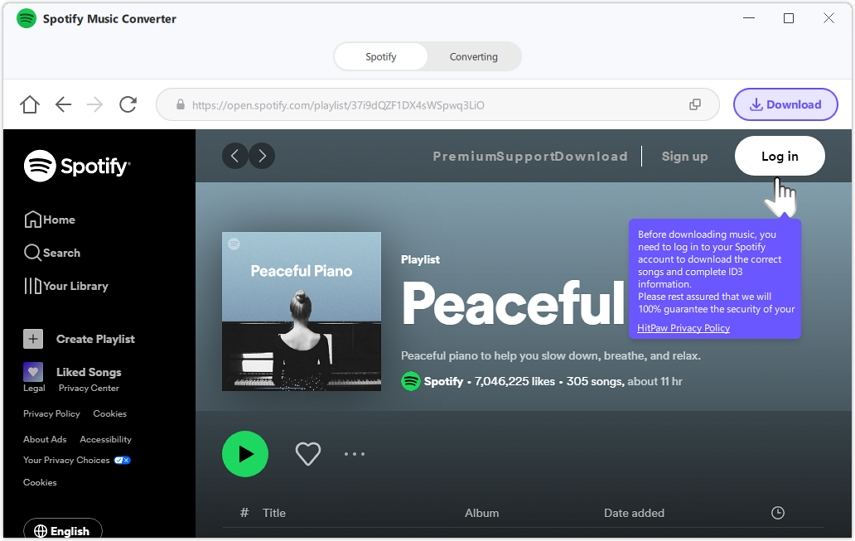
Step 2: Enter Spotify account credentials
To access the Spotify albums and songs, you'll need to input the Spotify account credentials there.
Step 3: Choose the Appropriate Spotify albums
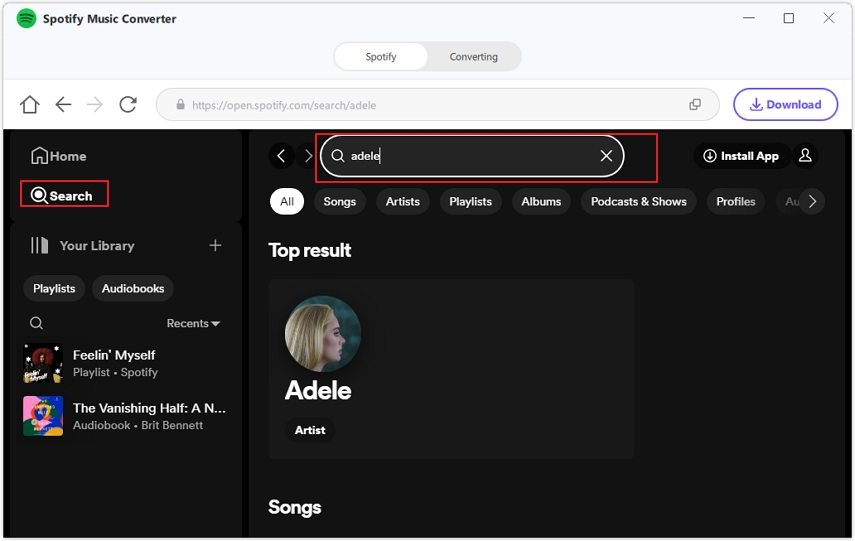
In this phase, you'll need to select the type of music files you wish to download and hit the Download button afterwards.
Step 4: Preview the Spotify music files
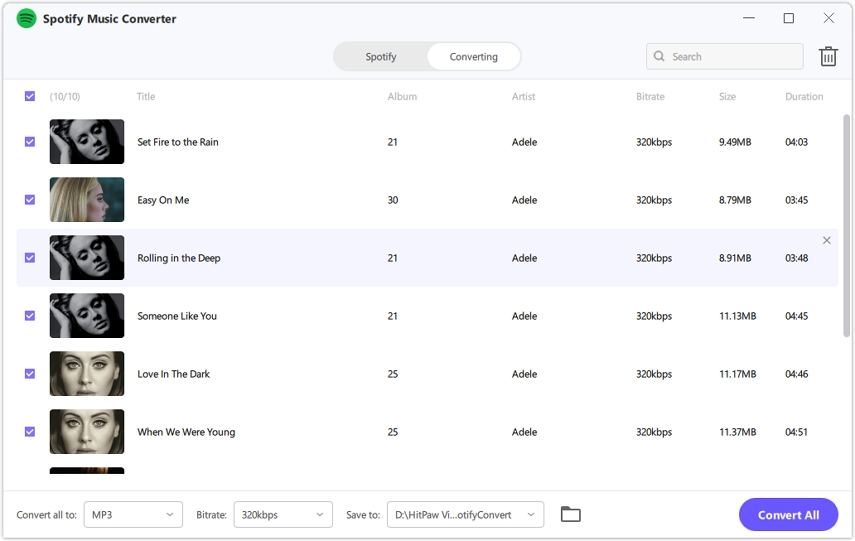
In this phase, you'll need to let the HitPaw Univd to start analyzing for the URL address of the Spotify music files you've pasted.
Step 5: Select Audio Format
HitPaw Univd is compatible with the number of audio formats as you can hit the Convert All to button to select the appropriate output audio format.

Step 6: Press Convert All
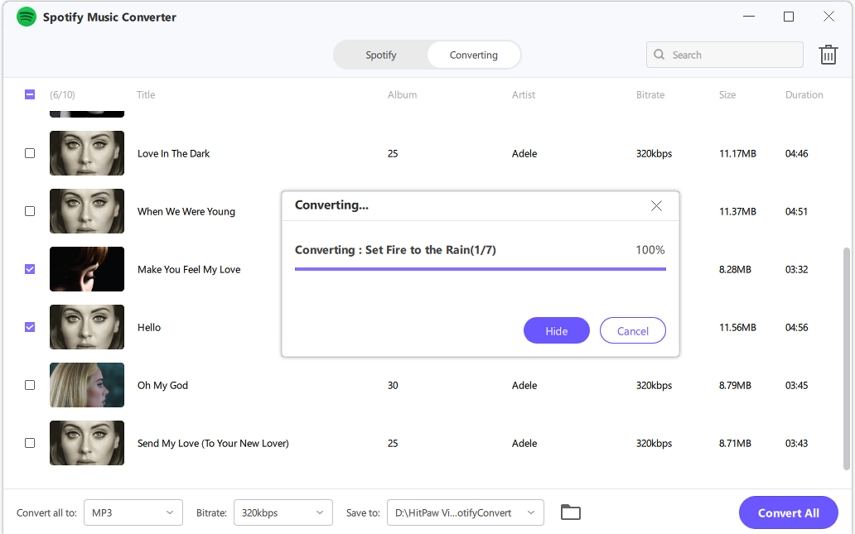
In this phase you'll need to press the Convert All button to initiate turning the Spotify music files into the WAV, M4A or MP3 audio files.
Part 4: FAQs about a Shared Album
Q1. Why can't my friend join the shared album?
A1.
If the friend you're trying to send the invitation to the shared album can't join the shared album, it could be due to various reasons. For instance, an incorrect phone and an incorrect email could cause the whole chaos if your friend didn't receive the invitation.
Joining the shared albums won't be possible. If you haven't enabled the iCloud photo sharing on the iCloud or have been using outdated software, it might also become the main culprit behind the issue you're currently dealing with.
Q2. Why isn't the shared album updating?
A2.
If you're unable to update the shared album, it could be due to the following factors. You'll need to ensure that you and your friends and members must have a stable internet connection as you won't be able to update the albums if either party has a weak internet connection.
If the iCloud isn't synced appropriately, it also becomes the main culprit behind the shared albums not getting updated. You won't be able to make the syncing work if the iCloud storage is full on the iOS device.
Q3. Do I need iCloud storage for a shared album?
A3. Despite being a component of the iCloud photo sharing feature, shared albums are not counted against the storage capacity. Each shared album holds the ability to store 5000 videos or photos but the storage consumed by the shared albums is different from the allocation of the iCloud storage. However, if you're relying on the iCloud photos for the personal photo library, it could count towards the iCloud storage.
Conclusion
You don't need to put in any extra effort to accept a shared album as only following a few simple steps will be enough to help you learn how to accept a shared album. Apart from enabling you to create the shared albums, we've listed a detailed guide to help you to accept the shared albums on iPhone.
Downloading the albums to share the music files has also become effortless courtesy of the HitPaw Univd. With this tool, you've got the chance to download the Spotify music files without affecting the quality of the audio, retaining the metadata information and ID3 tags.


 HitPaw Edimakor
 HitPaw FotorPea
 HitPaw VoicePea


Share this article:
Select the product rating:
Daniel Walker
Editor-in-Chief
My passion lies in bridging the gap between cutting-edge technology and everyday creativity. With years of hands-on experience, I create content that not only informs but inspires our audience to embrace digital tools confidently.
View all ArticlesLeave a Comment
Create your review for HitPaw articles