How to Cut Music in GarageBand
GarageBand was launched in 2004. That makes it a two-decade-old software. During this time, GarageBand has undergone several updates and upgrades. Many of its features have undergone tremendous changes over the years. So, if you're trying to cut music on the GarageBand version, you may need some help. Don't worry; we've created this guide for just this purpose - to help you cut music in GarageBand with ease. We'll take you through the process step-by-step so you can do it easily.
Part 1: How to Edit and Cut Music in GarageBand
1. How to Split a Track in GarageBand
- Step 1: Select the Track
- Step 2: Set the Split Point
- Step 3: Split the Track
Click on the track you wish to split
Use the playhead (vertical slider on the track) to choose the exact point where you wish to split the track
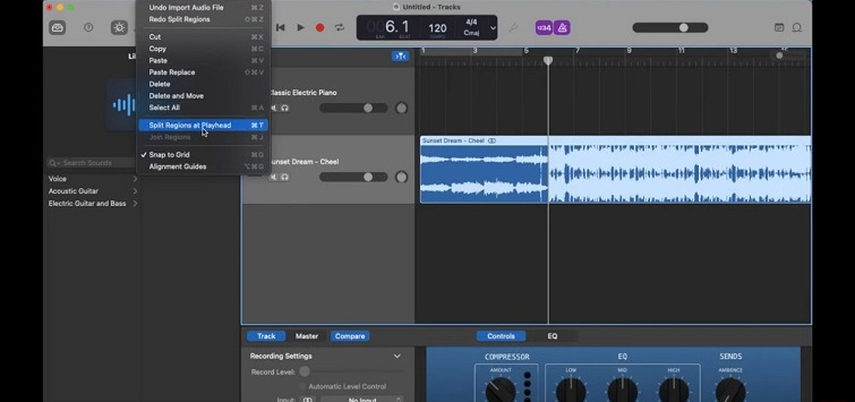
Click "Edit" in Main Menu >> Hit "Split Regions at Playhead"
Alternatively, you can use the "Command + T" shortcut to split the selected region.
2. Trimming Audio Segments in GarageBand
- Step 1: Select the Region
- Step 2: Activate the Trim Tool
- Step 3: Grab and Drag
Click on the track or region that you'd like to trim
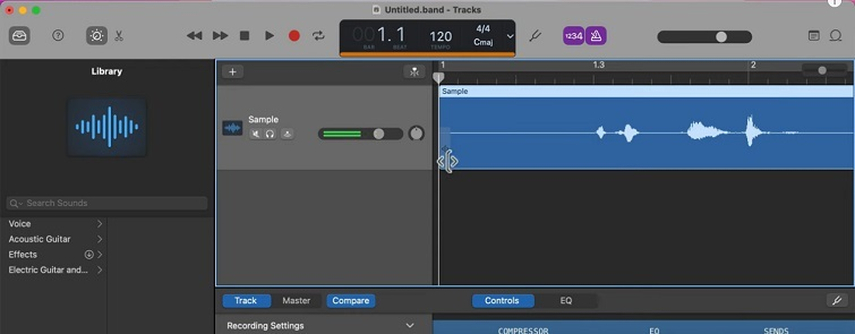
Hover your cursor over the left or right end of the selected region, depending on whether you need to trim the audio's beginning or end respectively. This activates and makes visible the trim tool
Grab the trim tool and drag it to where you'd like to trim the track.
3. Deleting Unwanted Audio Sections in GarageBand
This is a 2-part process. First, you split the track. Then, you delete the unwanted section. Here's how you do it:
- Step 1: Select the Track
- Step 2: Set the Split Point
- Step 3: Split the Track
- Step 4: Delete
Click on the track you wish to split
Use the playhead (vertical slider on the track) to choose the exact point where you wish to split the track
Click "Edit" in Main Menu >> Hit "Split Regions at Playhead"
Alternatively, you can use the "Command + T" shortcut to split the track.
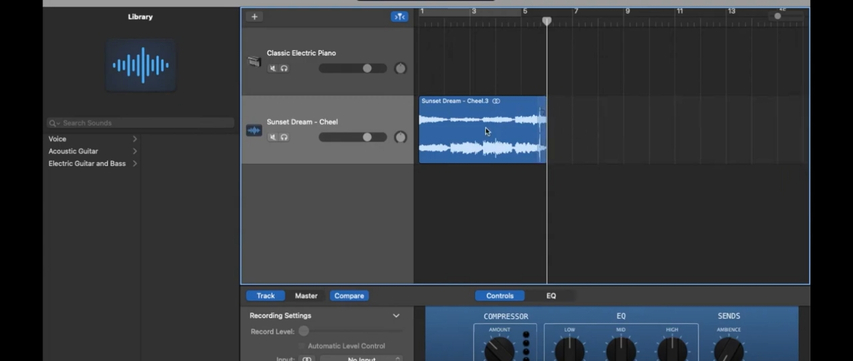
Once the track is split, select the unwanted segment and press "Delete"
4. Using the Fade-In/Fade-Out Effect in GarageBand
- Step 1: Set Track Parameter
- Step 2: Set the Fade-in Curve
Navigate to "Mix" in Main Menu >> Select "Show Automation" (shortcut: "A" button) >> When Track Parameter appears, set it to "Volume"
Adjust the yellow volume curve to start at zero and curve upwards to meet the rest of the track's normal volume level. So, the upward curve should eventually coincide with the normal height level of the rest of the track for the fade-in effect.
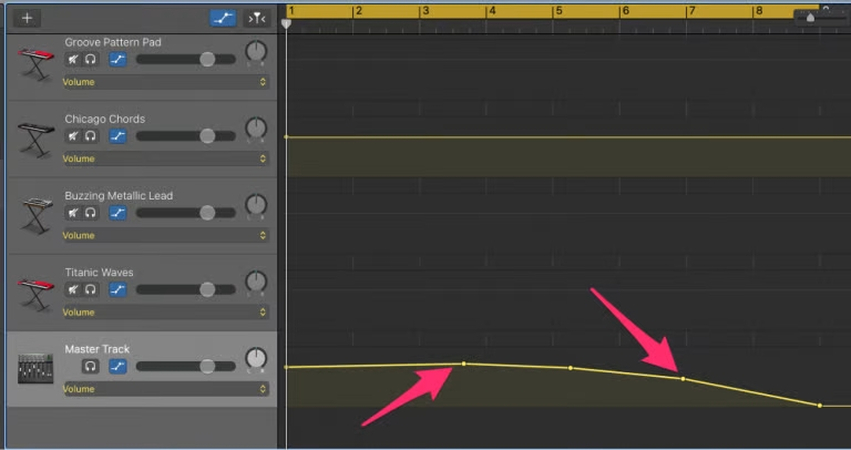
For the fade-out effect, follow the same steps, except that the yellow volume line should curve downwards until it hits zero.
5. Using Automation to Refine Cuts in GarageBand
- Step 1: Activate Automation
- Step 2: Select Effect
- Step 3: Refine
Hit the shortcut button "A" to activate Automation on GarageBand.
Alternatively, you can use the "Mix" option to activate it as follows: Navigate to "Mix" in the Main Menu >> Select "Show Automation"
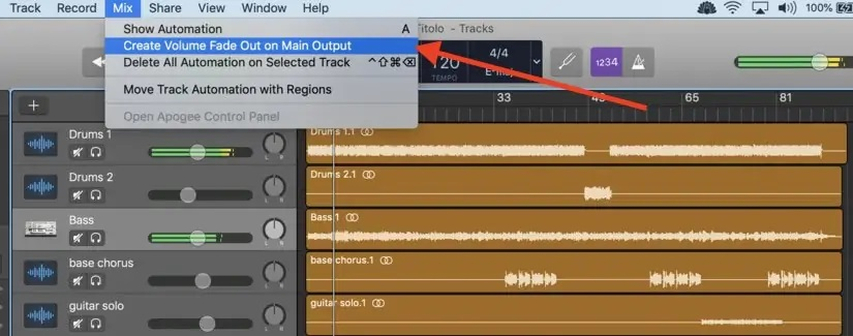
Use the dropdown menu to select the effect you'd like to refine: Volume, Pan, Echo, Reverb, etc.
Click the track you're refining, and a yellow line appears on the track. Drop automation points on the yellow line to mark the beginning and end of the effect by double-clicking the line.
These are the general steps for using automation. The steps must be customized for different effects, depending on the plugins installed on your GarageBand.
Part 2: Best Alternatives to GarageBand Cut and Edit Music Songs
GarageBand is easily one of the most feature-loaded audio editors in business. With each update, it only gets better too. However, all those features come at a cost - complexity. Using GarageBand to perform minor edits to your music can be painful. If you're just looking to make a quick edit, then HitPaw Univd (HitPaw Video Converter) is your best bet. This versatile software not only converts videos and audio but also provides robust editing tools to trim, split, and fine-tune your songs.
What Makes HitPaw the Best Alternative to Garageband
HitPaw Univd - All-in-one Video Solutions for Win & Mac
Secure Verified. 254,145 people have downloaded it.
- Provides an intuitive interface, making music editing easy for users without prior technical experience.
- Supports various audio formats, ensuring compatibility with most music files for seamless editing and conversion.
- Users can effortlessly trim and cut tracks, allowing for quick editing without complicated steps or tools.
- Offers fast processing speeds, letting you edit and export your music quickly and efficiently.
- Provides accurate audio editing features, preserving sound quality while making precise edits.
- No need for additional plugins or installations; the built-in editor provides everything you need for quick music editing.
Secure Verified. 254,145 people have downloaded it.
How to Edit and Cut Music Songs using HitPaw
- Step 1: Import Audio Files
- Step 2: Edit Audio
- Step 3: Export Edited Files
Download, install, and launch HitPaw Univd. Navigate to the "Edit" Tab >> Click "Add Files" >> Click "Add Audio" >> Use the popup window to select and import audio files to be edited.
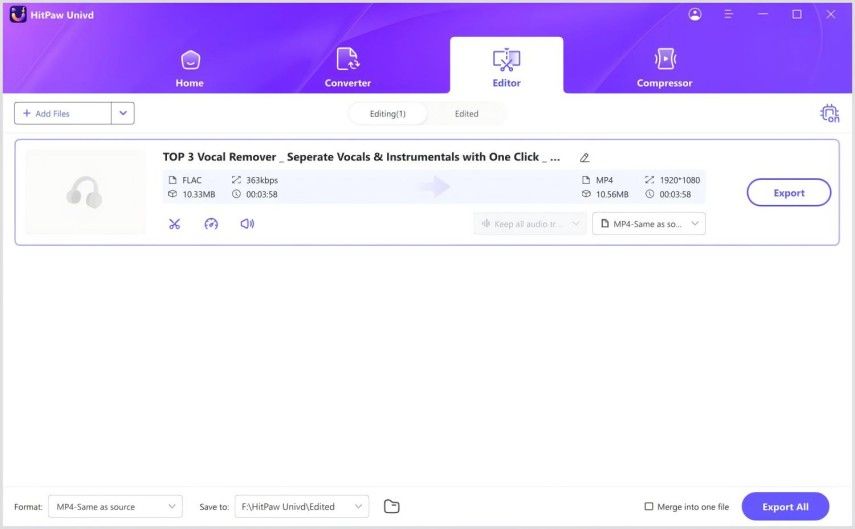
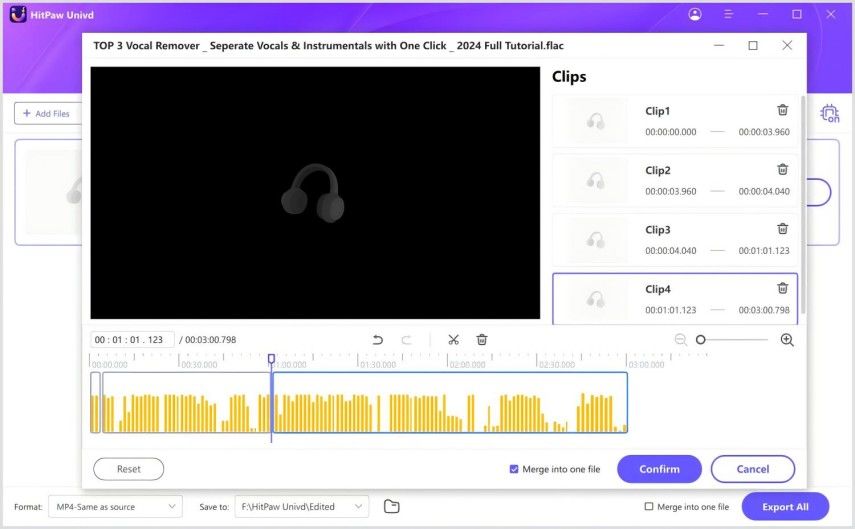
Click the "Cut" (scissors) button below each file in the imported list to start cutting the file >> Choose the Start point and End point of the audio while listening >> Click "Cut"
You also have the options to "Merge" and "Delete" each segment of the audio clip.
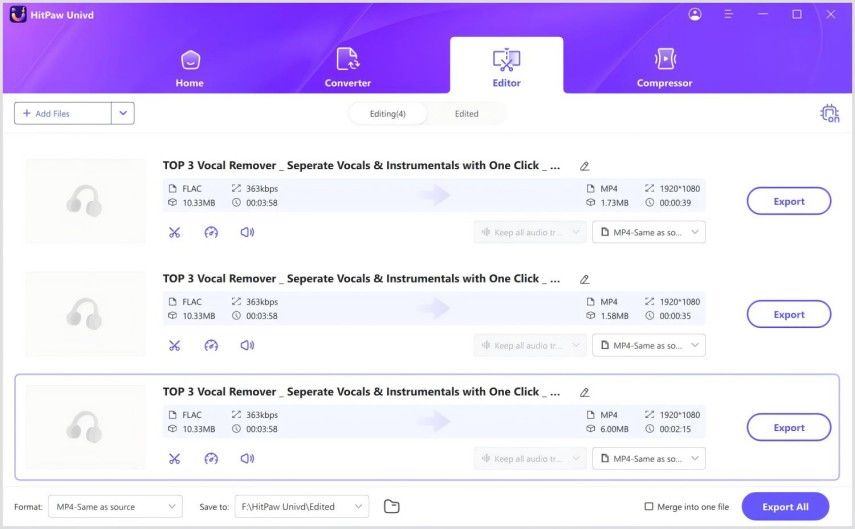
Click "Export" and all your split files will be exported as separate audio clips.
Part 3: Online Alternative to GarageBand Cut Audio
No time to install new software and learn its ways? Don't worry. HitPaw has got you covered. HitPaw Online Audio Cutter is designed just for this purpose. It lets you cut your audio files on the fly. HitPaw Online Audio Cutter can be accessed from any browser-compatible device. The best part? It even has some cool editing features like fade-in, fade-out, playback speed control, and so on. Here's how easy it is to use.
- Step 1: Upload Audios to HitPaw Online
- Step 2: Edit Audio Online
- Step 3: Export and Download
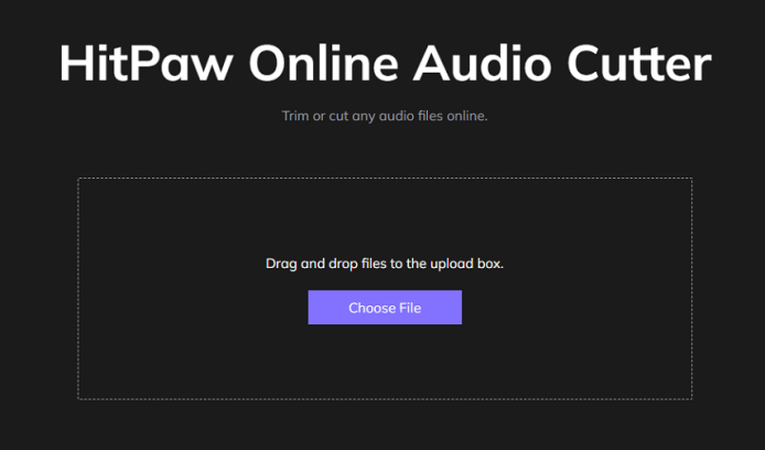
Drag and drop the audio file directly into the tool.
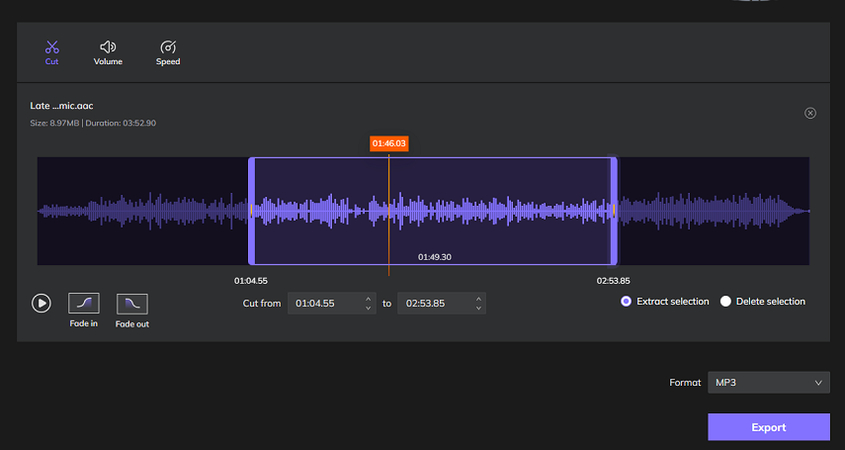
Click "Cut" to start cutting the audio file. You can also edit Volume and Speed of the playback
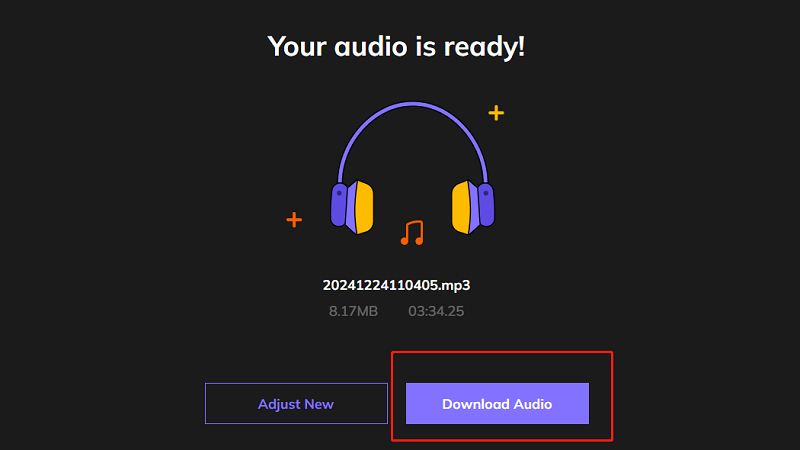
Once you're done editing, click "Export" and when the output is ready, click "Download"
FAQs about Cut and Edit Songs in GarageBand
Q1. How do I delete part of a song in GarageBand?
A1. Split the segment you wish to delete using the method described in this guide. Then select that part and press "Delete".
Q2. Where is the song section control in GarageBand?
A2. The song section control is located at the top right corner of the app. It's the "+" button.
Q3. What is shortcut cut in GarageBand?
A3. "Command + X" is the shortcut for "Cut" in GarageBand.
Q4. How to split a track in GarageBand iPhone?
A4. Once you've opened the project with the tracks you need to split, double-tap the track to highlight it, and then tap on it again. You'll be presented with the edit options menu. Tap "Split" and use the Scissors icon visible on the track to choose the split point. You can split the track at multiple points too.
Conclusion
Now you know how to use GarageBand to make basic edits like cut, split, fade-in, fade-out, etc. GarageBand is a powerful software that lets you edit your music and other audio projects in creative ways. However, when you need to cut your audio file quickly, HitPaw Univd is a more convenient option. It's faster, easier, and more convenient. Give it a try today.


 HitPaw VoicePea
  HitPaw VikPea (Video Enhancer)
 HitPaw FotorPea


Share this article:
Select the product rating:
Daniel Walker
Editor-in-Chief
My passion lies in bridging the gap between cutting-edge technology and everyday creativity. With years of hands-on experience, I create content that not only informs but inspires our audience to embrace digital tools confidently.
View all ArticlesLeave a Comment
Create your review for HitPaw articles