Step-by-Step Guide: How to Trim Audio in Audacity?
In the realm of audio editing, precision is paramount. While editing a podcast, a song, or a soundbite, you may need to remove unwanted sections like speech mistakes at the beginning or end. Here is when the ability to trim your audio accurately is essential. Audacity, a well-known open-source audio editing software, comes to the rescue.
Whether you're a novice or a pro, mastering the art of trimming in Audacity will take your audio projects to new heights. Let's explore how to trim audio in Audacity with a step-by-step approach to complete this task. Let's dive into their details.
How to Trim Audio in Audacity?
Audacity is widely used open-source software with a straightforward and customizable interface that helps you edit audio projects such as interviews, music production, podcasts, etc. You can easily select and remove unwanted sections from your recordings with precision. This feature allows for quick & efficient editing, making Audacity a go-to choice for anyone needing to trim audio files. Let's learn how to trim an audio file in Audacity:
Step 1. Import Your Audio File

After downloading and installing this software, open Audacity and import your audio file by tapping "File"> "Import"> "Audio." You can also select multiple files with Shift+Click buttons and tap "Open." The supported formats include FLAC, WAV, MP3, OGG, and AIFF.
Step 2. Select the Region to Trim
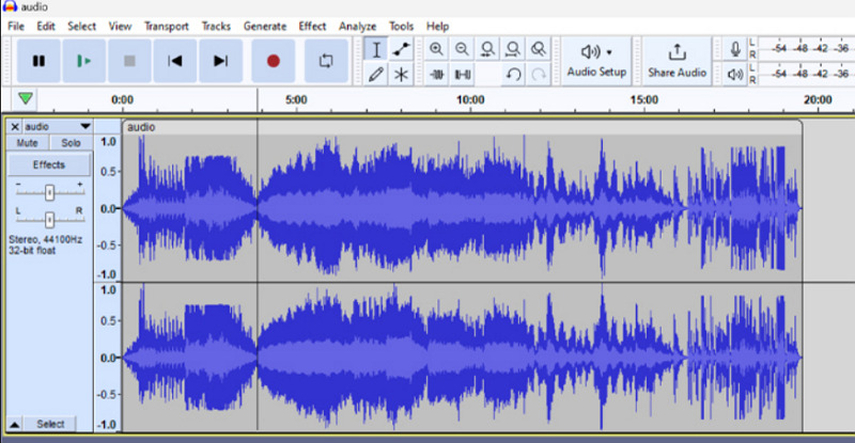
Tap the play icon to preview the tracks and locate the section of the audio you want to trim. Use the selection tool (hotkey: F1) to highlight the portion you wish to remove. Or press "Select" from the menu.
Step 3. Cut the Selected Region
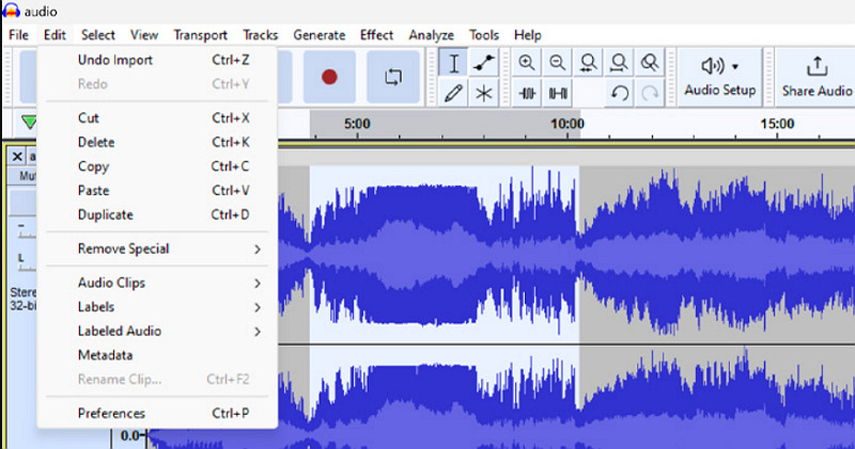
Once you've selected the region, press the "Delete" key on your keyboard to remove it. Alternatively, you can click on "Edit"> "Cut" from the menu bar.
Step 4. Trim the Beginning and End Simultaneously
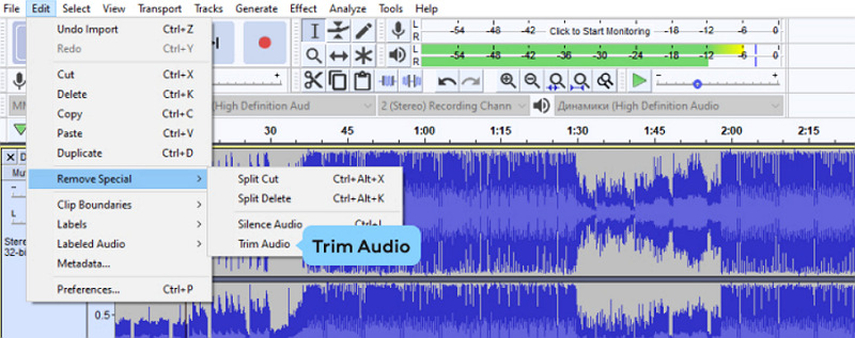
If you want to trim the beginning and end at once, use the "Selection Tool" to select the part you don't want to delete. Now, press "Edit"> "Remove Special"> "Trim Audio." Move the track to the beginning with the "Time Shift" tool, or drag it to the start.
Step 5. Export Your Trimmed Audio
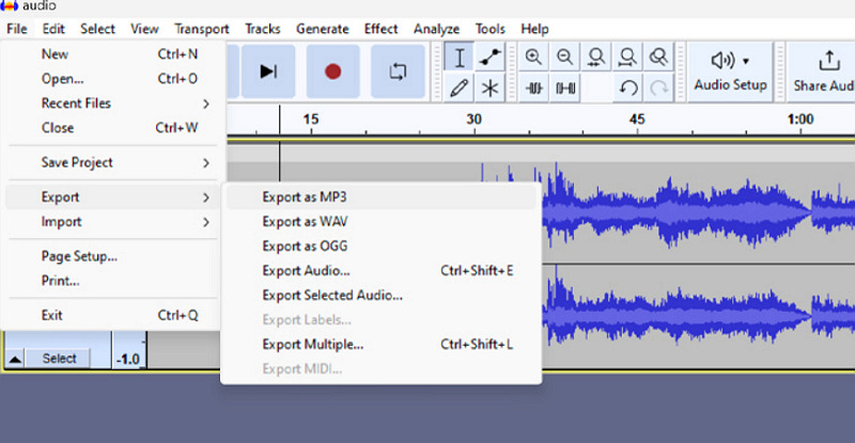
After trimming, it's time to rearrange all the clips and save your edited audio. Go to "File"> "Export"> "Export as MP3" (or your preferred format) and choose the destination folder for your file. You can also select the bitrate, quality, and channel mode. That's all!
Extra Tip: Change Your Voice in Real-Time for Better Audio Perfomance
Enhance your audio projects further by utilizing HitPaw AI Voice Changer. This innovative tool offers a seamless way to alter voice characteristics instantly, adding depth, humour, or intrigue to any audio project. You can explore a diverse range of voice effects, from robotic and alien-like tones to gender-swapping transformations.
Its intuitive interface and real-time preview feature ensure a hassle-free experience, allowing users to fine-tune their voice modulation settings on the fly. Whether for entertainment purposes or professional endeavours, this software is valuable for elevating audio performance and leaving a lasting impression on listeners.
Features:
- Offer various customizable options to personalize your voice
- Provide you with natural voice effects for real-time voice changing
- Compatible with almost all popular gaming & streaming platforms
- Remove background noise and echoes during voice modulation
- Help you change your voice from the pre-recorded audio/video files
Click Now & Check How to Change Your Voice in Real-Time
Step 1. Choose Input and Output
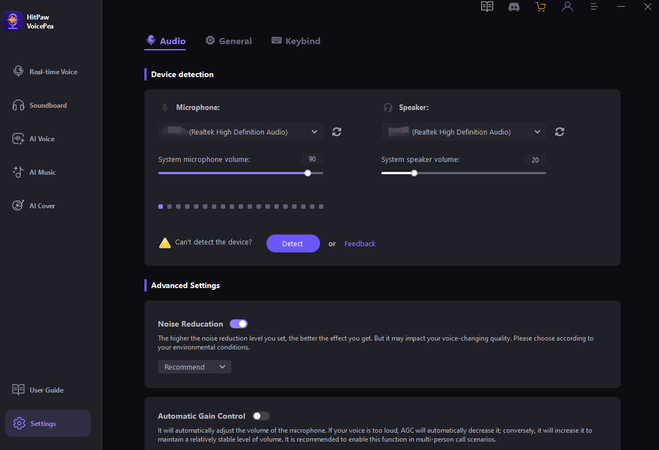
The first step involves launching HitPaw VoicePea and opening its "Settings." Now, expand the "Microphone" and "Speaker" drop-down menus and choose the input and output sources. For the manually connected sources, press the refresh icon. If the source doesn't appear, tap "Detect."
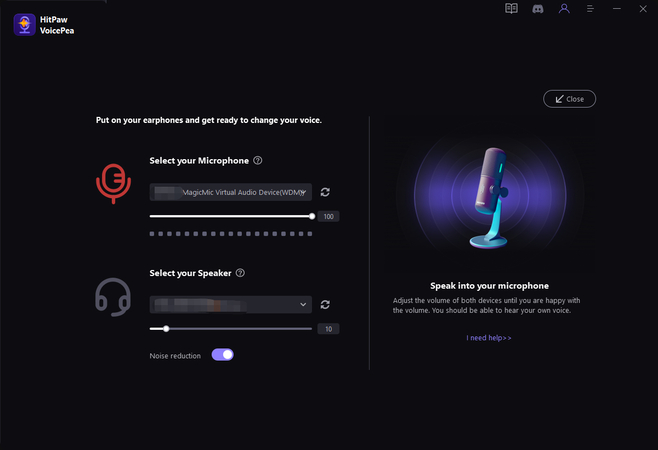
Once the "Choose your Microphone" and "Choose your Speaker" Window appears, check the colour of the icons. The green colour indicates that they are ready for normal use.
Step 2. Select Voice Effect

It's time to open the "Real-time Voice" effects section and explore the voice effects. Click the desired one to apply.
Step 3. Change Global Settings

Next, you must look at the bottom to enable or disable the "Switch voice changer" and "Hear myself" options. You can also change the volume for the voice changer, soundboard, and the system.
Step 4. Adjust Voice Settings

Lastly, hover your mouse on the cartoon avatar to adjust the "Pitch," "Timbre," and "Volume" levels using the given sliders. Start speaking in the chosen voice after integrating this software into the supported platform.
FAQs About Audio in Audacity
Q1. How do I record audio with Audacity?
A1. To record audio in Audacity, connect your microphone to your computer, ensure it's recognized, and click the red record button. Adjust input levels and settings as needed to achieve optimal recording quality. Later, click the yellow button to stop recording.
Q2. Can Audacity improve audio?
A2. Yes, Audacity offers a range of tools and effects designed to enhance audio quality. These include features like noise reduction, which helps eliminate background noise, equalization to adjust frequency levels, and compression to even out audio dynamics.
Q3. How to trim audio on TikTok?
A3. To trim audio on TikTok, record or upload your video, select the required part, access editing options, tap "Volume," adjust the audio length, preview, and save your changes.
Q4. How to trim audio in iMovie?
A4. To trim audio in iMovie, open your project, select the audio clip, and click the "Modify" button. Then, choose "Trim to Playhead" or drag the edges of the audio clip to trim it.
Q5. Can I change my voice in Audacity?
A5. While Audacity primarily focuses on editing rather than voice modulation, you can achieve voice changes using plugins or external software. Various plugins for Audacity allow you to alter pitch, tone, and other aspects of your voice.
Conclusion
Trimming audio in Audacity is a fundamental skill for any aspiring audio editor. Following this procedural guide, you can effortlessly remove unwanted sections from your recordings, ensuring a professional and polished final product.
But for added versatility and creativity, consider integrating HitPaw AI Voice Changer into your workflow and taking your audio projects to the next level. Start changing your voice in real-time to improve your audio performance today with HitPaw AI Voice Changer.


 HitPaw Univd (Video Converter)
  HitPaw VikPea (Video Enhancer)


Share this article:
Select the product rating:
Daniel Walker
Editor-in-Chief
My passion lies in bridging the gap between cutting-edge technology and everyday creativity. With years of hands-on experience, I create content that not only informs but inspires our audience to embrace digital tools confidently.
View all ArticlesLeave a Comment
Create your review for HitPaw articles