How to Add Automatic Captions in Adobe Premiere Pro
Although the process is slightly intimidating, you can generate auto captions in Premiere Pro if you have access to the program. Premiere Pro auto subtitles are helpful when you have a shorter turnaround time and want to expedite your workflow.
Adobe Premiere Pro is an industry-standard tool many production houses use to edit movies, add captions, work on chroma keys, and much more.
However, the bitter truth is that all Adobe products are petty expensive. Furthermore, Adobe Premiere Pro auto caption generation takes a considerable amount of time, and the entire process is quite resource-intensive. Therefore, you must have a powerful PC to use Premiere Pro for auto subtitles.
To overcome this hurdle, one section of this piece also talks about an alternate solution that is lightweight and uses the powers of AI to automatically generate captions with lightning speed.
Part 1. Steps to Add Auto Captions and Subtitles in Premiere Pro
Note: Adobe Premiere Pro has a steep learning curve. Therefore, you must have a basic understanding of the program before proceeding to auto-generate captions in Premiere Pro.
Going further, explaining how to create a new sequence, adding source files to the Project Window, using the Source Monitor, and then adding the media to the Timeline is beyond the scope of this guide. This section assumes you completed all the preliminary steps, and the video is in the Timeline window. Once you’re at this stage, you’re good to go.
Step 1: Choose the Correct Workspace
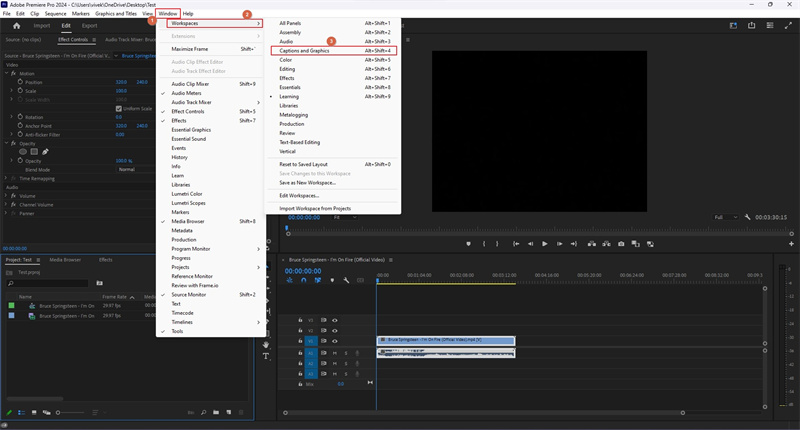
Go to the ‘Workspace’ menu from the menu bar at the top and click ‘Captions and Graphics’. This replaces the ‘Source Monitor’ with the ‘Captions and Graphics’ window at the top-left corner of the interface. Alternatively, you can go to the ‘Window’ menu, scroll down, and click ‘Text’ to get the same box.
Step 2: Auto-Generate Subtitles
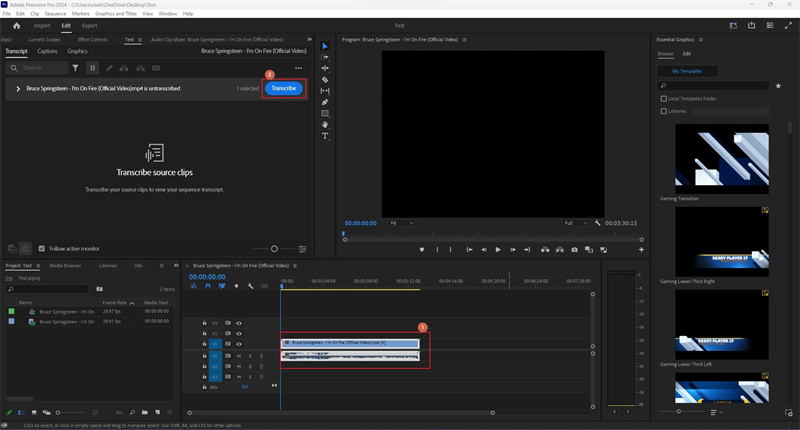
Ensure the source video is selected in the Timeline window and click ‘Transcribe’.
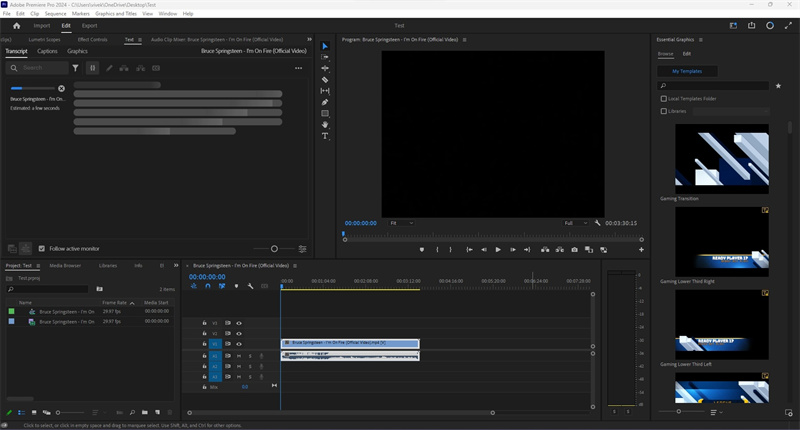
Wait while Adobe Premiere Pro automatically generates captions from the audio in the video. The time Premiere Pro auto subtitles generation takes depends on the length of the footage.

Step 3: Finalize Your Project
Once Adobe Premiere Pro automatic subtitles are ready, use the other tools within the program to personalize their appearance and adjust their occurrence in the Timeline as required, before rendering the video for the final output.
Part 2. Best Way to Add Auto Captions to Videos with Premiere Pro Alternative
Even though Premiere Pro is considered an industry-standard tool for post-production tasks, Adobe is notorious for unnecessarily complicating things for users. Also, as explained earlier, you must go through a steep learning curve to exploit all Premiere Pro’s features to get the best output.
Because of all these downsides, many people drop the idea of generating auto captions in Premiere Pro altogether and look for an alternate, comparatively cheaper, and easier solution.
In this context, one tool that offers an intuitive UI and works flawlessly is Edimakor by one of the renowned companies, HitPaw.
Available for Windows and Mac platforms, HitPaw Edimakor is an AI-oriented all-in-one solution for almost all your personal and professional movie creation and editing projects. The program comprises a screen recorder, an AI-powered scriptwriter, and an AI-based and Timeline-based video editor for automatic and granular editing purposes.
In addition, the application comes with several layout templates for video intros, saving you a significant amount of time.
As for generating AI captions with HitPaw Edimakor, you can follow the step-by-step instructions given below:
Step 1: Import the Source Media
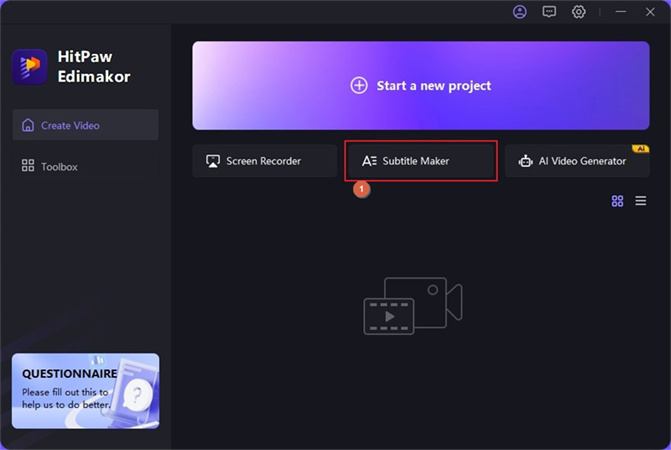
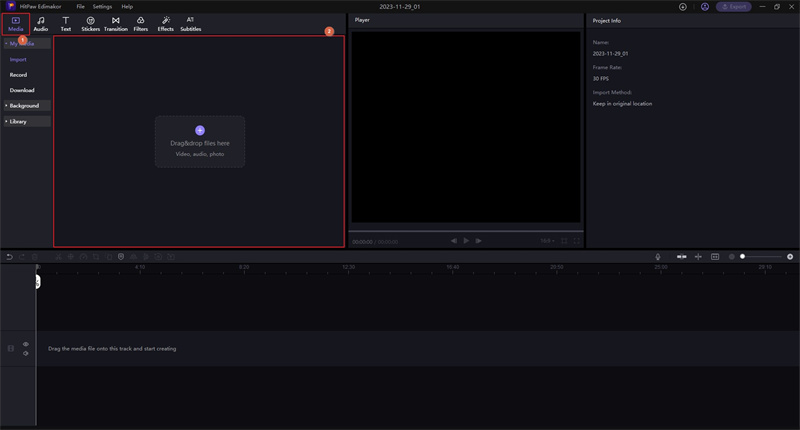
Launch HitPaw Edimakor and click ‘Subtitle Maker’ from the main interface.
On the video editor window, click ‘Media’ from the standard toolbar at the top, click inside the ‘Media Bin’ from the upper-left section, and choose a video or audio file you want to create AI subtitles for.

Step 2: Add Media to the Timeline
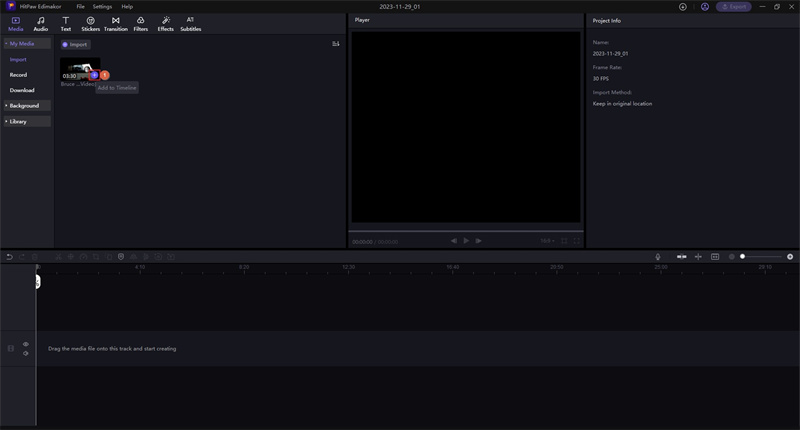
Hover the mouse over the thumbnail of the media you imported and click the ‘+ (Add)’ icon from its lower-right corner to add it to the Timeline.
Step 3: Create Subtitles
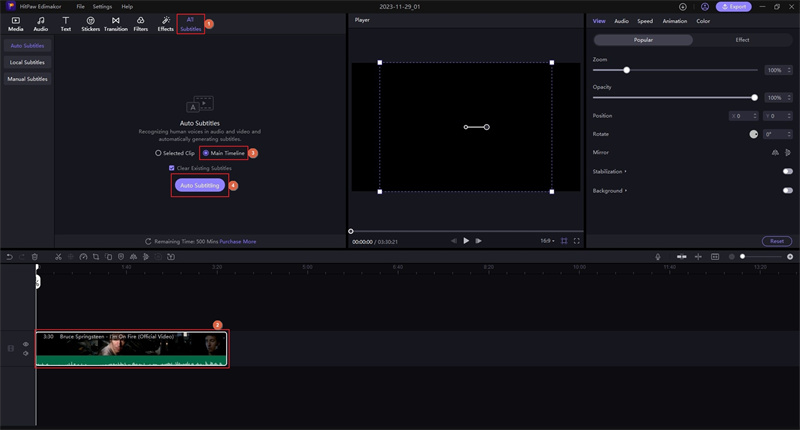
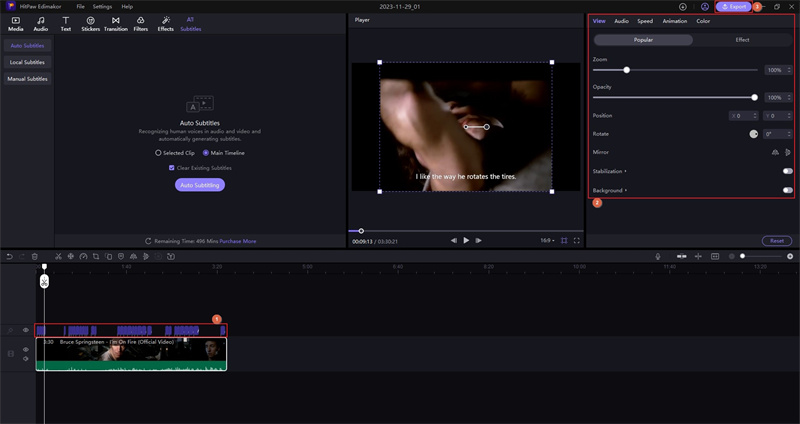
Click ‘Subtitles’ from the standard toolbar. In the ‘Auto Subtitles’ box of the ‘Subtitles’ window, ensure that the ‘Main Timeline’ radio button is selected.
Note: If the Timeline has multiple clips, click to select the one you want subtitles for and choose the ‘Selected Clip’ radio button in the ‘Auto Subtitles’ box.
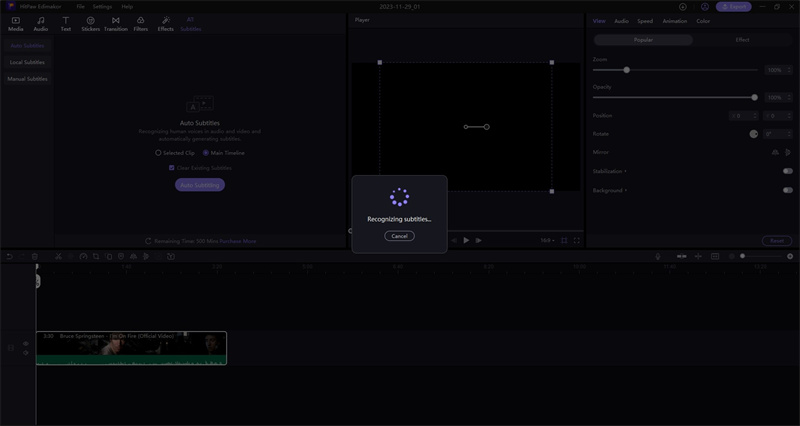
Next, click ‘Auto Subtitling’ and wait while HitPaw Edimakor generates subtitles for the media. Depending on the length of the video, the process may take a while. Nevertheless, HitPaw Edimakor does its work way, way faster compared to Premiere Pro.

Once done, adjust the occurrence time of subtitles by moving their blocks in the ‘Subtitles’ track above the media layer in the Timeline. Optionally, use the tools in the right pane to personalize the appearance of the text as required, and export the final video when you’re satisfied with the customizations.

Part 3. Bonus Part: How do I generate SRT files from Premiere Pro?
The process is simple. After generating automatic subtitles in Premiere Pro, go to the ‘Captions’ tab on the upper-left box, click the ‘More’ icon (with three dots) from the upper-right corner of the ‘Captions’ box, and click ‘Export to SRT file’. After this, you can choose a destination folder on your computer and save the SRT file on the local drive.
Conclusion
Automatic subtitles in Premiere Pro are easy to generate as long as you know how to use the program. Honestly speaking, Adobe products are expensive and have a steep learning curve. Therefore, you must undergo an extensive training program to become proficient in using the tool. The good thing is that you can easily bypass all these hurdles by switching to an alternate, better solution called HitPaw Edimakor, which has an intuitive interface and works pretty fast, eliminating the need to generate auto captions in Premiere Pro.




 HitPaw Univd (Video Converter)
  HitPaw VikPea (Video Enhancer)
Share this article:
Select the product rating:
Daniel Walker
Editor-in-Chief
This post was written by Editor Daniel Walker whose passion lies in bridging the gap between cutting-edge technology and everyday creativity. The content he created inspires audience to embrace digital tools confidently.
View all ArticlesLeave a Comment
Create your review for HitPaw articles