Understanding After Effects Deinterlace for Enhanced Video Quality
Have you ever thought that your videos don't appear as clear or smooth as they need to? This can be the result of interlacing, a bothersome problem with older video formats that can cause your footage to appear blurry or distorted. The good news is that Adobe After Effects has a strong fix for this deinterlacing.
We will cover all you need to know about After Effe cts deinterlace in this guide. Regardless of your level of experience, this step-by-step guide will help you improve the quality of your videos so they are sharp, clear, and suitable for any screen. Let's get started and transform your video into stunning quality.
Part 1. What is After Effects Deinterlace
A. Definition of Deinterlacing in Video Editing
Deinterlacing is the process of transforming interlaced video footage, which is frequently present in older formats, into a progressive or non-interlaced format. Each frame of interlaced video is split into two fields, which may cause motion blur or visible lines on contemporary screens. These problems are resolved by deinterlacing, which guarantees clearer and smoother playing.
B. Importance of Deinterlacing for Video Quality
Deinterlacing is essential for enhancing the quality of videos, particularly when working with older video formats, broadcast materials, or archival footage. Your video may look distorted, with flickering lines and uneven motion, if you don't deinterlace. Professional-grade editing requires proper deinterlacing because it improves clarity, sharpness, and overall visual appearance.
C. Overview of After Effects as a Tool for Deinterlacing
One particularly useful program for deinterlacing video is Adobe After Effects. It is perfect for removing interlacing artifacts while maintaining the original quality of your footage because of its sophisticated capabilities and precise controls. After Effects offers the quality and versatility required to turn interlaced footage into smooth, excellent material, regardless of your background as a filmmaker, content developer, or video editor.
Part B. The Process of Deinterlacing in After Effects
A. A step-by-step-guide to Deinterlace in After Effects
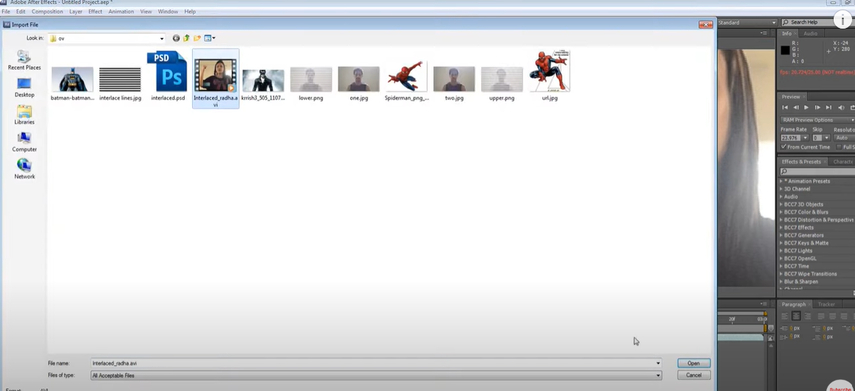
Step 1. Import Your FootageOpen After Effects and drag your interlaced video into the project panel.

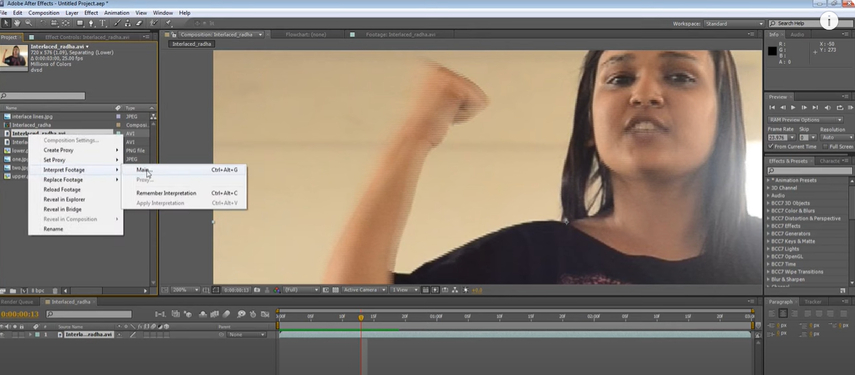
Step 2. Interpret the Footage
Right-click on the video in the project panel and choose Interpret Footage > Main.
Under Fields and Pulldown, set the Separate Fields option to the correct field order (Upper Field First or Lower Field First) based on your footage.

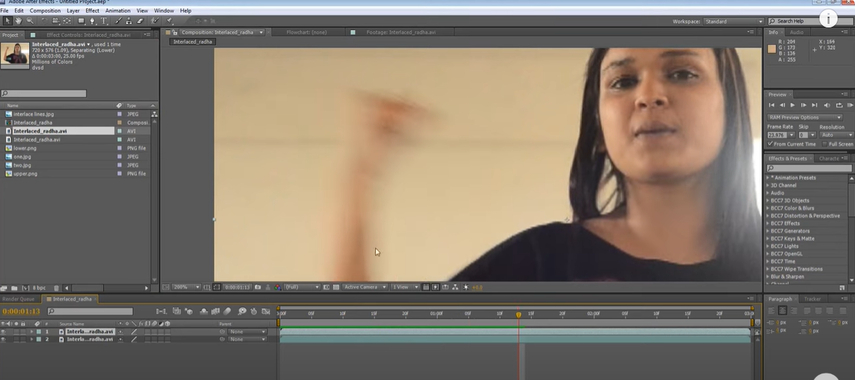
Step 3. Create a Composition
Drag the interpreted footage to the timeline to create a new composition. This step ensures the deinterlacing settings are applied to the footage.

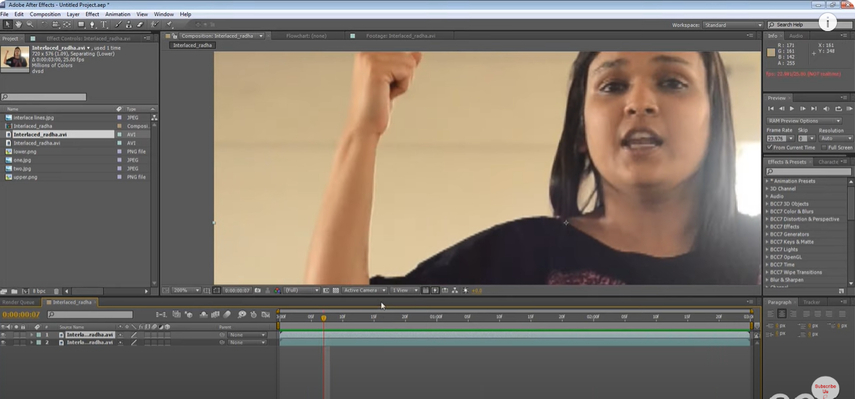
Step 4. Preview and Refine
Scrub through the timeline to check the results. Adjust settings if necessary to remove artifacts or motion issues.

Step 5. Export Your Deinterlaced Video
Go to File > Export > Add to Render Queue.
Select an appropriate output format and codec, ensuring high-quality rendering of the deinterlaced video.
B. Key Features of After Effects for Effective Deinterlacing
- Field Interpretation: For more seamless transitions, it automatically recognizes and handles interlaced video.
- Advanced Frame Blending: This technique fills in the gaps between frames to improve motion.
- Connectivity with External Plugins: Compatible with specialized tools for advanced deinterlacing such as RE:Vision Effects or FieldsKit.
- Real-time previews: Previews and edits are possible with non-destructive editing, which doesn't change the original file.
- Adjustable Render Settings: Provides fine-grained control over codecs, frame rates, and output resolution.
C. Common Challenges and solutions in Deinterlacing
Artifacts in Fast-Moving Scenes: High-speed video may show motion blur or ghosting.
To reduce artifacts, use After Effects' frame blending or motion estimation features.
Field Order Misinterpretation: Incorrect field settings result in unstable playback.
Check footage metadata or test both Upper Field First and Lower Field First choices to ensure the field order is correct.
Loss of Fine Details: Deinterlacing can reduce image detail. Use sharpening effects or Detail-Preserving Upscale to increase the video's resolution.
Long Rendering Times: High-resolution or extensive footage might hinder the process.
Use proxies while editing and tweak your render settings for maximum efficiency.
Part 3. Comparing After Effects Deinterlace with Other Methods
Advantages of using after effect for deinterlacing
Professional-grade quality
After Effects is well known for its ability to produce broadcast-quality results. Its powerful interpolation and frame mixing techniques make your deinterlaced video appear smooth, sharp, and professional.
Customization and Precision
After Effects gives you complete control over the deinterlacing process. From field interpretation settings to complex plugins, it enables precise alterations specific to your video, resulting in optimal outcomes.
Integration with Other Effects
After Effects not only deinterlaces your footage, it also allows you to enhance it further with tools like color correction, stabilization, and sharpening, all in one workflow.
Support for third-party plugins
While After Effects' native tools are impressive, its compatibility with plugins such as FieldsKit and RE:Vision Effects provides an additional layer of versatility and quality for challenging tasks.
Non-destructive Editing Workflow
After Effects enables you to experiment with deinterlacing and other effects without affecting the original video. This is perfect for experimenting with different ways to see which produces the best results.
Part 4. Tips for Optimizing Video Quality with After Effects Deinterlace
Deinterlacing is only the first step in improving the quality of your video; with the correct tools and techniques, you can take your footage to the next level. While Adobe After Effects is a great tool for deinterlacing, incorporating additional tools like HitPaw VikPea (formerly HitPaw Video Enhancer) can further streamline the process and improve results. HitPaw VikPea is an easy-to-use, powerful video editing tool that streamlines complex processes while producing high-quality output.
Features
- Provides a smooth finish by enhancing clarity and details in deinterlaced videos.
- AI-powered conversion of older, low-resolution video to HD or 4K quality.
- Noise reduction produces smoother, cleaner images by eliminating artifacts and grain.
- Effortlessly and quickly enhance colors, contrast, and overall video quality.
- Use-friendly interface makes it easy to use tool for beginners and pros alike.
Steps to enhance video
Step 1. Download the VikPea program from the official HitPaw website, then follow the installation instructions. After the program has been installed, launch it.
Step 2. You can submit your deinterlaced video by opening HitPaw VikPea and selecting the "Import Video" button. drag-and-drop the video into the main interface.

Step 3. Depending on the needs of your video, choose one of the AI enhancer models (such as General, Face Restoration, or Noise Reduction). Every model is customized for particular improvements, like enhancing details or cutting down on noise.

Step 4. Preview the video to make sure the improvements meet your expectations. After you're happy, click "Export" to save the improved video in the resolution and format of your choice.

Learn More about HitPaw VikPea Video Enhancer
Conclusion
In order to transform interlaced videos into smooth, high-quality footage, deinterlacing is necessary. This procedure is where Adobe After Effects shines, providing accurate tools for polished outcomes. HitPaw VikPea is the perfect tool for additional improvement. Video optimization is made simple by its AI-powered capabilities, which include noise removal, upscaling, and sharpening. For outstanding results, give it a try!


 HitPaw Edimakor
 HitPaw FotorPea
 HitPaw Univd (Video Converter)


Share this article:
Select the product rating:
Daniel Walker
Editor-in-Chief
My passion lies in bridging the gap between cutting-edge technology and everyday creativity. With years of hands-on experience, I create content that not only informs but inspires our audience to embrace digital tools confidently.
View all ArticlesLeave a Comment
Create your review for HitPaw articles