[Easily] How to Create Photo to Watercolor Portrait in Photoshop
Dive into the enchanting world of digital artistry as we explore the captivating process of transforming ordinary photos into mesmerizing watercolor portraits using Adobe Photoshop. Unleash your creativity and embark on a journey where imagination meets technology, revealing the secrets behind crafting stunning watercolor effects with just a few clicks.
Join us as we unravel the steps to breathe life into your photos and infuse them with the timeless beauty of watercolor paintings. Get ready to embark on an artistic adventure like never before with the photo to watercolor portrait Photoshop technique.
Part 1. What is Photo to Watercolor Portrait in Photoshop?
Photo to Watercolor Portrait in Photoshop" is a technique that transforms photos into watercolor-style portraits using Adobe Photoshop. By applying filters, adjustments, and brush strokes, the process mimics traditional watercolor paintings. Its goal is to evoke the aesthetic qualities of watercolor art digitally, allowing for unique enhancements. With Photoshop's tools like brushes, layer adjustments, blending modes, and filters, users simulate transparency and texture. Dive into creating watercolor effects in Photoshop for captivating results. Explore how to create watercolor effects in Photoshop for stunning portraits.
Part 2. How to Create Photo to Watercolor Portrait in Photoshop?
Follow these simple steps to how to create a watercolor effect in photoshop. Each step is straightforward and will guide you through the process seamlessly:
-
Step 1:
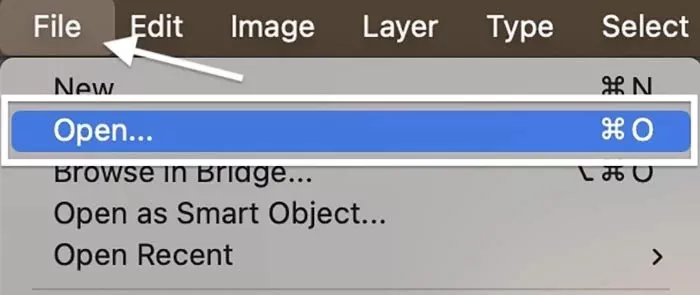
Begin by opening your desired photo in Photoshop. You can do this by selecting "File" from the menu, then "Open" (Ctrl/Command + O), and navigating to your file. Click "Open" to proceed.

-
Step 2:
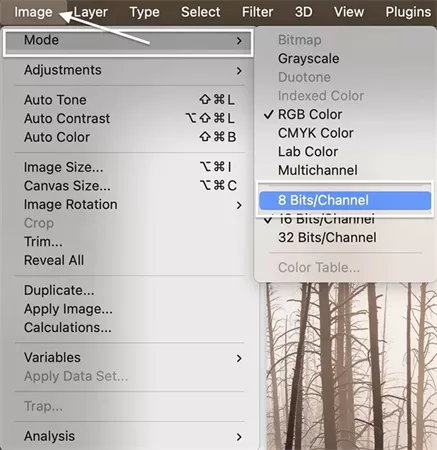
To prepare for the filter gallery, ensure your photo is in 8-bit mode. Go to the "Image" menu, select "Mode," and then choose "8 Bits/Channel." Your image may already be in 8-bit mode.

-
Step 3:
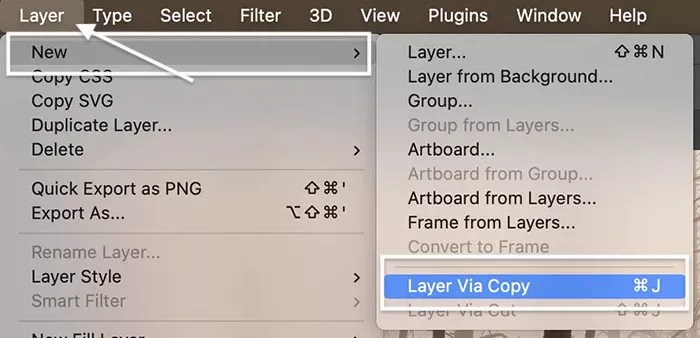
Duplicate the background layer by going to the "Layer" menu, selecting "New," and then "Layer via Copy" (Ctrl/Command + J). Rename this new layer, "Watercolor Effect" and hide the original background layer by clicking on the eye icon.

-
Step 4:
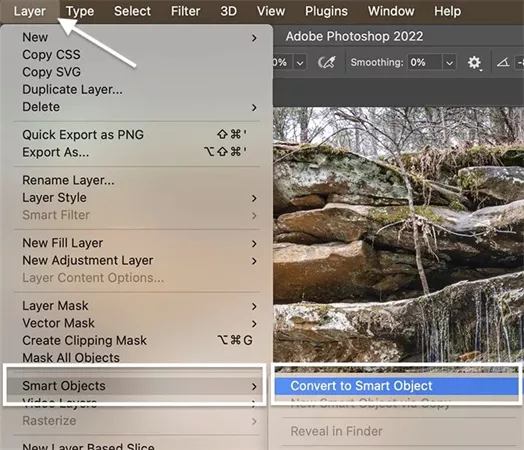
Convert the "Watercolor Effect" layer to a smart object to allow for non-destructive editing. Go to the "Layer" menu, choose "Smart Objects," and then select "Convert to Smart Object."

-
Step 5:
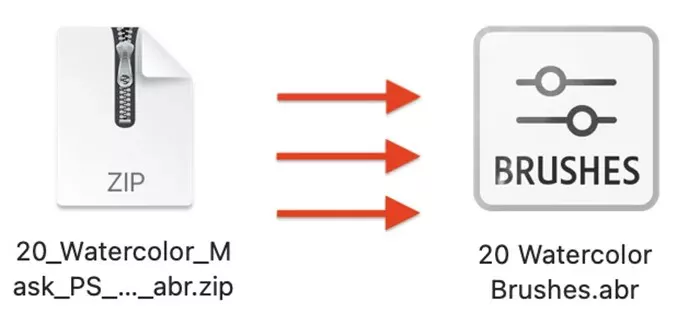
Import the watercolor brushes into Photoshop. Access the brush panel by going to the "Window" menu and selecting "Brushes." Click the icon in the top-right corner and choose "Import Brushes." Locate your brush file and click "Open" to import.

-
Step 6:
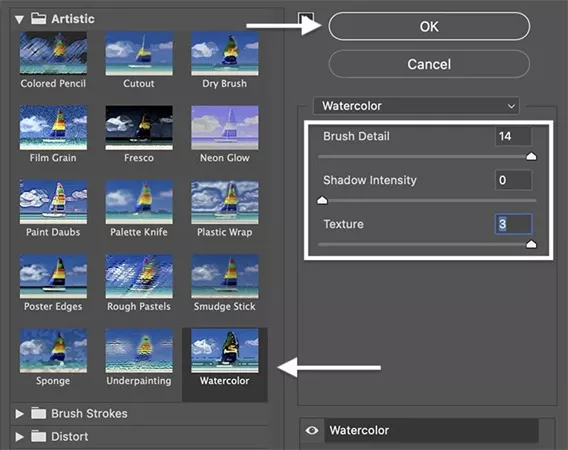
Watercolor paintings typically have a soft blur. To achieve this effect, go to the "Filter" menu, select "Filter Gallery," and ensure your file is in 8-bit mode. Open the "Artistic" menu and apply the "Watercolor" filter with specific settings for Brush Detail, Shadow Detail, and Texture.
By following these steps, you can easily create a beautiful watercolor painting in Photoshop without any difficulty. Enjoy the creative process and explore the artistic possibilities!

-
Step 7:
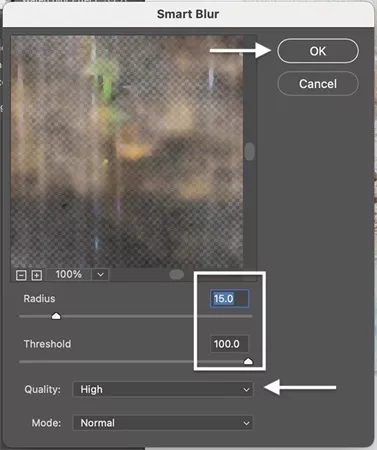
Select the Watercolor Effect layer and navigate to the Filter menu again. Choose Filter > Blur > Smart Blur. Adjust the Radius slider to 15 and the Threshold slider to 100, then set Quality to High. Click OK to apply the smart blur effect.

-
Step 8:
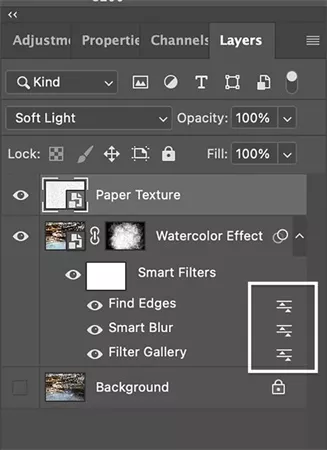
Introduce sketched edges to enhance the artistic effect. Access the Filter menu and select Filter > Stylize > Find Edges. This filter simulates a sketched appearance. Ensure that three Smart Filters—Find Edges, Smart Blur, and Filter Gallery—are visible in the layers panel.

-
Step 9:
Fine-tune the blending modes for each Smart Filter. Double-click the icon beside the filter's name in the layers panel to modify its blending mode. Set the Filter Gallery blending mode to Soft Light and click OK. For Smart Blur, choose Screen blend mode and adjust the Opacity to 50%. Similarly, set the blending mode for Find Edges to Multiply with an Opacity of 50%. Click OK to confirm.

-
Step 10:
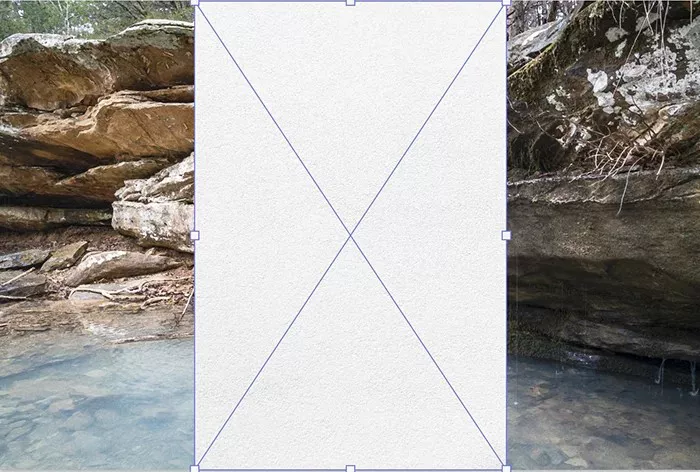
Embed the paper texture by navigating to the File menu and selecting File > Place Embedded. Locate the texture file and resize it to cover the entire photo. Change the blending mode to Multiply for a seamless integration. If you opted for colored paper, consider using a blending mode like Soft Light for a better aesthetic.

-
Step 11:
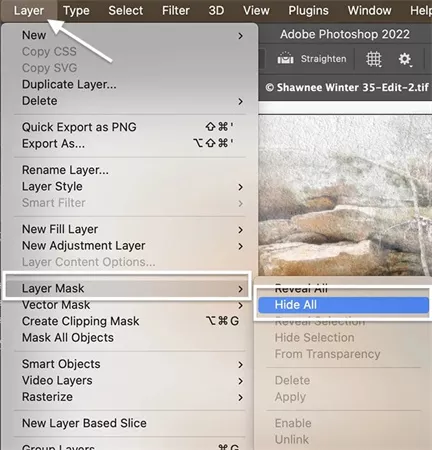
Return to the Watercolor Effect layer and add a layer mask. From the Layer menu, choose Layer > Layer Mask > Hide All. This action conceals the entire layer, allowing you to selectively reveal parts of the watercolor effect as needed. That's all you've had to do to learn how to make a watercooler effect in Photoshop.

Part 3. The Best Alternative to Generate Watercolor Effect with HitPaw FotorPea
HitPaw FotorPea excels in producing stunning watercolor effects effortlessly, making it an excellent choice for creating AI-generated images. With its advanced algorithms and intuitive interface, HitPaw FotorPea allows users to generate captivating watercolor-style artwork from their photos with just a few clicks. Whether you're a professional artist or a hobbyist, HitPaw FotorPea offers a seamless and enjoyable experience for transforming your photos into beautiful watercolor masterpieces.
Moreover, HitPaw FotorPea isn't limited to just generating watercolor effects. It also boasts the ability to upscale generated images, allowing users to enhance the resolution and quality of their artwork. This feature ensures that your AI-generated images maintain clarity and detail, making them suitable for a variety of creative projects and applications. With HitPaw FotorPea, the possibilities for artistic expression are limitless.
Features
- Enhance images for clarity & color with the best image enhancer.
- Transform text into stunning artwork using an AI photo generator.
- Achieve natural outcomes with a cutting-edge AI portrait generator.
- Effortlessly remove objects from photos for perfect results.
- Replace unwanted backgrounds with a solid color seamlessly.
Steps to Generate Watercolor Effect
-
Step 1:
Download and install HitPaw FotorPea. Open the program and click on the AI Generator button to begin.

-
Step 2:
Input your prompt text or upload images for AI-generated portraits.

-
Step 3:
Select your preferred style, resolution, and image size. HitPaw FotorPea offers various styles, including oil paintings and realistic drawings. Click Generate to initiate the process.

-
Step 4:
Preview the generated images and click the Export icon to save them to your computer if satisfied.
Extra function: Steps to Enhance Images
-
Step 1:
Download and install HitPaw FotorPea on your computer. Open the program and select "AI Enhancer." Import your photo by clicking on the "Choose Files" icon.

-
Step 2:
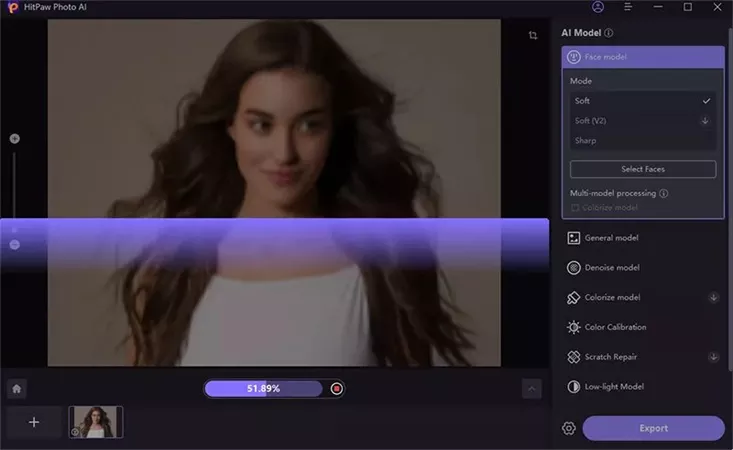
Explore the various enhancement tools available, such as the low light model, scratch model, color calibration model, and denoise model. Choose the appropriate AI model for your enhancement requirements and apply it to your photo.

-
Step 3:
Preview the enhancements by clicking on the "Preview" icon. If satisfied, export the enhanced images to your computer by clicking on the "Export" icon.

Part 4. FAQs of Photo to Watercolor Portrait Photoshop
Q1. Are there any specific Photoshop tools or filters recommended for this process?
A1.
When crafting watercolor portraits in Photoshop, key tools and filters prove essential. The Watercolor Brush Tool enables manual painting for precise effects, while the Filter Gallery offers diverse artistic filters like Watercolor and Dry Brush. Layer Blend Modes allow experimentation with blending layers using modes like Multiply and Overlay.
Layer Masks help selectively apply or hide watercolor effects, and Blur Filters like Gaussian Blur soften edges for a painterly touch. These elements combine to create captivating watercolor portraits in Photoshop.
Q2. Is it possible to customize the watercolor effect in Photoshop?
A2. Yes, it is possible to customize the watercolor effect in Photoshop. Photoshop provides various tools and options to adjust and tailor the watercolor effect according to your preferences, including settings within the Watercolor Filter and additional adjustments using layers, blending modes, and filters.
The Bottom Line
In conclusion, while Photoshop provides robust tools for crafting watercolor portraits, HitPaw FotorPea emerges as the top choice for effortlessly generating stunning watercolor effects. With its user-friendly interface and advanced algorithms, HitPaw FotorPea is the perfect companion for artists and enthusiasts.
Embrace HitPaw FotorPea to explore endless creative avenues and seamlessly transform your photos into enchanting watercolor masterpieces. Witness the magic of AI-driven artistry today and unlock your artistic potential! Explore the beauty of photo to watercolor portrait Photoshop with HitPaw FotorPea.







 HitPaw Edimakor
 HitPaw Screen Recorder
 HitPaw VikPea (Video Enhancer)
Share this article:
Select the product rating:
Daniel Walker
Editor-in-Chief
This post was written by Editor Daniel Walker whose passion lies in bridging the gap between cutting-edge technology and everyday creativity. The content he created inspires audience to embrace digital tools confidently.
View all ArticlesLeave a Comment
Create your review for HitPaw articles