Full Guide to Use Generative Fill Background in Adobe Photoshop
Introducing the Generative Fill Background feature in Adobe Photoshop opens a realm of creative possibilities for digital artists, photographers, and designers alike. This cutting-edge tool harnesses the power of artificial intelligence to generate unique background patterns, textures, and imagery automatically, eliminating the need for manual creation or sourcing from external assets. With its intuitive interface and robust capabilities, the Generative Fill Background feature empowers users to effortlessly enhance their compositions with captivating backgrounds tailored to their specific vision and style.
Whether you're looking to add depth to portraits, create striking visual effects, or elevate your digital artwork, this comprehensive guide will walk you through the steps to master the Generative Fill Background feature in Adobe Photoshop.
Part 1. Using Generative Fill Background in Adobe Photoshop
Photoshop AI's generative fill tools offer a variety of applications. They enable users to generate images from scratch, remove objects and backgrounds, extend canvas sizes, alter elements within photos, and create backgrounds or realistic objects. Despite their limited number, these tools prove invaluable in saving designers significant time when editing low-quality or unattractive photos.
1. Extend Images With Photoshop AI
Expanding images using Photoshop generative fill extend background is a highly effective application, suitable for various users. Whether you're a developer requiring images with specific dimensions or a social media creator seeking to resize the perfect photo for your Facebook profile, this feature proves invaluable. Here's how to use the generative fill extend background through Adobe Photoshop
-
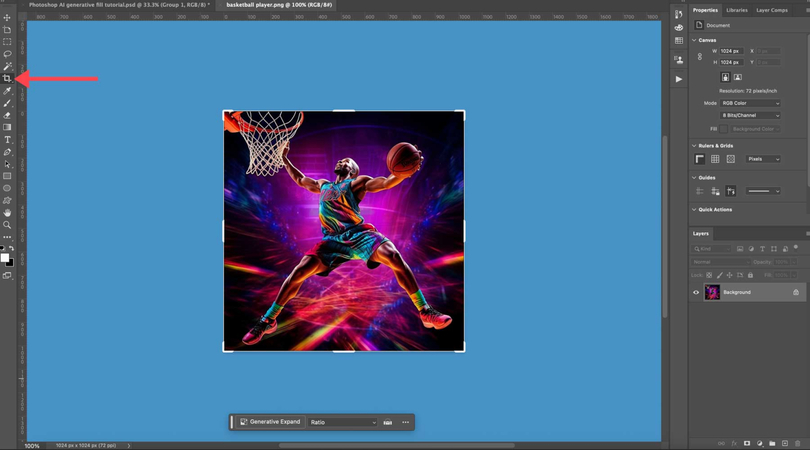
Step 1: Begin by selecting the crop tool in Photoshop.

-
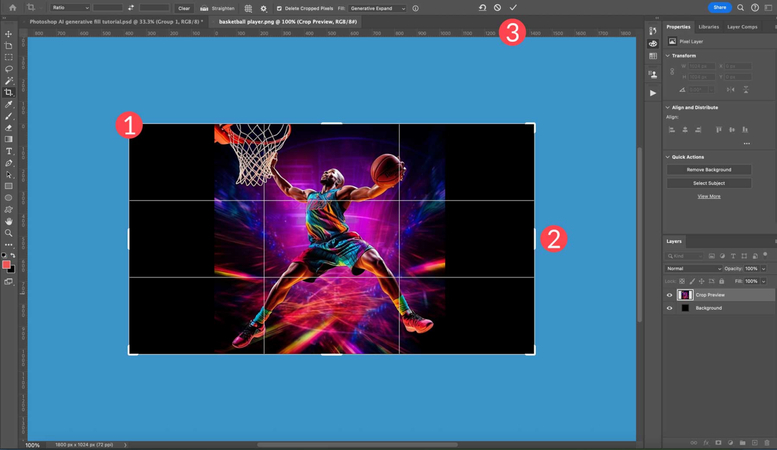
Step 2: With the crop tool activated, drag the left side of the image container and then the right to create even space on both sides. Once you've achieved the desired dimensions, click the check button on the toolbar at the top of the Photoshop window to confirm the changes. Here's what the image looks like after Photoshop fills in the blank areas of the canvas. After utilizing generative fill, you'll find three variations in the generative layer properties.

-
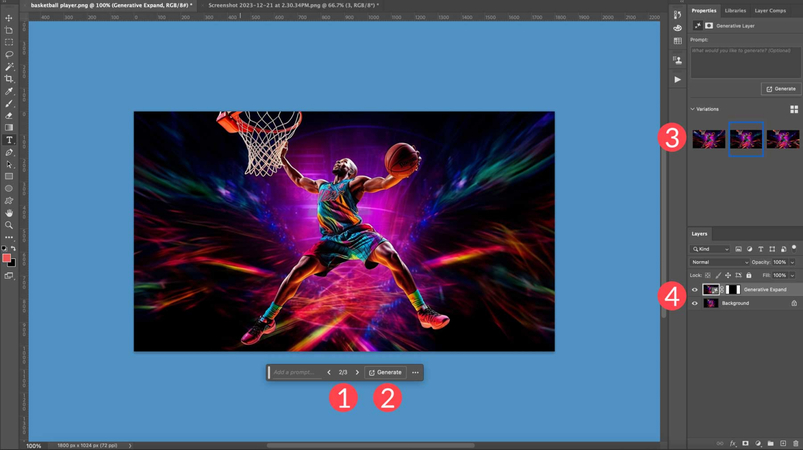
Step 3: As mentioned earlier, Photoshop generates a new layer with a mask, ensuring your original image remains untouched. If unsatisfied with the results, click the generate button to access three new variations. You can repeat this process as needed to achieve the desired outcome. To manage file size, delete any variations that don't meet your criteria.

Generate Backgrounds with Photoshop AI
Moreover, aside from expanding the image area of your canvas, generative fill can be utilized to substitute backgrounds in your images. In this step, we'll eliminate the background of our car image and replace it with a depiction of the salt flats in Utah. To begin, ensure that no elements are selected. While the select subject button can be used for our image, other selection tools may yield better results depending on the specific image you're working with.
Here's how to rely upon the Photoshop generative fill background to produce the attractive images via Adobe Photoshop
-
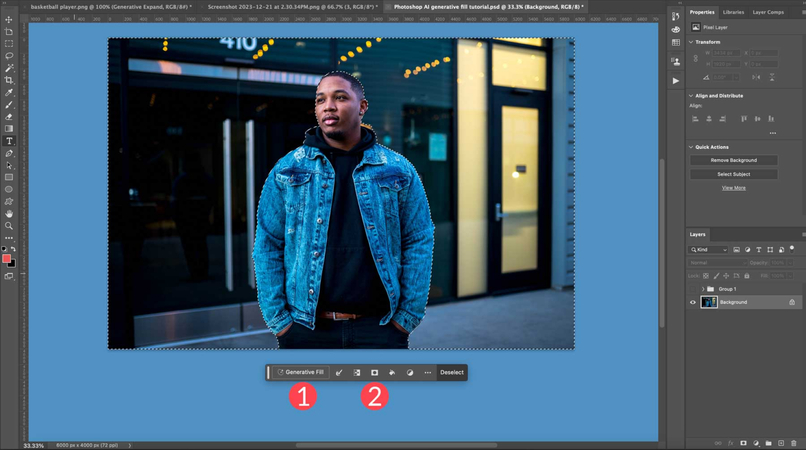
Step 1: Once your subject is selected, click on the invert selection tool. Make any required adjustments to your selected area, then proceed to click the generative fill button.

-
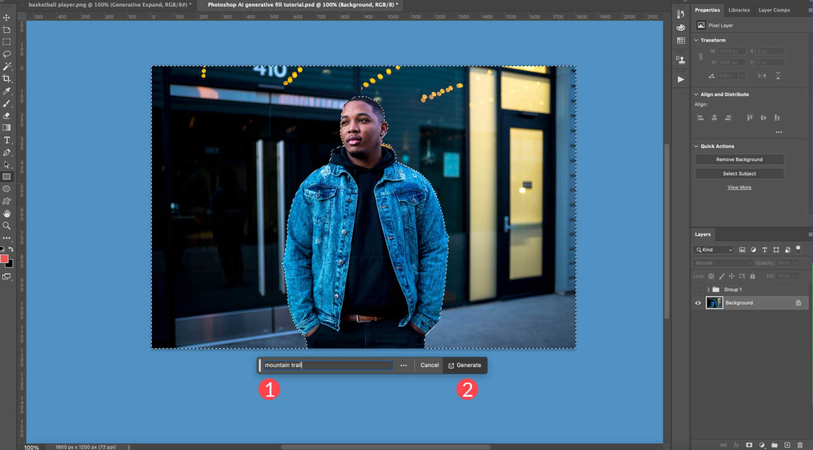
Step 2: After clicking the generative fill button, a text prompt will appear—type in the desired background, such as "mountain trail" for this example. Then, click the generate button to proceed.

Part 2. Recommended Alternative: HitPaw FotorPea
While Adobe Photoshop offers powerful background creation capabilities, its complex interface may be daunting for some users. In such cases, HitPaw FotorPea emerges as the optimal solution. This innovative tool allows you to effortlessly generate backgrounds and other images through text prompts, offering a simple user experience.
HitPaw FotorPea delivers mind-blowing image resolution, ensuring exceptional quality. Additionally, it supports simultaneous import of multiple images and is compatible with both Mac and Windows platforms. With its intuitive interface and impressive features, HitPaw FotorPea stands out as the best choice for creating stunning backgrounds and images with ease.
Features
- Quickly generate image backgrounds effortlessly.
- Maintain image quality across various image types.
- Enable colorization and image repair functions.
- Support simultaneous production of multiple images.
- Upscale resolution to 4K, 8K, or 2K as required.
- Provide a wide range of AI-generated styles and designs.
Here's the step by step guide to produce the images through HitPaw FotorPea.
-
Step 1: Begin by clicking the "Download" button below to access the AI Generator feature of HitPaw FotorPea.

-
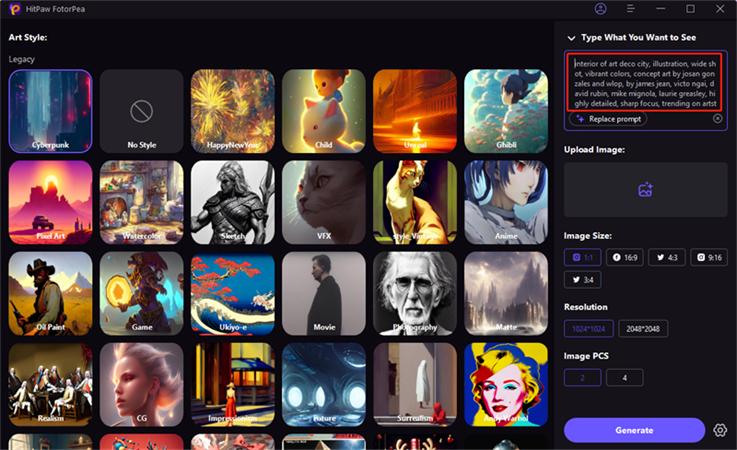
Step 2: Provide a prompt or description of what you wish to generate. You can choose from pre-existing prompts or replace them with your own. Additionally, upload an image from your computer on the right panel to generate an AI photo based on your prompts.

-
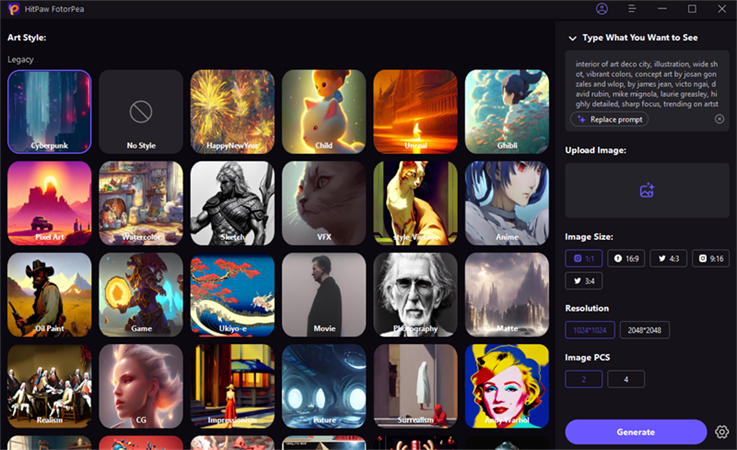
Step 3: Enter the prompt and select the desired image size, resolution, and art style. Then, click the "Generate" button to initiate the transformation of AI artwork from text. HitPaw FotorPea offers hundreds of art styles, ranging from realistic drawings to surrealistic digital arts, to inspire imagination.

-
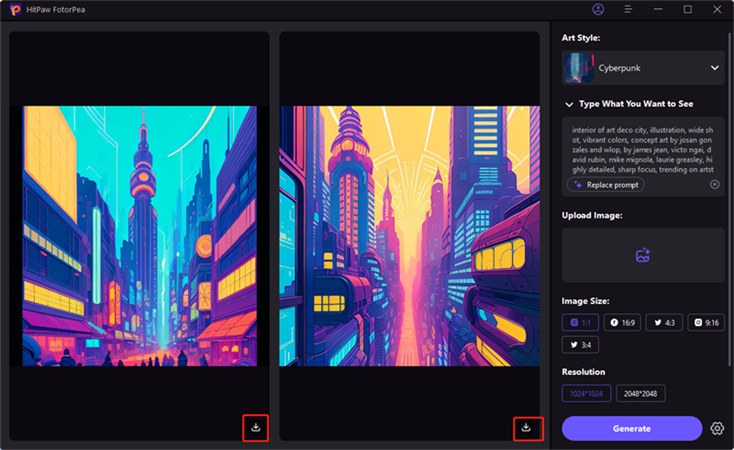
Step 4: HitPaw FotorPea will generate two images with similar art styles for you to choose from. The time to develop AI artwork depends on the image size and server processing speed. You can preview each image by clicking on it. Once satisfied, click the Download icon to save the desired AI-generated art to your computer.

Part 3. FAQs of Generative Fill Extend Background
Q1. How can I customize the colors and patterns in generative fill background?
A1.
Customizing colors and patterns in the generative fill background feature of Adobe Photoshop is a straightforward
process that allows for creative freedom in image editing. After selecting the Generative Fill Background tool, users
can access various options in the toolbar to tailor the background to their liking.
These options typically include sliders or color pickers for adjusting hues, saturations, brightness, and opacities to
fine-tune the background color. Additionally, users may have access to pattern options, enabling them to choose from
preset patterns or create custom ones for added visual interest. Experimenting with these settings provides users with
the flexibility to achieve the desired look for their background, with real-time previews facilitating quick
adjustments.
Q2. Where is generative fill in Photoshop 2024?
A2. Generative fill in Photoshop 2024 can be found in two places depending on what you're trying to achieve:
- Contextual Taskbar: This is the bar that appears at the top of your workspace when you make a selection. If you have an area selected in your image, you'll see the Generative Fill option within the Contextual Taskbar.
- Edit Menu: If you don't have a selection but want to use Generative Fill, you can access it through the Edit menu. Go to Edit > Generative Fill.
Final Words
We've outlined six absolutely top-notch ways to create stunning wedding photos, each option worthy of your attention.
However, if you're seeking a cutting-edge solution to generate AI-enhanced wedding photos with brilliant image resolution, we highly recommend HitPaw FotorPea. With its advanced AI technology, ai wedding photo generator empowers you to create exquisite wedding images with unparalleled detail and clarity, ensuring your cherished memories are beautifully preserved for years to come.




 HitPaw Video Object Remover
 HitPaw Photo Object Remover
 HitPaw VikPea (Video Enhancer)



Share this article:
Select the product rating:
Daniel Walker
Editor-in-Chief
My passion lies in bridging the gap between cutting-edge technology and everyday creativity. With years of hands-on experience, I create content that not only informs but inspires our audience to embrace digital tools confidently.
View all ArticlesLeave a Comment
Create your review for HitPaw articles