What is ISO in Photography? Understanding the ISO Settings
You'll most likely need to discover "what is ISO photography" if the picture you took turns out to be excessively dark or fuzzy. The ISO number indicates how sensitive your camera sensor becomes to light.
Your camera's sensitivity will rise as the ISO number is raised, allowing you to capture images with less light, which may lead to noisy or grainy images. Many people consider ISO to be a part of the exposure triangle, along with shutter speed and aperture. All the intriguing information you require to fully comprehend "what is ISO in photography" is contained in this piece.

Part 1. What is ISO in Photography?
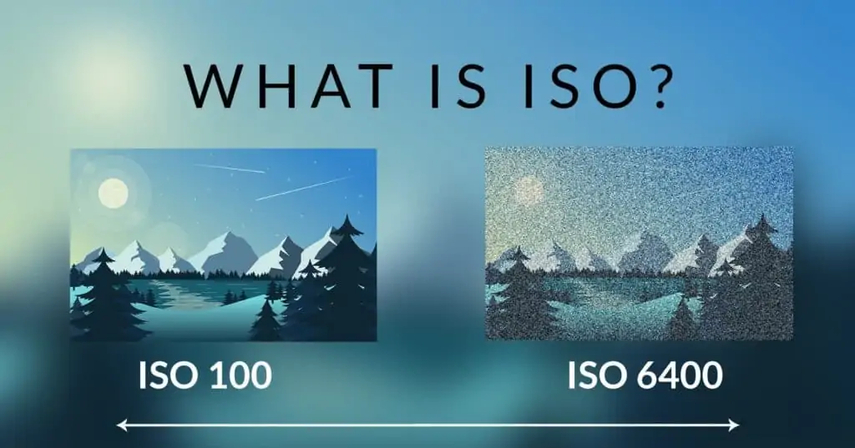
In photography, the ISO indicates how sensitive the camera's sensor is to light. In film photography, the term ISO was first used to refer to the film's sensitivity to light. ISO determines how much power your camera has to improve the light that the sensor detects in digital photography.
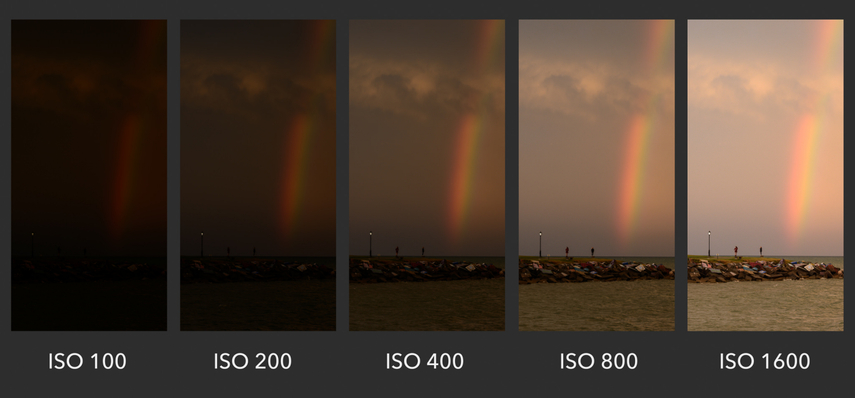
As we said in the introduction, raising the ISO will make the camera more light-sensitive, while lowering it will make it less light-sensitive. Simply put, ISO instructs photographers on how to modify the photographs' brightness and blackness. For instance, if you're clicking or shooting in low light, increasing the camera's ISO level will help you get brighter images. If you wish to prevent overexposure, you may lower the ISO value to get the desired effects.
Giving broad instructions on how to choose the best ISO setting for the camera is difficult. If you have a good camera with you, there is little likelihood that you will choose the wrong ISO settings. The guidelines for the various ISO numbers and the types of numbers you must select based on the circumstances are reviewed below.

1. ISO 100
You can use the ISO 100 in outdoor or sunny conditions. If there is not enough light in the area, ISO 100 should not be used. Selecting different ISO settings is frequently advised because this kind of setup typically doesn't function properly.
2. ISO 400
If you're looking to click the images indoors, going for the ISO 400 won't be a bad option.This type of situation works best on cloudy days, but you need to ensure that the camera is getting enough light to make the most of the ISO 400.
3. ISO 800
If you choose to use the ISO 800, you must ensure that you are capturing your photos indoors. If you use an ISO of 800, your image is likely to have noise.
4. ISO 1600, 3200, and 6400
These types of ISO settings and efficient for the circumstances where the light seems to be imperfect.
Part 2. The Best Way to Change ISO with HitPaw FotorPea
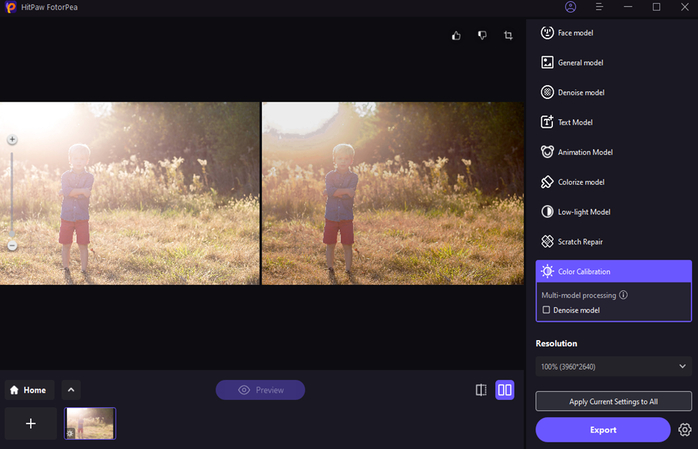
After clicking the images in the higher ISO, if you want to eliminate the overexposure of an image, HitPaw FotorPea could be a handy tool. It is a remarkable photo quality enhancer that prompts the colour calibration features to handle overexposed images.
Since HitPaw FotorPea depends took the AI powered technology, it only asks you to upload the photo to the timeline of the tool to begin fixing the overexposed images. HitPaw FotorPea also supports batch processing meaning you've got the opportunity to fix the multiple overexposed images simultaneously.
Features
- Lets you fix overexposed images quickly
- Offers an effortless user interface no technical knowledge is required
- Compatible with Mac and Windows
- Supports multiple images formats
- No watermark added
- Affordable premium package
- Explore the 9 outstanding AI models
- No ads detected
How to fix the overexposed images through HitPaw FotorPea?
Step 1: After going to the official webpage of the HitPaw FotorPea, you'll need to press the Download button to download the HitPaw FotorPea on the computer. After installing the software, you must start the program and click on the AI Enhancer. Upon pressing the Choose Files button, you'll need to upload the photo.
HitPaw FotorPea also holds the ability to import multiple images simultaneously so you've got the chance to upload the various images at once.

Step 2: In the timeline of the HitPaw FotorPea, you'll see the 9 outstanding AI models out there. All you need to do is select the Color Calibration model to fix the overexposed images.
Step 3: Press the Preview button to apply the Color Calibration model on the images and then you can tap on the Export button to download the images into the computer.

Part 3. FAQs of What is ISO Photography
Q1. What is the difference between high ISO and low ISO?
A1.
If you intend to learn about the main difference between low ISO and high ISO, you'll need to know about how sensitive your sensor camera is to light. If the ISO number is lower, it implies that the sensor is less sensitive to the light bringing in the darker image but you won't see any noise in the images.
Low iso is an appropriate thing for the bright light conditions allowing you to produce detailed and clean images. A higher ISO, on the other hand, will make the sensor more sensitive to the camera's light offering brighter images. Going for the high ISO could also end up inserting the digital noise in the images.
Thus, High ISO images are well suited in the low light conditions where you're required to amplify the light to attain the properly exposed images but in this scenario, you might also have to deal with the grainy results.
Q2. What ISO should I shoot at?
A2.
The number of ISO you must aim for depends upon the lighting conditions of the scene. If you're clicking the images in bright conditions using 100 or 200 ISO is recommended as this will ensure that the images look clear and noise-free. If the conditions you're clicking the images into are low light, increasing the ISO number to 1600 800 or even higher is crucial.
If you're unsure of the iso number you must be looking at, you can select the auto iso that helps your camera to behave according to the conditions provided to the camera and the camera will adjust the iso numbers according to the requirements.
Final Words
A lot of people often ask ''what is ISO photography'' and what is the difference between low ISO and high ISO? This guide has perfectly explained the ISO term in photography and what type of ISO number you must select while clicking the images.
We've also highlighted the HitPaw FotorPea as the best way to change the iso numbers of an image enabling you to decrease the ISO number making the noisy and overexposed images look clear and fascinating. HitPaw FotorPea tends to maintain the quality of the images while adjusting the iso numbers offering an intuitive user interface.


 HitPaw Edimakor
 HitPaw VoicePea
  HitPaw Univd (Video Converter)

Share this article:
Select the product rating:
Daniel Walker
Editor-in-Chief
My passion lies in bridging the gap between cutting-edge technology and everyday creativity. With years of hands-on experience, I create content that not only informs but inspires our audience to embrace digital tools confidently.
View all ArticlesLeave a Comment
Create your review for HitPaw articles