How to Use the Upscaler Ultrasharp Pack to Sharpen Images
After the emergence of AI power technology, the photo editing industry has evolved immensely, and new techniques have been introduced to take the quality of the images to the next level. One such technique that can make your images look more sharper is the upscaler ultrasharp pack.
With this tool, you can upscale the quality of the images significantly, and it doesn't take any extra time to improve the credentials of the images. Lets dig into this guide to learn about the upscaler ultrasharp pack and how to use it in photo enhancing software.
Part 1. What is Upscaler Ultrasharp Pack?
The Upscaler Ultrasharp pack is a combination of tools or plugins that help you to enhance the image sharpness resolution and images. Fortunately, you don't need to install the plugins of this package separately as a lot of photo upscaling tools nowadays come up with the built-in upscaler ultrasharp pack to increase the resolution of the images without affecting the overall quality of the images.
Part 2. How to Use Upscaler Ultrasharp Pack: A Step-by-Step Guide
Before using the upscale ultrasharp pack, you'll need to ensure that you've selected an appropriate photo editor or photo enhancer where you wish to use the ultrasharp pack. Luckily, various tools come up with the built-in ultrasharp pack and Premier Pro is also one of them.
The thing to like about Adobe Photoshop is that it lets you enlarge the images quickly but the interface of Adobe Photoshop is often questioned courtesy of the hectic framework of the software.
If you don't mind using Adobe Photoshop to upscale the image quality, you can rely on the guide listed below to enlarge the photo quality through Adobe Photoshop.
Step 1: After marching into the official website of Adobe Photoshop, you'll need to install the tool and launch it afterwards. Upon getting into the timeline of Adobe Photoshop, you'll need to hit the Import button to upload the photo you wish to upscale.
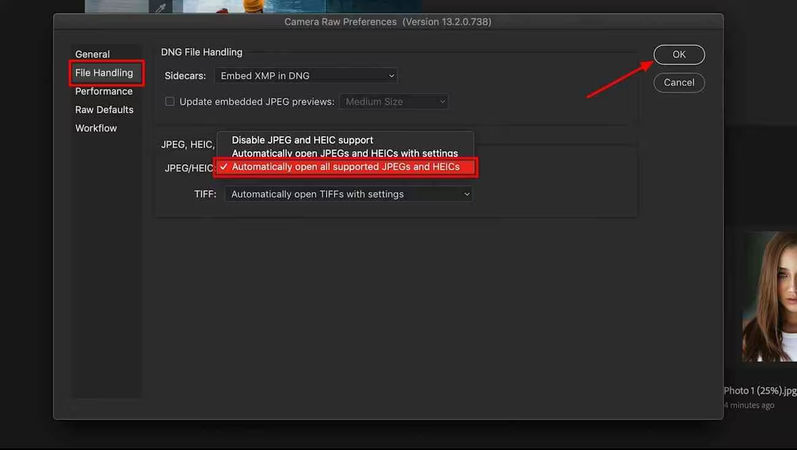
Before uploading the photo, you'll need to customize the preferences of Adobe Photoshop. To do it, you'll need to press on the Edit icon and navigate to the Preference button afterwards. After getting into the extended menu, you'll need to hit the Camera Raw and choose the File Handling afterwards.
When a small window appears on the screen with the ''Camera RAW Preferences'', you'll need to tick the ''Automatically open all supported JPEGs and HEICs'' icon from the from down menu of the JPEG/HEIC drop down menu.
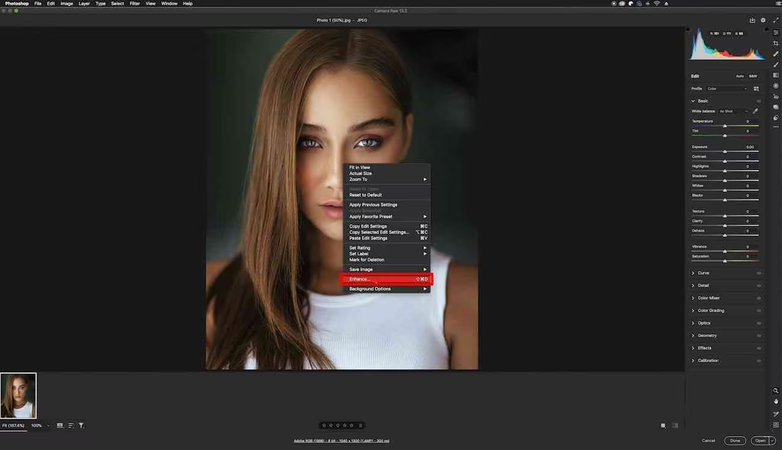
Step 2: After adjusting the preference settings, you'll need to upload the photo and then right press the image to take it to the timeline of Adobe Photoshop. Once you're done opening the photo in the Camera Raw, you'll need to tap on the Enhance icon to begin upscaling the credentials of the images.
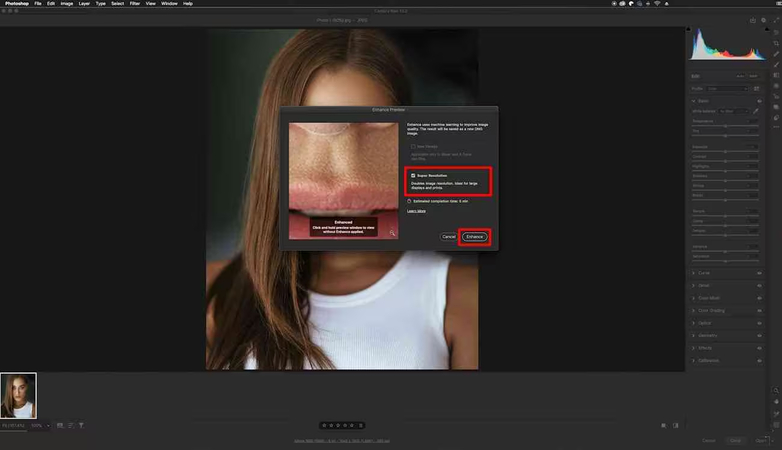
Step 3: You can now adjust the photo enhancing settings by selecting the Enhance Preview button. In this phase, you'll need to click the ''Super Resolution'' button and doing so will help you to increase the resolution of the images. You can get to see the final outcome of the images by hitting the Enhance icon. After reviewing the image, if you're satisfied with the overall results of the image's photo, you can then tap on the Export icon to save the images into the preferred location on the computer.
Part 3. The Best Alternative to Upscale Images with HitPaw FotorPea
Opting for the upscaler ultrasharp pack through Adobe Photoshop could be a difficult gig for newcomers so going for the HitPaw FotorPea to upscale the image quality makes sense.
With this tool, you can improve the quality of the images automatically thanks to the 7 highly efficient AI models.
Whether you're looking to enlarge the images or insert colors to the images, HitPaw FotorPea comes up with all the necessary credentials to enhance the image quality quickly. On top of that, HitPaw FotorPea also supports batch processing meaning it can upscale multiple images simultaneously.
Features
- Upscale the image quality quickly
- Offers the simple user interface
- Compatible with Mac and Windows
- Lets you to upscale multiple images simultaneously
- Reduce the noise from photos
- Colorize the black and white photos
- Doesn't offer the watermark
- No ads detected
- Prompts the affordable premium package
How to upscale image quality with HitPaw FotorPea?
Step 1: The first step in improving the image quality is to visit HitPaw FotorPea's official website and download the software subsequently. You will need to install and launch the software on the computer after downloading it. Next, select the file you want to upscale by clicking the Choose Files button.
Fortunately, HitPaw FotorPea supports batch processing, so you can import several photographs at once and import images in practically every format.

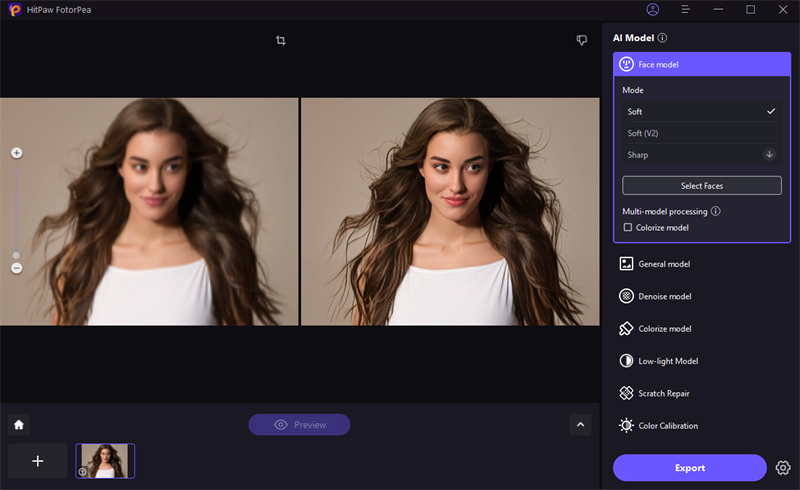
Step 2: After uploading the photo into the timeline of the HitPaw FotorPea, you'll be able to see the 7 stunning AI models on the screen. If you want to eliminate the blur from the images, going for the Face model will do the job for you. General model on the other hand, will assist you in enhancing the real scene images including the flowers, animals, buildings, etc.
The denoise model allows you to fix the low light or high iso images and if you wish to insert the new life to the images by adding the color, you can select the Colorize model.
Color calibration model allows you to fix the underexposed images and if you're looking to fix the damaged old images, opting for the Scratch Repair is on the cards. If the images were clicked in the low light environment, you can go for the low light model to improve the things.
Enlarging the image quality is possible as you can get straight into the bottom side and select the resolution button to choose the preferred resolution from there.

Step 3: It doesn't take long to apply the AI models on the HitPaw FotorPea, and once you've done so, you can click the Preview button to see all of the image's credentials. In the next phase, you'll need to hit the Export icon to download the images into the preffred folder on your computer.
Bottom Line
The introduction of the upscaler ultrasharp pack has helped the photographer to make the images look more sharp by upscaling the images. We have listed Adobe Photoshop as an appropriate way to explore the ultrasharp pack upscaling features to improve the overall quality of the images by enlarging them. Since Adobe Photoshop prompts the complex user and could take some applying the upscaling credentials to the images, HitPaw FotorPea appears the most suitable alternative to Adobe Photoshop as a ultrasharp pack upscaler.
With the 7 outstanding AI models, HitPaw FotorPea is capable of taking the quality of the images to the next level, making them look sharper and smooth.


 HitPaw Edimakor
 HitPaw Univd (Video Converter)
  HitPaw Watermark Remover



Share this article:
Select the product rating:
Daniel Walker
Editor-in-Chief
This post was written by Editor Daniel Walker whose passion lies in bridging the gap between cutting-edge technology and everyday creativity. The content he created inspires the audience to embrace digital tools confidently.
View all ArticlesLeave a Comment
Create your review for HitPaw articles