3 Methods to Solve How to Increase Resolution of JPG
When a photographer clicks an image, his motive is to make the image look perfect and relevant. Unfortunately, it might happen that the image you clicked doesn't have an appropriate resolution.
Can you increase the resolution of JPG images? Fortunately, increasing the resolution of the JPG or other images is possible, and we'll introduce amazing ways to help you know how to increase the resolution of JPG.
Part 1. The Best Tool to Upscale Images with HitPaw FotorPea
When it comes to upscaling the images or enhancing the resolution of the photos, there is no better tool than HitPaw FotorPea. It is a multi-talented tool that allows you to improve the quality of the images significantly courtesy of the 7 outstanding AI models.
From allowing you to get rid of blur from the images, colourizing the black and white images, and removing the noise from the images to helping you to increase the image resolution, HitPaw FotorPea will make the photos look admirable and majestic. HitPaw FotorPea doesn't alter the quality of the photos while it enhances them, and you won't notice the watermark showing up and ruining the enjoyment when you download the photos to your computer.
Features
- Allows you enhance images quickly
- Prompts 7 AI models to customize the image credentials
- Colorize the black and white images
- Compatible with Mac and Windows
- Supports the batch conversion
How to enhance images with HitPaw FotorPea?
Step 1: Once you're done installing the software from the main web page of the HitPaw FotorPea, you'll need to launch it and select the AI enhancer button. Click on the Choose Files button to import the photo you wish to enhance. HitPaw FotorPea allows batch processing, so you may upload several photographs at once.

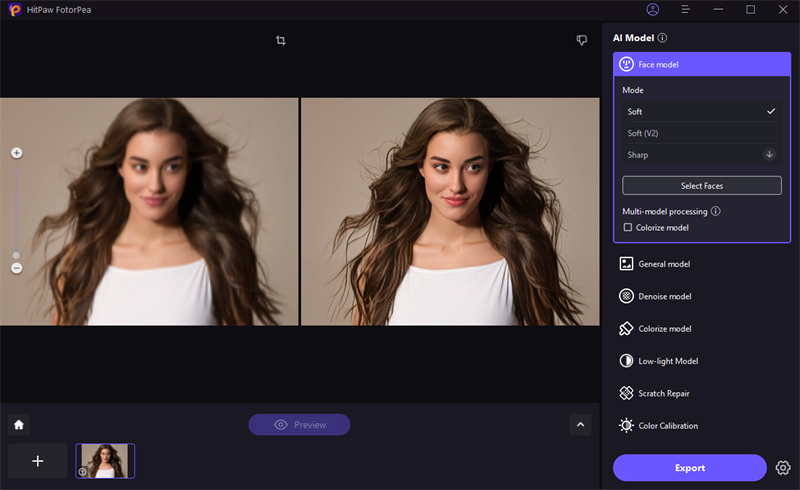
Step 2: Now, you can see the 7 stunning AI models out there. Selecting the Face model will help you eliminate the blur from the images, while the General model is designed to enhance the real scene images including the flowers, animals, buildings, etc.
You can use the Denoise model to fix the low light or high iso images and the colorize model will be helpful to add the colors into the black and white images. Fixing the underexposed images is possible through a color calibration model, and a low model will bring the much-needed light to the images.
If you're interested in fixing the old photos, scratch repair will come in handy enabling you to make the old photos look relevant.
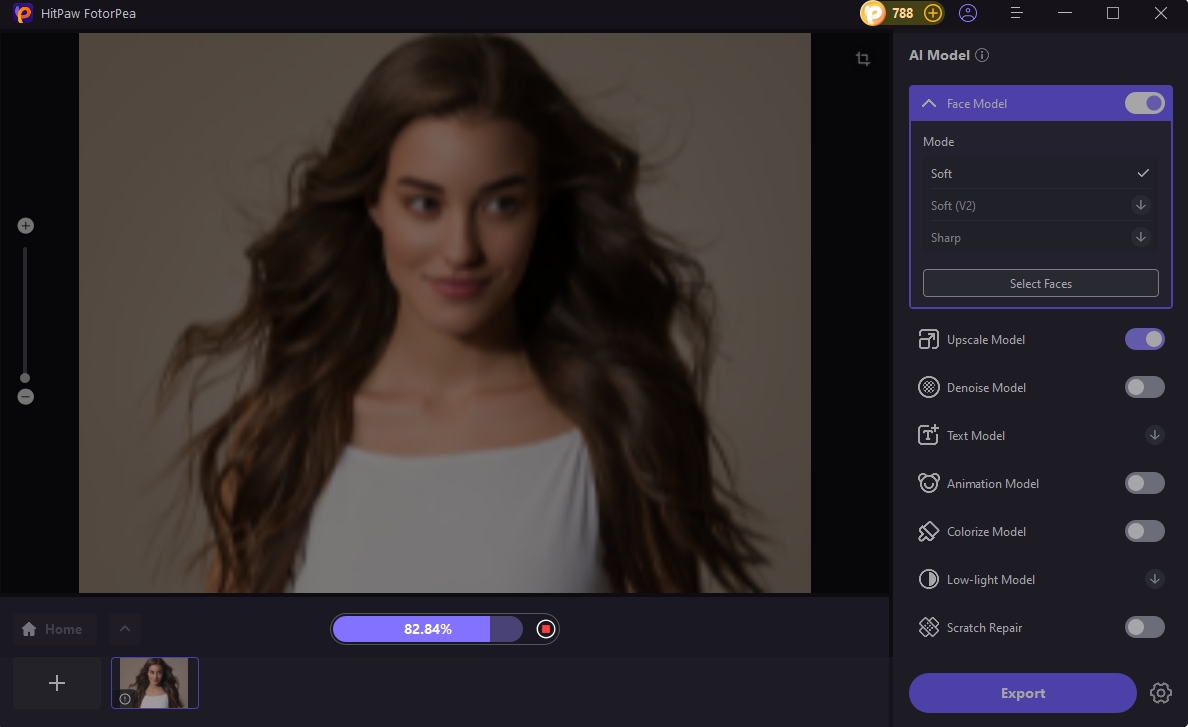
Step 3: After applying the preferred AI model, you can click on the Preview button to review the image credentials. Now, you can decide whether you want to add more AI models to the images or are satisfied with the results of the issues. You can then click on the Export icon to download the photo into the desired destination folder on your computer.
Part 2. How to Increase JPG Resolution with Adobe
Photoshop comes up with an enhancer that helps you know how to increase JPG resolution. Adobe Photoshop is probably the classiest and oldest tool to edit images and now it has introduced AI-powered features to ensure that you can upscale the photos efficiently.
Since Adobe Photoshop is all about professional and advanced features, the user interface this tool prompts could be hectic to many people's liking, but that won't be a big concern for you.
How to make a JPEG higher resolution with Adobe Photoshop?
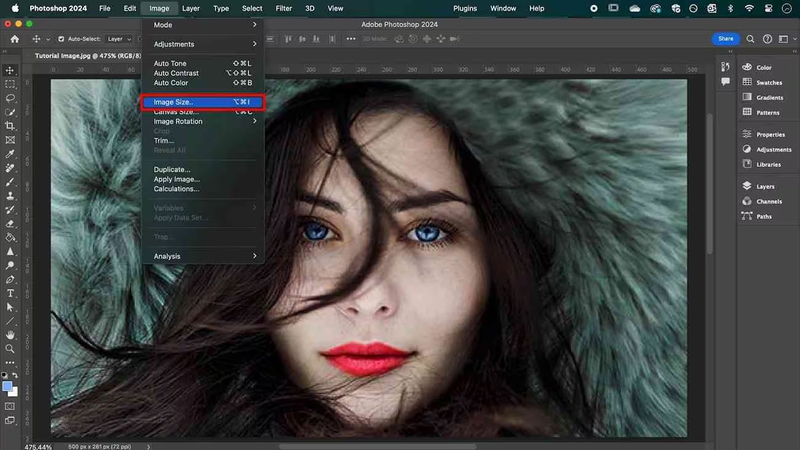
Step 1: First, you'll need to install Adobe Photoshop and launch it afterwards. After launching Adobe Photoshop, you'll need to tap on the Image button to import the photo to increase the resolution of. To launch the small window, you'll need to choose the Image Size from there.
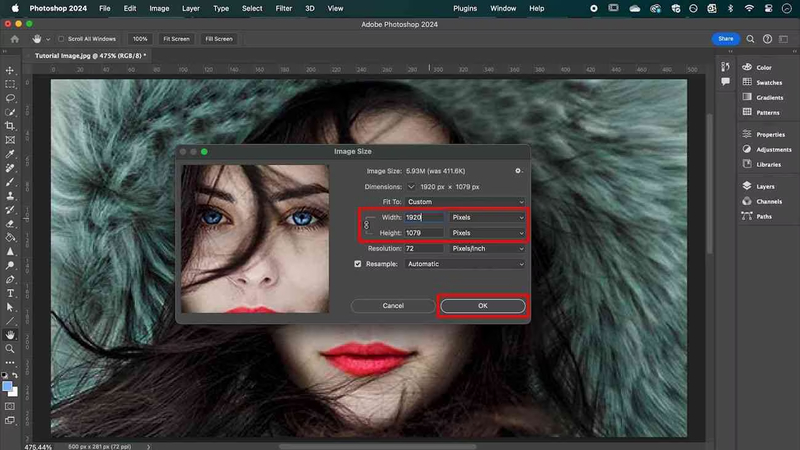
Step 2: Now, a small window comes up containing the Image Size make, and you'll also be able to see various more options there. Now, you can list the height and width of the photo you wish to edit. Upon hitting the ''OK'', you'll be able to distort the photos in different areas.
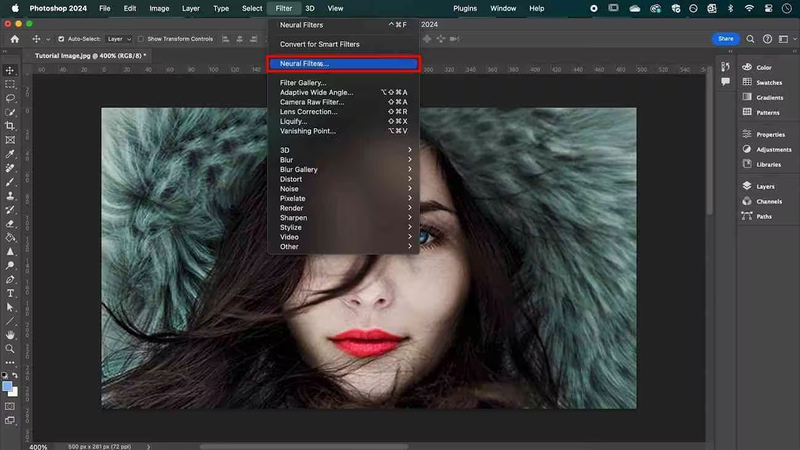
Step 3: You can now click on the Filter button to enhance the pixelated image. After visiting the drop-down menu, you can see the multiple filters like Lens Correction and Camera Raw filter. Proceed ahead by launching the right-side panel after choosing the Neural filters.
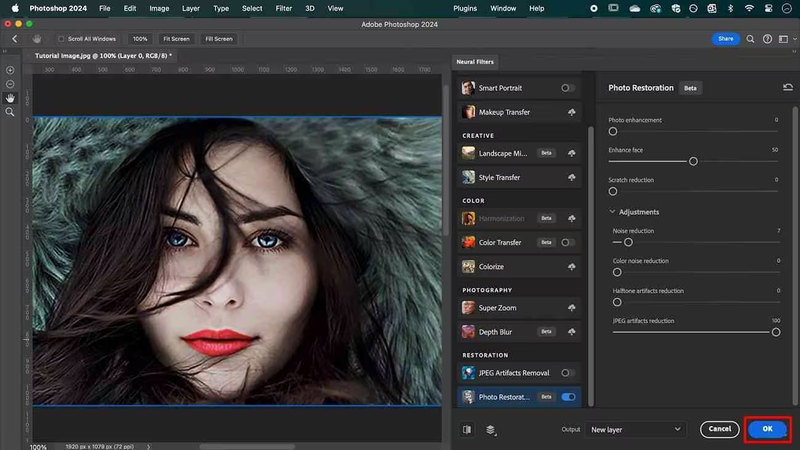
Step 4: Select the "Photo Restoration" filter by moving to the right side of the screen. You will have access to a variety of photo repair choices if you choose this option. If you wish to increase the photo enhancement and Enhance Face ratio, you'll need to slide left and right.
You can also customize the noise reduction settings by hitting the ''Adjustments'' button. Once you're happy with the results you've made, you'll need to tap the OK icon and this will save all the settings.
Part 3. How to Make a JPEG Higher Resolution with Pixelcut
Pixelcut is a stunning tool that helps you to customize the resolution of the images quickly. Since it is an online tool it doesn't ask you to install any software to enhance the image resolution. Instead, only going into the official timeline will be enough to help you enhance the resolution of images. Despite being an online tool, Pixelcut allows you to eliminate the blur from the images and make the less clear images look clearer and sharper.
Apart from offering excellent photo enhancing operations, Pixelcut is also capable of offering various photo editing features like black removal, changing the color, or removing objects from images.
How to convert JPG to higher resolution images with Pixelcut?
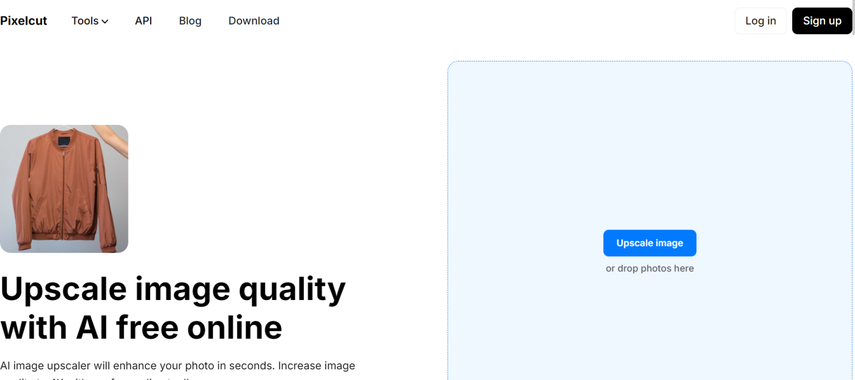
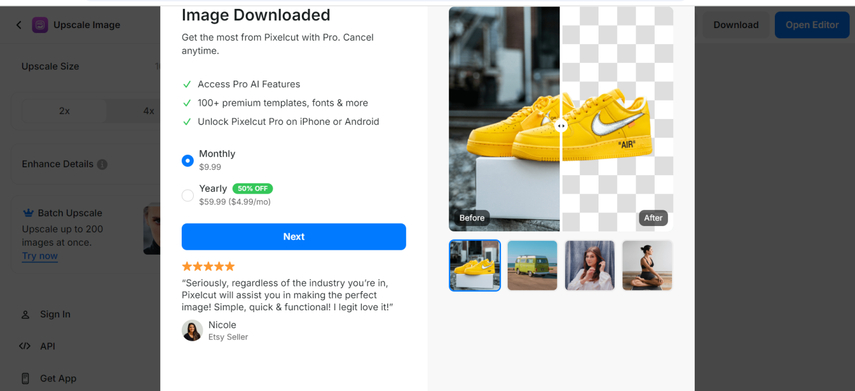
Step 1: After using the preferred web browser, you'll need to visit the official timeline of the Pixelcut and click on the Upload Image icon. You can now import the photo you wish to increase the resolution of, and Pixelcut won't take any extra time uploading the selected image into the main window of timeline.
Step 2: In this phase, you'll need to choose the appropriate upscale quality, as increasing the resolution of the images this way will be possible. Pixelcut could take some time to change the resolution of the images depending upon the speed of the internet.
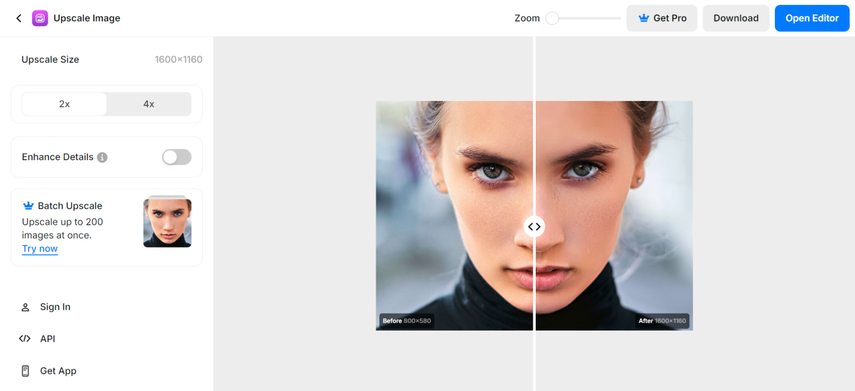
Step 3: After reviewing the image and checking whether you're satisfied with increasing the resolution of the images, you can now hit the Download icon to export the enhanced image to the preferred folder on your computer.
Final Words
Knowing how to increase the resolution of JPG images has turned simple courtesy of this excellent guide where we've listed the three excellent methods. Going for the Adobe Photoshop and Pixelcut is an appropriate way to learn how to improve JPG quality, but the user interface of the Adobe Photoshop and the speed of the Pixelcut might urge you to go for a third option.
HitPaw FotorPea appears the best way to enhance the quality of images in numerous ways without asking you to perform any manual operations. It only asks you to upload the photo to the timeline of the HitPaw FotorPea and let the 7 AI models to do the rest.


 HitPaw Edimakor
 HitPaw Univd (Video Converter)

Share this article:
Select the product rating:
Daniel Walker
Editor-in-Chief
My passion lies in bridging the gap between cutting-edge technology and everyday creativity. With years of hands-on experience, I create content that not only informs but inspires our audience to embrace digital tools confidently.
View all ArticlesLeave a Comment
Create your review for HitPaw articles