3 Best Tools to Add Warmth to Studio Portraits
Warmth might play a key role in the overall feel and look of the photos. In Photography, warmth is all about the spectrum of the red tones, orange, and yellow. Opting for the warmer tones might promote the feelings of caution, comfort, and happiness.
In comparison, cooler times like blue, violet, and green will make you feel sombre, creative and calm. Adding warmth to the images can add the much-anticipated lighting to the images as it might make the images look stunning and exciting.
Tune into this guide to explore the excellent ways to add warmth to studio portraits.
Part 1. The Best to Add Warmth to Studio Portraits with HitPaw FotorPea
When it comes to adding warmth to the image, no tool comes closer to the HitPaw FotorPea. With this tool, you've got the leverage to enhance the quality of the images from all aspects, and when it comes to enhancing the overall credentials of the images, HitPaw FotorPea brings in the exciting 9 AI models.
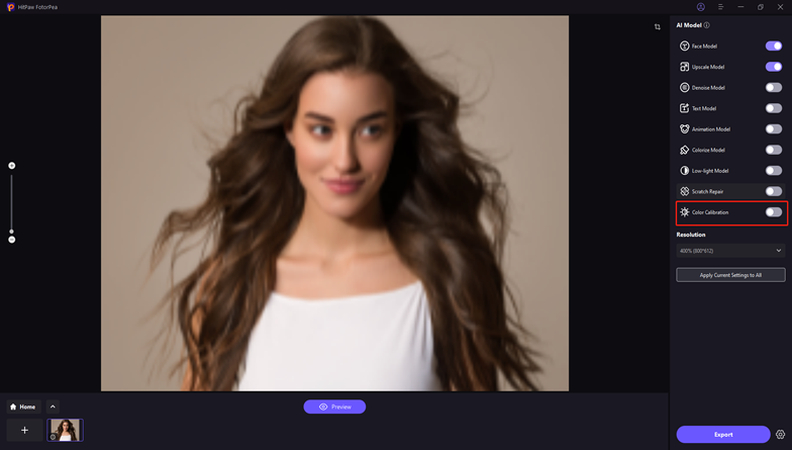
HitPaw FotorPea offers the designated color calibration model that allows you to adjust the light of the images. HitPaw FotorPea doesn't put the watermark in the images and it also supports batch processing so you can enhance the quality of multiple images simultaneously.
Features of the HitPaw FotorPea
- Allows you to add warmth to studio portraits quickly
- Compatible with Mac and Windows
- Enables you to enhance the quality of the images simulataneosly
- Doesn't insert the watermark in the images
- Apply the color calibration model to the images
- Explore the 9 outstanding AI models
- Allows you to remove the blur from the images quickly
- Enables you to reduce the noise from the images
How to adjust the light through HitPaw FotorPea?
Step 1: Tune into the official website of HitPaw FotorPea and click on the Download button to access the HitPaw FotorPea on the computer. After downloading the HitPaw FotorPea you'll need to install the HitPaw FotorPea on the computer and start the software afterwards.
Upon launching the HitPaw FotorPea you'll need to click on the AI enhancer button and select the Choose Files button. Doing so lets you import the photo into the timeline of HitPaw FotorPea. Upon launching the HitPaw FotorPea you'll need to click on the AI enhancer button and select the Choose Files button. Doing so lets you import the photo into the timeline of HitPaw FotorPea.

Step 2: Now you can see the 9 outstanding AI models in the screen and since you're looking to add the light to the images, you'll need to select the Color calibration model. Doing so helps you to add the much-anticipated lighting into the images.

Step 3: After adding the light to the images, you'll need to select the Color Calibration model to add the much-anticipated light to the images. After hitting the Preview button, you'll need to select the Export button as doing so helps you to download the enhanced images into the computer.
Part 2. Add Warmth to Studio Portraits with BeFunky
Another outstanding way to add warmth to studio portraits is through BeFunky. It is one of the best photo editing tools that doesn't shy away from adding remarkable filters to the images. The thing to like about the BeFunky is that it doesn't mess up with the quality of the images while adding warmth to the studio portraits, and if you're a premium user of the BeFunky, you won't see the watermark in the images.
Here's how to add warmth to studio portraits via BeFunky.
Step 1: To begin with, you'll need to visit the timeline of BeFunky and tap on the Open button on the top side of the screen to import the photo you wish to enhance the quality of.

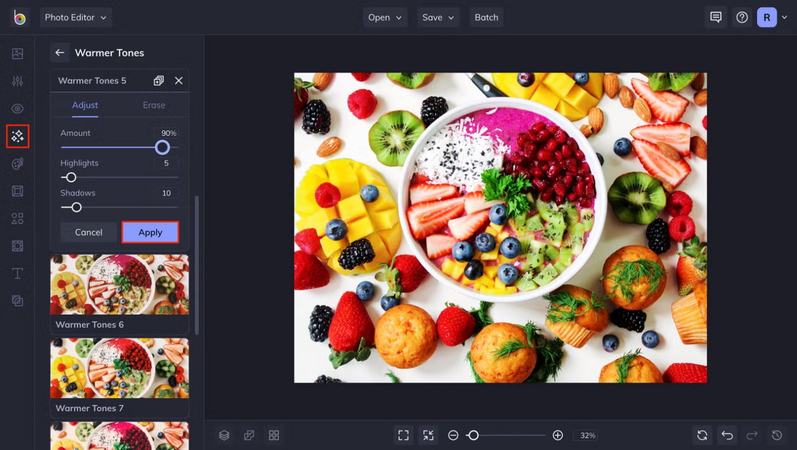
Step 2: Once you've uploaded the photo, you can click on the ''Warmer Tones'' from the Effects tab to launch the Warmer Tones menu. After making the selection, you've got the leverage to edit the settings to customize the effect as per your requirements. You can now experiment with the Shadows, Amount, and Shadows sliders to access the look you're aiming for. Once you're done editing the photo, you'll need to hit the Apply button to save the edits you've performed on the images.

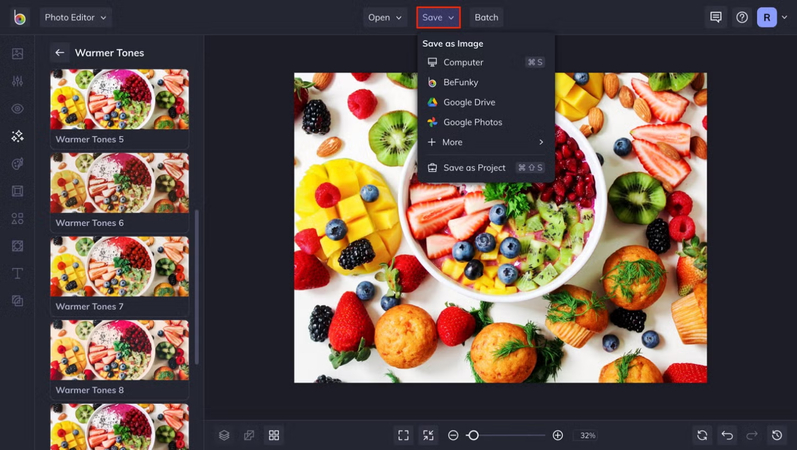
Step 3: After applying all the editing's in the images, you'll need to click on the Save button to save the changes into the computer.

Part 3. Add Warmth to Studio Portraits with Fotor
Despite looking at all the options listed above, if you're still struggling to add warmth to studio portraits, going for the Fotor won't be a bad option. With this tool, you've got the leverage to customize the multiple parameters of the images, and adding the light to the images is also on the cards.
Despite looking at all the options listed above, if you're still struggling to add warmth to studio portraits, going for the Fotor won't be a bad option. With this tool, you've got the leverage to customize the multiple parameters of the images, and adding the light to the images is also on the cards.
Apart from adding light to the images, Fotor is also capable of adding various stunning things to the images if you want to eliminate the blur, noise, or darkness from the images, Fotor will surely come in handy.
Here's a detailed guide to using the Fotor to add warmth to studio portraits via Fotor.
Step 1: To begin with, you'll need to jump into the official website of the Fotor and select the Apply Photo Effects Now button. Doing so asks you to import the images you want to add the warmth into.

Step 2: Click on the effects you wish to apply and then select the light effects you wish to apply on the image The significant thing to like about the Fotor is that it lets you apply the gigantic effects to the images.

Step 3: After applying all the effects to the images and accessing all the photo editing techniques, you'll need to preview the credentials of the images.
If you want to import multiple images simulataneosly, you can click on the plus button to import some more images into the computer. Once you're done applying all the filters to the images, you'll need to hit the Export button to save all the images on the computer.
Conclusion
You can take notes from this guide to add warmth to studio portraits as we've listed the stunning guide to insert the warmth or much-anticipated lighting into the images. All the options we've listed in this guide are worth your attention but HitPaw FotorPea remains the best option to add light to the images.
It supports enhancing the quality of multiple images simultaneously HitPaw FotorPea also doesn't put a watermark on the images, and you can explore the premium package of the HitPaw FotorPea at affordable rates.


 HitPaw Edimakor
 HitPaw VikPea (Video Enhancer)
 HitPaw Univd (Video Converter)


Share this article:
Select the product rating:
Daniel Walker
Editor-in-Chief
This post was written by Editor Daniel Walker whose passion lies in bridging the gap between cutting-edge technology and everyday creativity. The content he created inspires the audience to embrace digital tools confidently.
View all ArticlesLeave a Comment
Create your review for HitPaw articles