How to Add Gloss Texture to a Picture in Photoshop
Adding the gloss texture to the photos can make the images look professional and wonderful.
These images are well-suited for artistic projects, portfolios, and advertisements. With Photoshop, adding the gloss texture to the images is fairly simple.
In this guide, we'll introduce the step by step guide to help you know how to add texture to picture Photoshop.
Part 1. How to Add Gloss Texture to a Picture in Photoshop?
Adobe Photoshop is one of the most substantial photo editing tools to edit the images credentials and when it comes to adding the gloss texture to a picture, Adobe Photoshop won't disappoint you.
Although Adobe Photoshop offers advanced features, new users might find it difficult to use it.
Overall Adobe Photoshop is a reliable tool to edit the images as it holds the ability to make the images look exciting and worth going for.
How to add gloss to a picture in Photoshop?
Step 1: To start with, you'll need to jump into the official webpage of Adobe Photoshop. After downloading the Adobe Photoshop, you'll need to install it and start the software afterwards.
Click on the Layer button afterwards choose the New Adjustment and select the Curves button afterwards. Tap on the OK button after naming this layer as Shine.
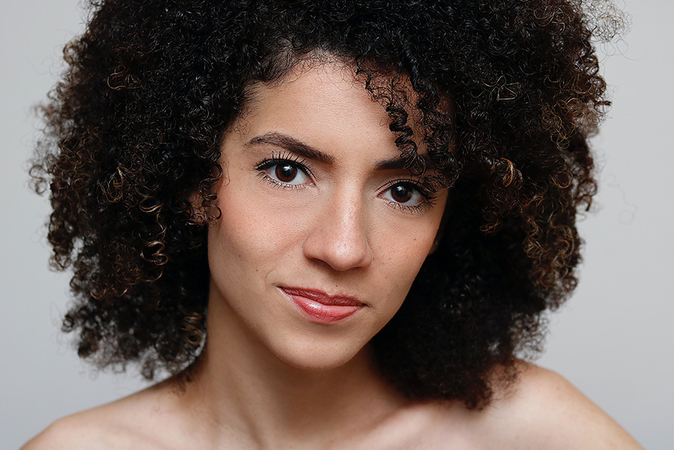
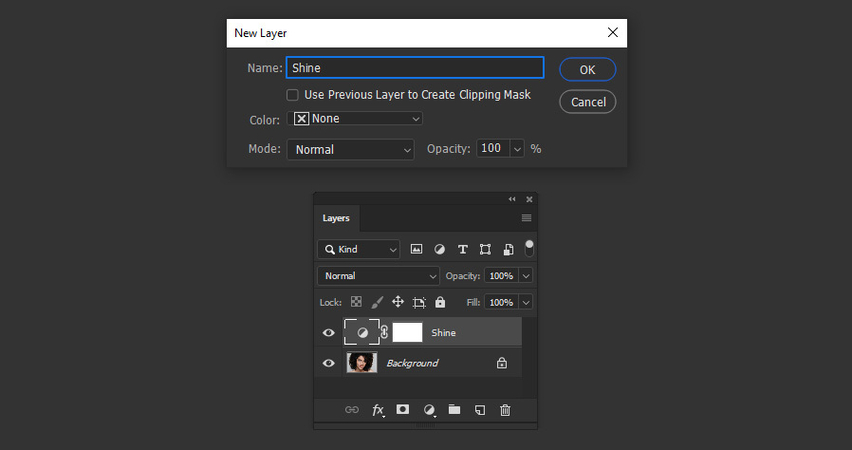
Step 2: After going into the Curves Properties panel, you'll need to add the new anchor by pressing anywhere over your curve and you'll need to proceed ahead by selecting the point input to 115 and output to 135.
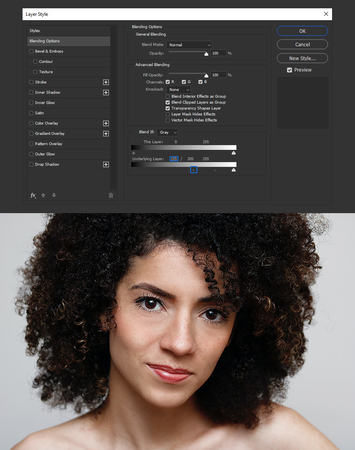
Step 3: Select the Shine Layer navigate to the Layer button, select the Layer Style, and choose the Blending options. Drag the black slider of your underlying layer until you reach a value where the shining part of your skin becomes more noticeable.
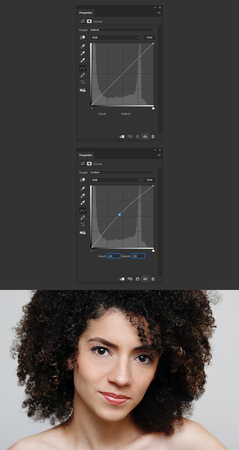
Step 4: Press the Alt key and then you can drag the black slider of your Underlying layer until you see the value where that shining area is smoother.
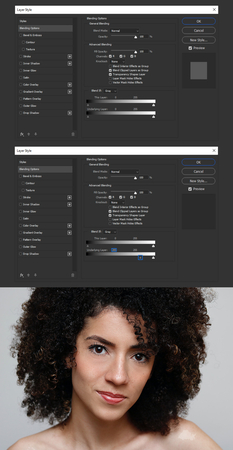
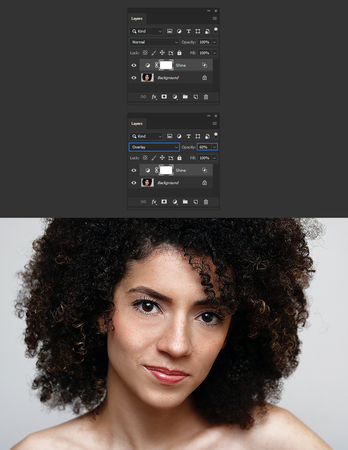
Step 5: In the Layer panel, set your blend mode of the Shine Layer to bring down and overlay down the opacity to 60%.
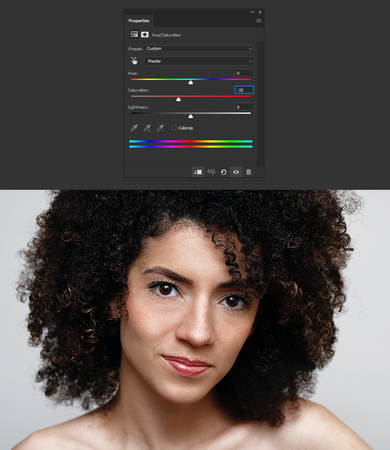
Step 6: Navigate to the Layer icon, select the New Adjustment Later and select the Hue/ Saturation. You can now name this layer as saturation check the ''Use Previous Layer to create Clipping mask and hit the OK button.
Step 7: Navigate to the Hue/ Saturation panel and set the Saturation to -20.
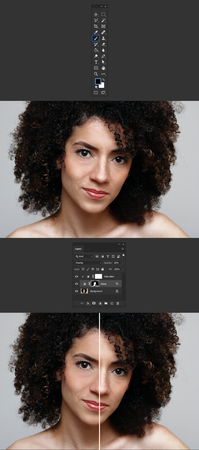
Step 8: Choose the Layer Mask Thumbnail of the Shine Layer to make the things look active. Next, you'll need to choose the Brush tool and use the softly rounded brush paint outside your skin areas to hide them.
Part 2. The Best Alternative for Retouching Images with HitPaw FotorPea
Although Adobe is an appropriate way to edit the images, it could be difficult for newcomers to retouch the images. Thus, aiming at the HitPaw FotorPea will bless you with more efficient and appropriate results that make sense.
It is a wonderful image editor that doesn't shy away from offering brilliant retouch features and it also allows you to explore the 9 AI models to make them look stunning and watchable. Whether you're struggling with the noise in the images or are looking to get rid of the unwanted blur from the images, HitPaw FotorPea comes in handy, enabling you to make the images look smooth and wonderful.
On top of that, HitPaw FotorPea also lets you to customize the background of the images as it only asks you to import the images into the timeline of the software to begin removing the background from the images. The quality and professionalism of this tool are such that it allows you to export the enhanced images without a watermark, and since it supports batch processing, you've gotten the chance to retouch multiple images simulataneosly
Features
- Allows you to retouch the images, enhance all the credentials of a photo automatically
- Explore the 9 AI models making them look smooth and relevant
- Supports various operating systems including the Mac and Windows
- Allows you to preview the images before exporting them to the computer
- No watermark detected, download the watermark-free images into the computer
- Enables you to import multiple images simulataneosly as it supports batch processing
How to retouch the images through HitPaw FotorPea?
Step 1: Visit the official timeline of the HitPaw FotorPea and then click on the Download button to download the software on the computer. Next, you'll need to Install the software and then launch it afterwards.
Upon clicking the AI Enhancer and Choose Files button, you'll be able to import the images you wish to enhance the quality of. HitPaw FotorPea is also compatible with batch processing, meaning you've got the leverage to enhance the quality of multiple images simulataneosly.
On top of that, HitPaw FotorPea also supports multiple image formats meaning you can upload the images in several image formats.

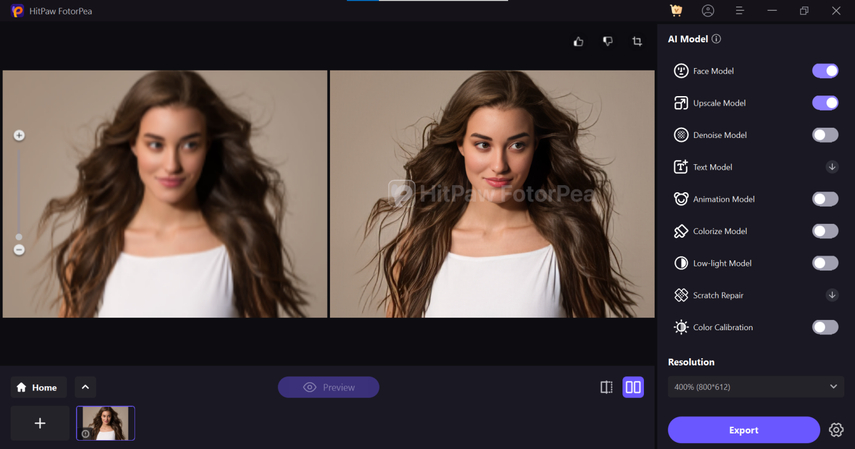
Step 2: After importing the images into the main interface of the HitPaw FotorPea, you can see the multiple AI models on the screen, including the Face model, Denoise model, upscale model, animation model, text model, color calibration model, scratch repair model, low light model, colorize model, and animation model.
Opting for the Face model enables you to enhance the facial details enabling you to enjoy the natural appearance. The model depends upon highlighting the different features and tends to improve the skin textures, allowing you to refine the imperfections of your images.
If you're struggling with the noise in the images, you can remove the noise from the photos by hitting the Denoise model. Improving the visibility of the text is possible courtesy of the text as it also helps you to enhance the clarity and sharpness of the images.
You can also enhance the animated images or artwork by selecting the animation model as it allows you to refine the edges of the images offering a simple user interface.
Adding stunning colors to the black and white images is also possible courtesy of the Colorize model and if you want to insert light into the images going for the low-light model is most recommended.

Step 3: Once you're done applying the favorite AI model to the images, you can click on the Preview button to review all the images. This way you'll be able to make some adjustments to the images if required and if you're satisfied with the overall results of the images, you can hit the Export button to enhance the images into the computer.
In Conclusion
Adobe Photoshop is a reliable tool when it comes to learning how to add gloss to picture Photoshop. You can look at the detailed guide below to learn how to add gloss to pictures in Photoshop and Adobe Photoshop.
HitPaw FotorPea remains the best alternative to Adobe Photoshop, and it doesn't take any extra time to add gloss texture to the images. It brings in the affordable premium package and while exporting the images to the computer, you won't see the watermark appearing there.


 HitPaw Edimakor
 HitPaw VikPea (Video Enhancer)
 HitPaw Univd (Video Converter)

Share this article:
Select the product rating:
Daniel Walker
Editor-in-Chief
My passion lies in bridging the gap between cutting-edge technology and everyday creativity. With years of hands-on experience, I create content that not only informs but inspires our audience to embrace digital tools confidently.
View all ArticlesLeave a Comment
Create your review for HitPaw articles