Step by Step Guide to Correct White Balance in Photoshop
During photography, achieving the perfect color balance can be tricky. Even if you have the best camera paired with the perfect camera settings, images may appear too warm, cold, or tinted due to lighting conditions. You may have noticed that usually indoor shots have an orange tint, whereas the beach photos look oddly blue. This kind of color inconsistency occurs because of incorrect white balance.
But you need not to worry about it because, luckily, Adobe Photoshop offers powerful editing tools to fix this. Wondering how? Well, in this guide, we will dive deep into how to correct white balance in Photoshop and make photos look natural and true to life. Besides this, we will introduce AI tools like HitPaw FotorPea that simplify the process.
Part 1: Understanding White Balance Correction
1. What is White Balance in Photography?
Think of white balance as your camera's way of seeing colors the way your eyes do. Your brain adjusts the colors automatically to different lighting conditions, but cameras need a little help. That's why when you're sitting in a room with fluorescent lights, everything looks normal to you, but the camera might turn everything green or blue in photos.
Since natural light, incandescent bulbs, or fluorescent lights emit different color temperatures, the goal of white balance is to neutralize these variations to produce accurate hues. In other words, the magic of white balance lies in its ability to make whites look genuinely white, regardless of the condition of light.
2. How Does Incorrect White Balance Affect Photos?
Usually photos with a poor white balance seem off and unnatural and can throw off your entire image in surprising ways. For example;
- Skin tones might look sunburned or unrealistic.
- Snow scenes could appear blue instead of pristine white.
- Indoor photos might have an unwanted orange glow.
- Sunset shots might lose their natural warmth.
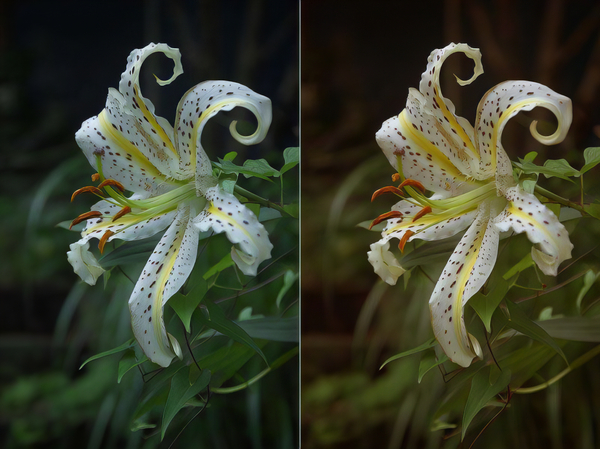
For example, a lot of us love shooting during the golden hour, but getting those colors to really pop is not everyone's cup of tea. This can be really tricky, but one can control it using the right white balance.

Take a look at the two images below. If you're going for bold, vibrant colors, try setting your white balance to something warmer, like 8500K. But if you prefer a softer, more toned-down vibe, a cooler setting around 6000K might be more your style.
So here, there's no right or wrong as both of these images are just a different artistic take on the subject. Hence, just by adjusting the white balance creatively, you can shape your photos to align perfectly with the mood and vision you're aiming for.
3. How to Adjust White Balance with Camera Settings
To prevent the white balance issue, cameras offer several built-in modes to assist. Such as;
- Auto White Balance (AWB): The camera detects the lighting and adjusts the white balance automatically.
- Use Custom White Balance: Photograph a white or gray card in your shooting conditions.
- Pick the Right Preset: Match your lighting (sunny, cloudy, tungsten, etc.).
- Shoot in RAW: Gives you more flexibility for post-processing adjustments
- Manual Kelvin setting: Some cameras allow direct temperature adjustment for precise control.
However, despite these modes, you may still require adjustments in post-processing using Photoshop to achieve perfection.
Part 2: (3 Methods) How to Correct White Balance in Photoshop Elements
Method 1: Adjusting the Color Balance
If the image leans toward a specific hue, such as too much red or blue, this method works wonder. Here's how you can correct white balance in Photoshop.
1.Open the Orignal image in Photoshop Elements

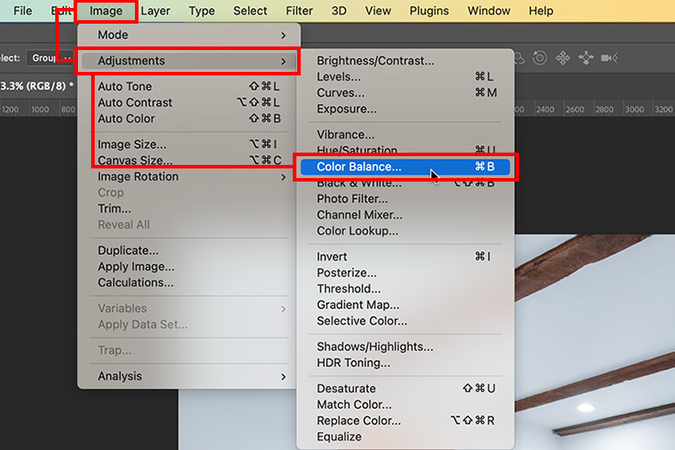
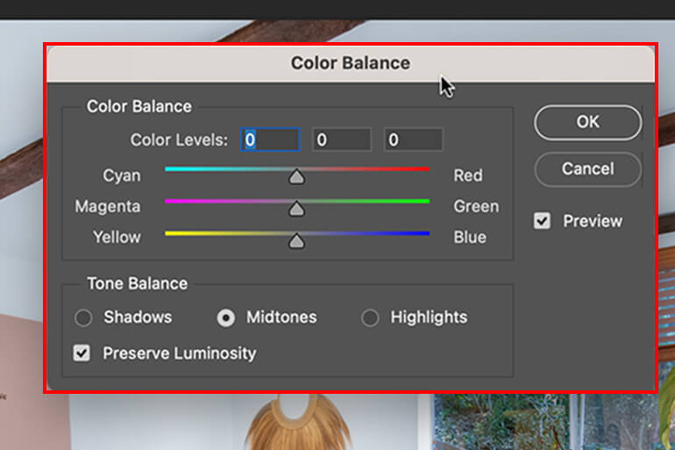
2.Navigate to Image > Adjustments > Color Balance.

3.In the Color Balance dialog box, adjust the sliders for Cyan-Red, Magenta-Green,and Yellow-Blue to balance the colors. To Maintain the original brightness, check the box labelled Preserve Luminosity.

4.Click OKand see the final result.

Method 2: Utilizing the Curves Tool
The Curves tool offers more precise control over the tonal values. Here's how to use it.
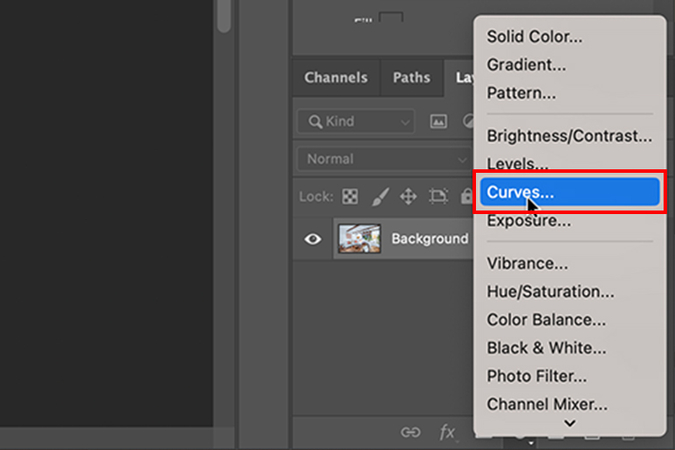
1.Create a curve adjustment layer.

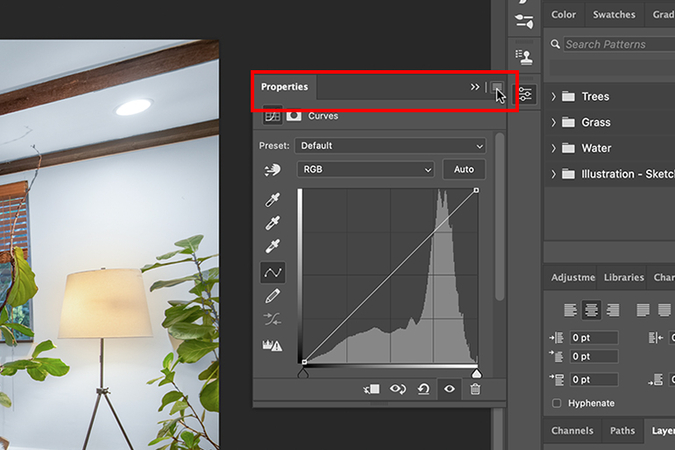
2.Click on the right edge of the Properties tab (marked green in the screenshot below).

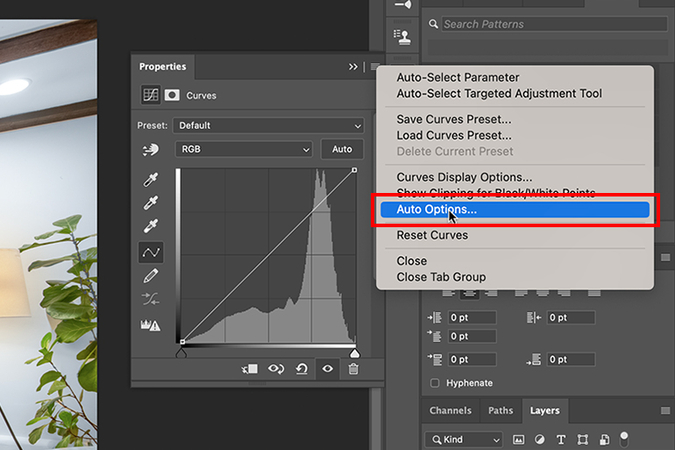
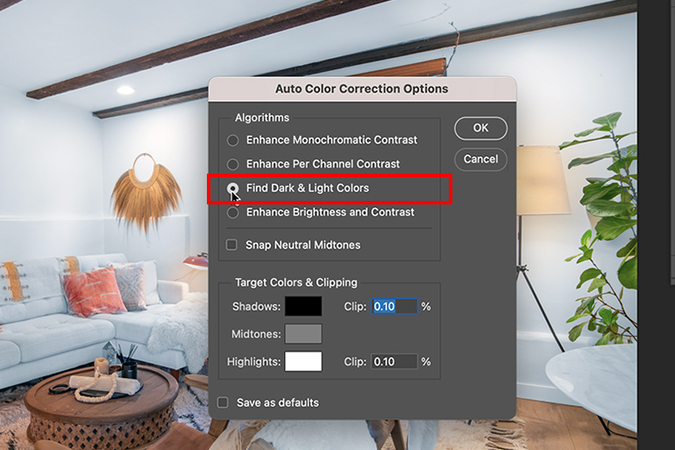
3.From the drop-down menu, select Auto Options.

4.This will bring up the Auto Color Correction Options. In this window, choose Find Light and Dark Colors.

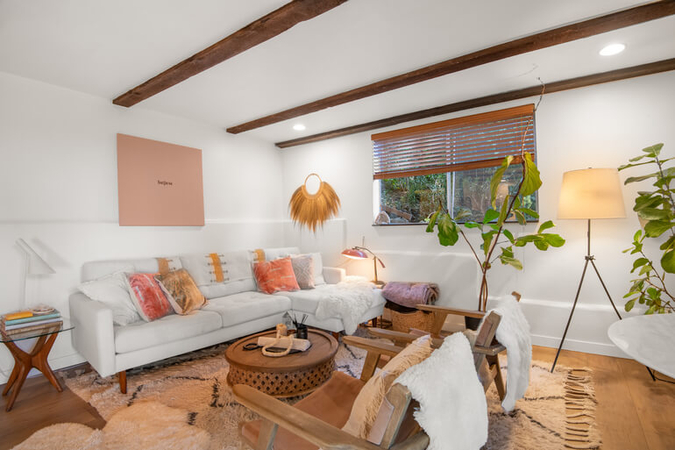
5.Click Ok and see the final result.

Method 3: Applying Adobe Camera Raw Plugin
The Adobe Camera Raw (ACR) plugin is especially useful for photographers who work with RAW files. It allows you to import raw images and make basic adjustments in Photoshop.
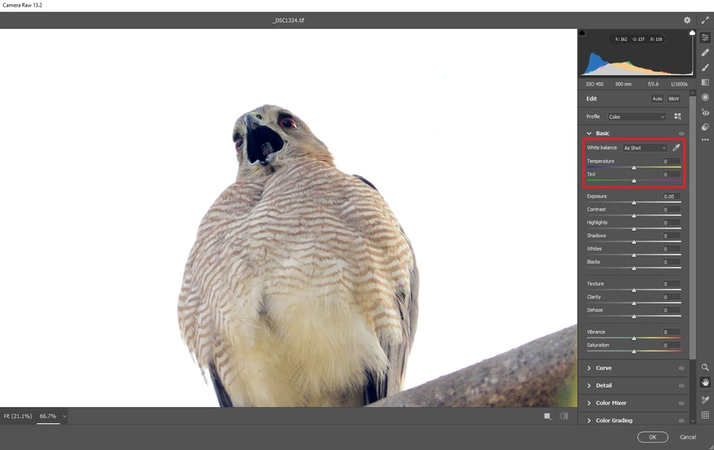
- 1.Open the raw imagevia Filter > Camera Raw Filter.
- 2.In the ACR panel, adjust the White Balance Tool (W)by clicking on a neutral grey
- 3.If needed, adjust the Temperatureand Tint sliders to fine-tune the balance.
Part 3: Extra Tip on Using AI for White Balance Correction
Although the techniques mentioned above provide a comprehensive way to correct the white balance in Photoshop, they can be overwhelming for beginners. Therefore, if you are looking for a quick and easy solution, consider using HitPaw FotorPea.
Powered by an advanced AI algorithm, HitPaw FotorPea is a robust editing that simplifies white balance correction with artificial intelligence. It automatically analyzes and corrects white balance, ultimately saving time and effort for photographers.
Some of the key features of HitPaw FotorPea
HitPaw FotorPea - All-in-one Photo Editing Tool for Win & Mac
Secure Verified. 212,820 people have downloaded it.
- AI-powered color correction to fix photo white balance
- User-friendly interface to edit photo and take it to next level
- Batch processing of multiple photos with the same model
- High quality output to make sure clarity for pictures
Secure Verified. 212,820 people have downloaded it.
How to correct white balance using HitPaw FotorPea?
Step 1: Download and Install HitPaw FotorPea
Visit the HitPaw FotorPea and download the software for your Window or Mac. Then install it following the on-screen instructions.
Step 2: Enter AI Enhancer
After the installation, select “AI Enhancer” from the main menu and and Click on “Choose File” to upload all the photos you want to correct.

Step 3: Choose AI Model of Color Calibration
Now, from the given options, select the Color Calibration model to correct white balance photo.

Step 4: Wait for Few seconds and let the ai do its work
Now in just a matter of seconds, HitPaw FotorPea's AI will analyse the photo and apply the necessary enhancements.
Step 5: Preview the effect and Export
Now preview the changes and compare before and after image. Once you're happy with the outcome, click on “Export” and download the enhanced image.

This is the ultimate guide of HitPaw FotorPea
Conclusion
If you are looking to give your photos a professional look, having the basic knowledge of white balance is necessary. Along with the knowledge about white balance, you may also need to know how to correct white balance in Photoshop, as this is what makes your photos stand out.
However, using these can be a steep learning curve and time-consuming. But if you are looking for a quicker solution, AI-powered tools like HitPaw FotorPea are what can serve the cause. Powered by AI, this amazing software provides a seamless editing experience with minimal effort, ensuring you get professional-grade photos in just a click.




 HitPaw Univd (Video Converter)
 HitPaw VoicePea
  HitPaw VikPea (Video Enhancer)


Share this article:
Select the product rating:
Daniel Walker
Editor-in-Chief
My passion lies in bridging the gap between cutting-edge technology and everyday creativity. With years of hands-on experience, I create content that not only informs but inspires our audience to embrace digital tools confidently.
View all ArticlesLeave a Comment
Create your review for HitPaw articles