How to Use Radial Blur for Stunning Motion in Photoshop
Adobe Photoshop is a fantastic photo editing software that comes up with various effects and tools that can perform various editing operations including matte paintings, retouches and photo manipulations. Of all the filters that Adobe Photoshop brings to the table, radial blur is one of the most talked about and popular ones as this can make the photos look stylish and extraordinary.
Tune into this guide to learn what is radial blur and how to create the blur effects of the radial in Adobe Photoshop.
Part 1. What is Radial Blur?
The radial blur effect has various similarities to the motion blur. You've got the leverage to blur the photos by relying upon the slow shutter speed enabling you to move the camera in specific ways. The more precise and direct you are with the movements, the better the blur effect will. With the motion blur, you can imagine the camera on the tripod panning from the right to the left side and having a slow shutter speed. This motion could take the surroundings of the images turning them into blurred parallel lines.
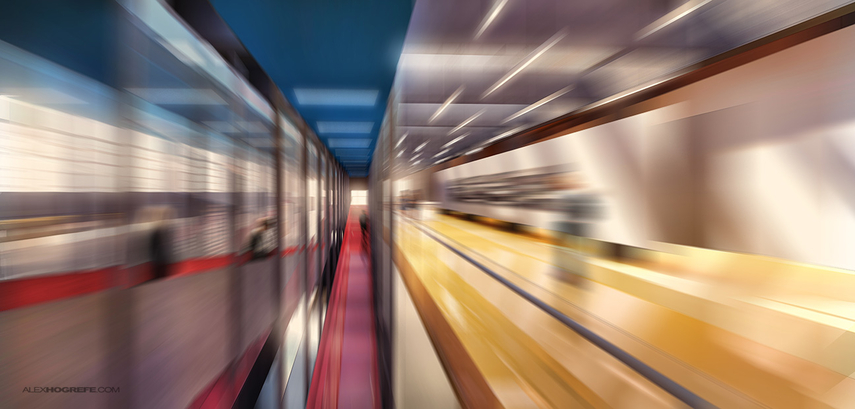
By using the radial blur effect, you can surely imagine that the camera is on the turntable with it spinning around the lens' centre. If you tend to click the photo having a slow shutter speed, it is bound to create a circular-looking image. You can then create the radial blur effect by zooming in by using the slow shutter speed. After doing this correctly, it will make you feel that you're moving at warp and brisk speed in space, it might also look like that you've got significant tunnel vision.
Part 2. How to Create Radial Blur Effect in Photoshop
Knowing how to create the layer mask and smart object is crucial to using the radial blur on Adobe Photoshop. It is a spectacular photo editor that apart from performing multiple photo editing operations also allows you to explore the various blur effects and using the radial blur is one of the most recommended blur effects. You can watch out for the step-by-step guide listed below to add the radial blur to the images by using Adobe Photoshop without spending even a penny.
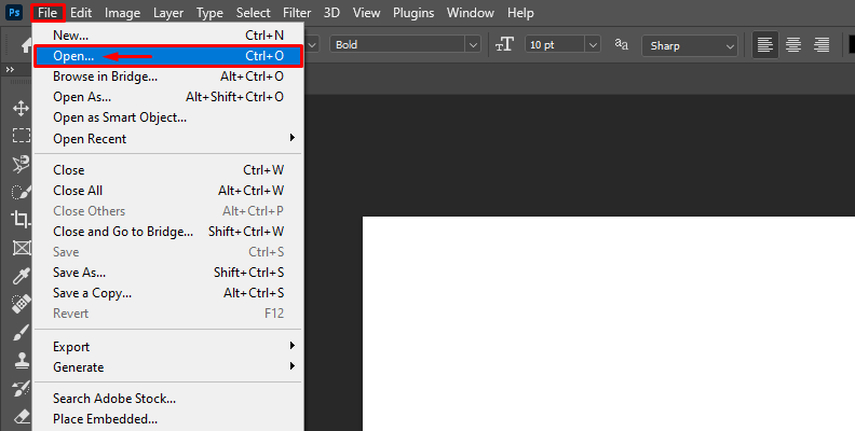
Step 1: To begin with, you'll need to install the software on the computer and then start it afterwards. Click on the File button and choose the Open button before selecting the photo you wish to upload.
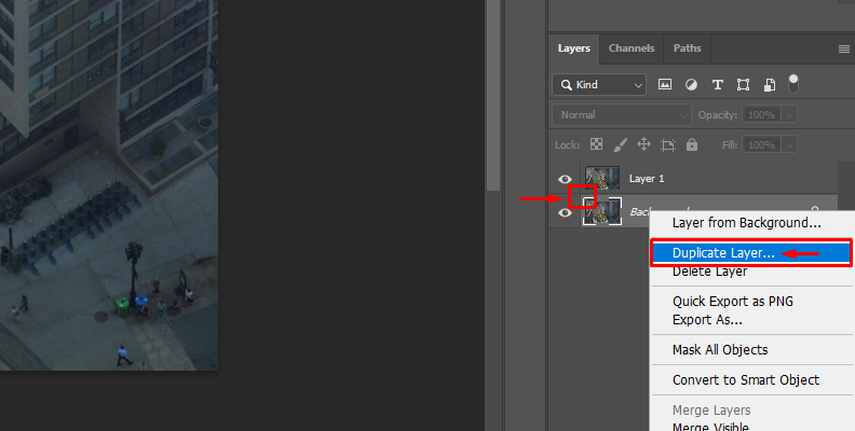
Step 2: You can preserve the quality of the original image by working on the duplicate layer. To do it, you'll need to press on the background layers in your layers panel and select the Duplicate layer button afterwards. You can then name your duplicate layer if you want to find it easily later on which will be helpful in complex projects.
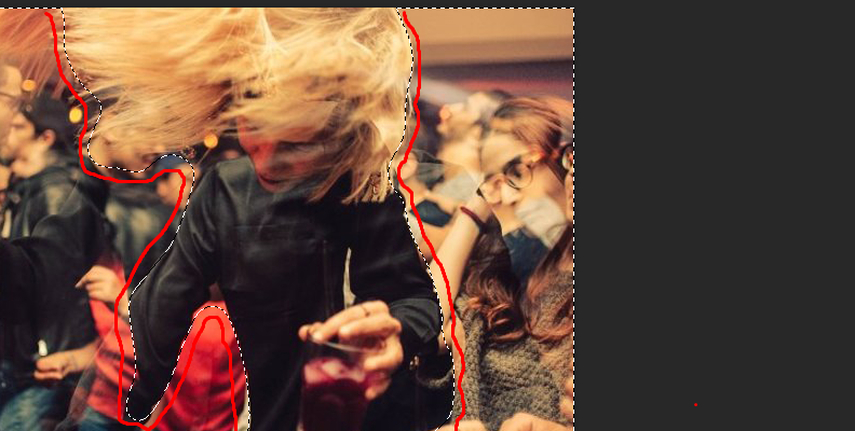
Step 3: If you're looking to use the radial blur effect on your separate layer, you've got the leverage to produce the new blank layer by hitting the New Layer button at the layers panel's bottom side. Determine the centre point for the radial blur effect in this stage, you can rely upon the selection tools you wish to use including the lasso tool and, the Marquee tool to make the selection unblurred and sharp. If you intend to make the entire image look blurred you can skip this step.
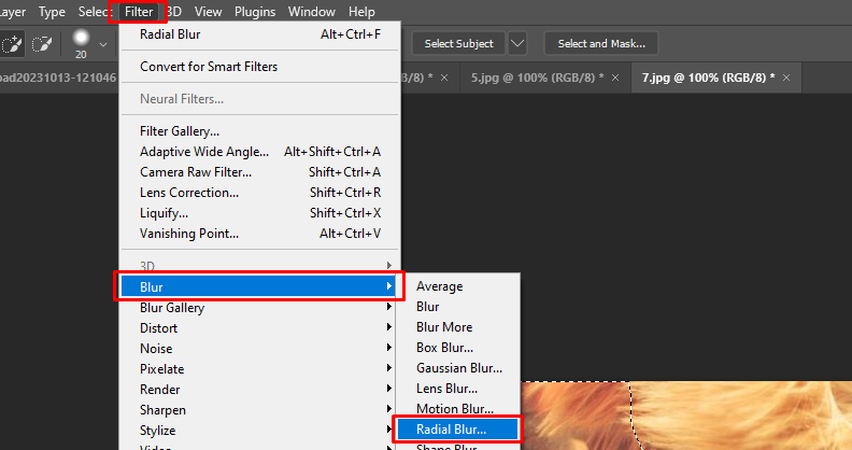
Step 4: With the selection, you'll need to navigate to the Filter button and select the Blur button afterwards. Click on the Radial blur button to launch the Radial blur dialogue box. After visiting the radial blur dialogue box, you can see the two blur methods including zoom and spin. In the next phase, you'll need to select the method that suits the image.
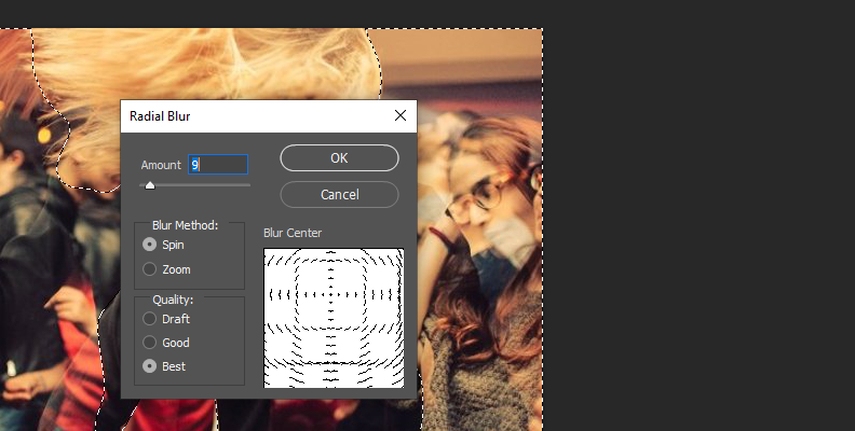
The spin blur method is a circular motion blur which appears when you spin the photo around the central point. When you talk about the zoom blur effect, it tends to produce the zooming effect making the photos zoom either in or out from the central point. You can control the blur effect's intensity by using the Amount slider. You can then review the effect in your dialogue box while adjusting the slider.
Now, you'll need to make sure that you've chosen the Center option in the dialogue box. You can now manually drag the centre point to your desired location within the photos. In the next stage, you'll need to press on the photo to adjust the centre point at the spot you wish to apply it. Upon getting satisfied with the preview and settings, tap on the OK button in the dialogue box or the Radial blur to apply the Radial blur meme effect.
Part 3. Simple Way to Generate Radial Blur Images with HitPaw FotorPea
Although creating the radial blur effect in Adobe Photoshop is worth your attention newcomers won't be able to use Adobe Photoshop to produce the radial blur effect in the Adobe Photoshop courtesy of the complex user interface of the tool. Hence, you can rely upon the HitPaw FotorPea to access the radial blur effect images by entering the text description and selecting the style of what you want to create.
While creating the radial blur meme images, HitPaw FotorPea tends to maintain the quality of the images and it prompts the effortless user interface making it simple for newcomers to use the tool to create the radial blur effect images.
Features
- Lets you create the radial blur effect images in original quality
- Prompts the simple user interface
- Compatible with Mac and Windows
- No image quality loss detected
- Create multiple AI-generated images simultaneously
- Doesn't insert a watermark on the generated radial blur effect images
How to generate the Radial blur images through HitPaw FotorPea?
Step 1: Once you're done installing the HitPaw FotorPea on your computer, you'll need to start the software. After hitting the AI Generator button you'll need to press the Generate AI Images button to access the AI image generation timeline.

Step 2: After going into the Type What You See button, you'll need to type in the text description of what you want to create through HitPaw FotorPea. You can also upload the photo and get it turned to the Radial blur images.

Step 3: In this phase, you'll need to select the image size and resolution of the generated images and then hit the Generate button. Select the photo you wish to download and then hit the Download icon to export the photos into the preferred location on the computer.

Conclusion
The efficiency and reliability of the radial blur effect in Adobe Photoshop are huge as they can elevate the quality of the images making them look impressive and attractive. This post apart from helping you know what is radial blur also assisted you in creating the radial blur effect in Adobe Photoshop. Since creating the radial blur effect through Adobe Photoshop could consume a lot of time, you can use the HitPaw FotorPea to produce the stunning radial blur effect.
HitPaw FotorPea enables you to create multiple AI-powered images by entering the text description offering the batch creation.


 HitPaw Edimakor
 HitPaw VikPea (Video Enhancer)
 HitPaw Univd (Video Converter)

Share this article:
Select the product rating:
Daniel Walker
Editor-in-Chief
My passion lies in bridging the gap between cutting-edge technology and everyday creativity. With years of hands-on experience, I create content that not only informs but inspires our audience to embrace digital tools confidently.
View all ArticlesLeave a Comment
Create your review for HitPaw articles