Why Are My Facebook Photos Blurry? Causes and Solutions
Facebook is an integral part of social media that allows you to communicate with friends by uploading magnificent images into your timeline of Facebook. Unfortunately, a lot of users often ask us about the ''Facebook photo blurry'' issue and facing this type of issue could be annoying.
Why are Facebook photos blurry? This post comes up with the answer to this most asked question along with mentioning the potential reasons causing the blurry Facebook photos.
Part 1. Common Reasons for Blurry Facebook Photos
Struggling with blurry Facebook photos won't be acceptable to anyone, but if you want to fix this issue knowing the root cause of the issue is paramount.
Here's the list of reasons why are Facebook photos blurry.
1. File Types
Although a lot of people don't consider the file type to be the main reason behind the image getting blurred on Facebook, uploading the images in a file format other than PNG or JPEG can make your images look blurred. Thus before uploading the images on Facebook, you'll need to ensure that the photos are either in the PNG format or JPEG format.
2. Pixels
Another thing that could cause the images to get blurred is the pixel limitation rule of Facebook. It implies that sometimes Facebook doesn't accept high-resolution images and this rule varies in different types of images. For instance, the pixel limitations of the profile photo on Facebook are a bit different from the cover page.
3. Editing
Facebook comes up with the editing that is ''Scale to fit'' which tends to compress or stretch the photo to get uploaded. This reason might be the main culprit behind the photos getting blurred. Although the the image was good in quality Facebook's editing has made the photo look distorted and blurred.
Part 2. How to Fix Facebook Photos Blurry
Here's the list of the three reliable ways to fix the blurry Facebook photos.
Method 1. Upload High-Quality Images
Increasing the quality of the Facebook settings to accept the images in HD or higher resolution might stop you from asking the question ''why are Facebook photos blurry''? Setting the Facebook settings in a mode to accept the HD images doesn't ask you to do much, as only visiting the Facebook app settings and customizing the few things out there will surely do good for you.
Step 1: After launching the Facebook app, you'll need to click on the Hamburger button and select the ''Settings and Privacy'' button afterwards.
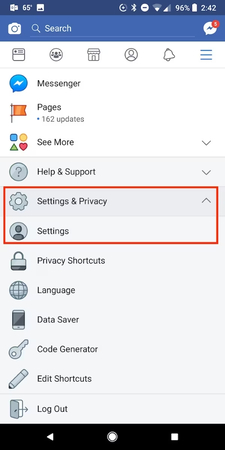
Step 2: Now, you can see the drop-down appearing there, and all you need to do is to choose the Settings tab.
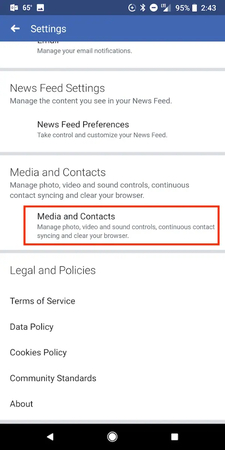
Step 3: After accessing the new screen, you'll need to tap on the ''Media and Contacts'' button after locating it from the Facebook App settings.
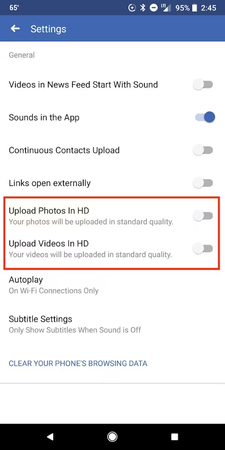
Step 4: Now, you'll another screen with different and new options. Turn on the ''Upload Photos in HD'' to ensure that now can upload the images in HD quality on Facebook.
Method 2. Clear the App Cache
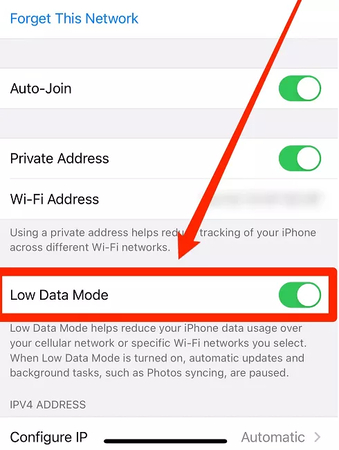
Many users tend to turn on the Data saving mode to ensure that the usage of data doesn't exceed the limit of the cellular data package. Unfortunately turning on the data saving mode might compress or restrict the data uploaded on social media or other platforms. It implies that when you try to upload photos in a higher resolution on Facebook, it will make the quality of the photos lower to save the data on the mobile device. This is why turning off the Data saving mode is compulsory to get rid of the ''Facebook photos blurry'' issue.
Step 1: Start Settings and choose the Cellular icon to check out the phone number. Click on the Cellular icon afterwards and navigate to the Data Mode afterwards.
Step 2: Change the other or standard mode to access some background tasks.
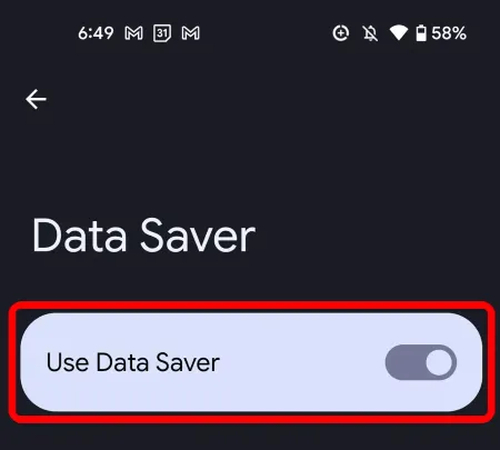
Step 3: If you're an Android user, you can click on the Network and Internet button and choose the Data Saver button afterwards. Turn off the Data Saver by toggling its icon off from there.
Method 3. Turn Off Data Saver
Despite looking at all the solutions we've listed above, if you're still asking ''why is my Facebook photo blurry'', there might be an unnecessary Facebook cache spoiling the fun. Thus, you must eliminate or clear the Facebook app cache files to ensure that you can upload the images in a higher resolution.
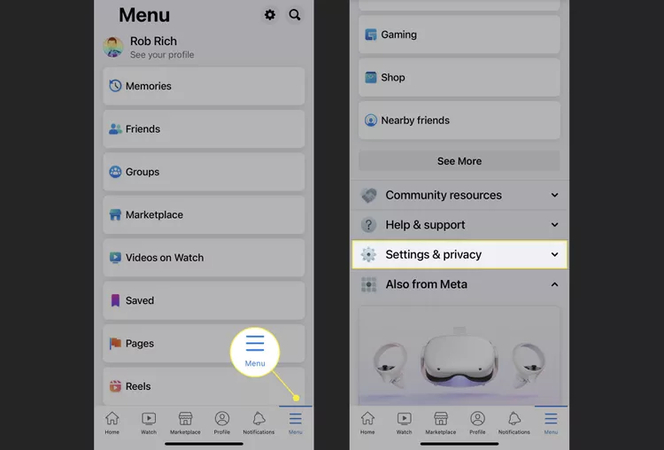
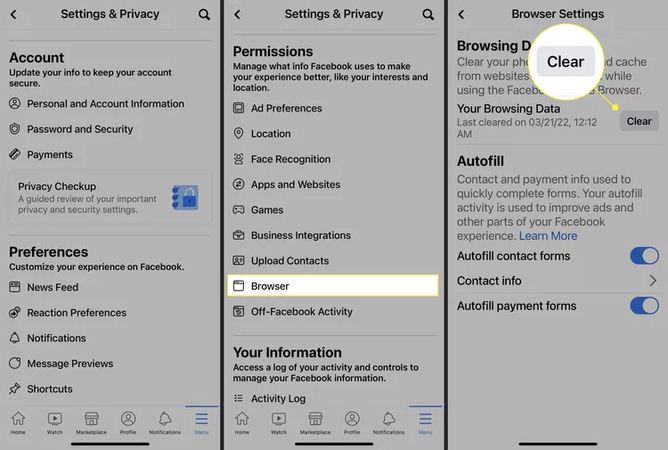
Step 1: Start the Facebook app on your mobile device and choose the Menu button afterwards. Click on the Settings and Privacy button after scrolling down to the bottom side.
Step 2: Press the Settings icon, choose the Permissions button and hit the Browser icon afterwards. After hitting the Clear button, you'll need to start clearing the Facebook cache to ensure that you can upload the images in a higher resolution.
Part 3. The Best Way to Change Fix Blurry Images with HitPaw FotorPea
If you're looking to upload images on Facebook but are struggling with blurry images, HitPaw FotorPea could be a game changer photo quality enhancer. With the 9 AI models, HitPaw FotorPea holds the ability to enhance the overall quality of the images making the photos look extraordinary and flawless.
HitPaw FotorPea ensures that the quality of the images doesn't get messed up while enhancing the image quality by supporting batch processing. Since HitPaw FotorPea relies upon AI-powered technology, it will perform all the photo-enhancing operations automatically.
Features
- Enables you to fix the Facebook photo blurry issue by improving image quality
- Compatible with Mac and Windows
- Doesn't affect the quality of the photos
- Supports multiple image formats
- Lets you process multiple images simultaneously
How to eliminate the blur from the images with HitPaw FotorPea?
Step 1: Once you're done installing the HitPaw FotorPea on the computer, you'll need to start the software and hit the AI Enhancer button afterwards. Click on the Choose Files button and then upload the photo you want to enhance the quality of. HitPaw FotorPea supports batch processing so you can import multiple images simultaneously.
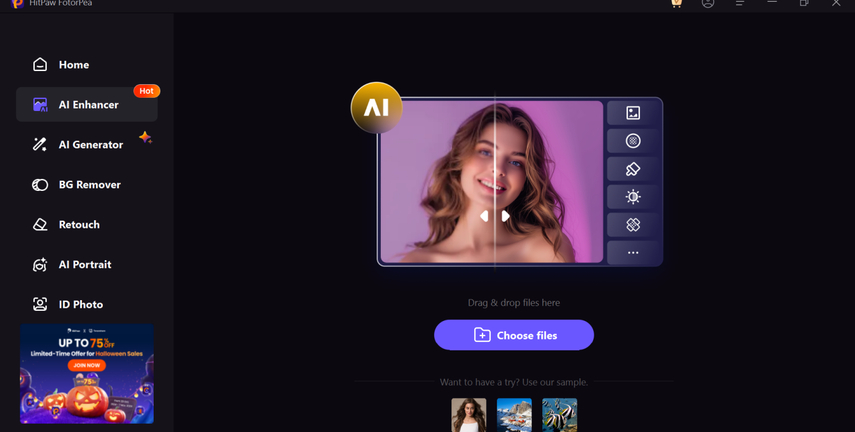
Step 2: After dragging the uploaded images into the timeline of the HitPaw FotorPea, you'll need to select the Face Model to eliminate the blur from the images. If you want to increase the quality of images in numerous manners, you can also explore the 9 other AI models.
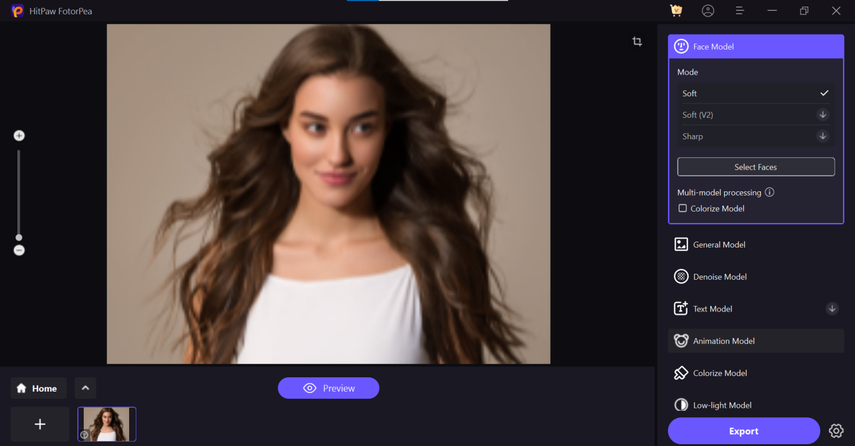
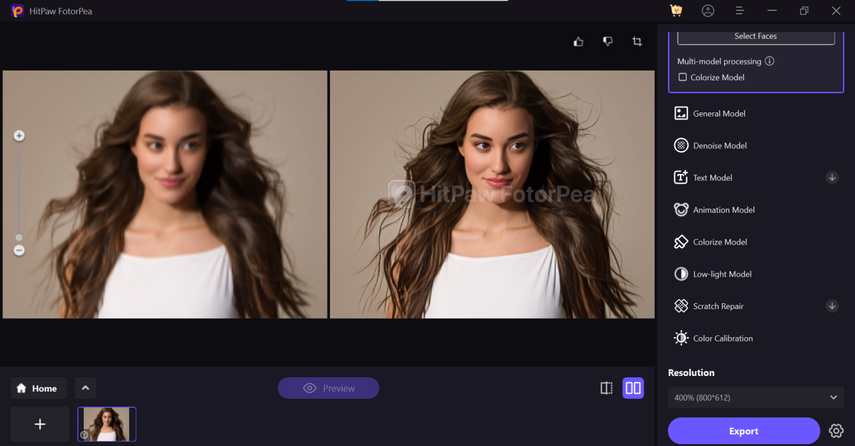
Step 3: By tapping the Preview button you'll be able to insert the selected AI model on the image and then you'll need to press the Export button to download the images.
Final Words
After creating the images in a higher resolution, if the photos tend to turn blurry while uploading them on Facebook, it could make your efforts in vain, making the images look deplorable. Fortunately, we've listed the brilliant ways in this guide to help you fix the Facebook photo's blurry issue enabling you to upload the photos in magnificent image quality.
Fixing the blurred images is also possible courtesy of the HitPaw FotorPea, as this tool brings in the Face AI model to eliminate the blur from the images, making the images look flawless and watchable.


 HitPaw Edimakor
 HitPaw VikPea (Video Enhancer)
 HitPaw Univd (Video Converter)


Share this article:
Select the product rating:
Daniel Walker
Editor-in-Chief
My passion lies in bridging the gap between cutting-edge technology and everyday creativity. With years of hands-on experience, I create content that not only informs but inspires our audience to embrace digital tools confidently.
View all ArticlesLeave a Comment
Create your review for HitPaw articles