


A Comprehensive Guide on How to Take a Passport Photo with an iPhone
Everyone loves to travel! Don't you? In the exciting world of travel, a Passport is your ticket to global adventures. At the core of this important document lies the passport photo. This may seem like a simple picture, but let me tell you that it holds immense weight because it is basically your official introduction to a foreign immigration officer.
Now, with the convenience of a smartphone, you can take a stellar passport photo on your own. Wondering how? Well, in this guide, we will dive deep into how to take a passport photo with an iPhone. Besides this, we will explore the essentials, techniques, and tips to ensure your passport photo meets all official requirements.
Part 1: Preparing for Your Passport Photo: Setting the Scene
Before diving into clicking the picture, first, it's important to set a perfect stage for the photo shoot. This step is important to mitigate the chances of getting rejected.
1. Choosing the Right Location for Optimal Lighting
Lighting is the crucial aspect, and it can literally make or break your passport photo. While clicking your passport photo, remember that natural light is your best friend here. So make sure to find a spot near a large window. Aim for a time of day when there is a soft light, such as early morning or late afternoon. However, make sure to avoid direct sunlight.
2. Selecting a Suitable Background
You might have heard that the passport photo requires a white back, and rightly so because white is the gold standard. However, light cream or pale grey can also work, but remember the background should be plain and light coloured, and there shouldn't be any object or pattern in it. For a background, usually, a white or light beige wall works wonders, but if you don't have a blank wall, get creative and place a white sheet or poster behind your head. It will serve as an excellent backdrop.
3. Dressing Professionally
For a passport photo, it's important to put some thought into your appearance. So opt for solid-coloured clothing that contrasts with your background. Generally, clothes with collars or turtlenecks can add a touch of professionalism. As far as grooming is concerned, go with a natural, everyday look. Style your hair as you normally would, but make sure it's not obscuring your face. And most importantly, if you wear eyeglasses and you don't want to keep them off, make sure there's no glare on the lenses.
Part 2: Capturing the Perfect Shot: How to Take a Good Passport Photo with iPhone
Now that the scene is set, it's time to dive into the technical aspect. This is how to take a passport photo at home with your iPhone.
1. Utilizing iPhone Camera Settings for Best Results
The iPhone camera is packed with multiple advanced features to help you capture the best photo. To capture the perfect shot, open the default camera app on your iPhone and choose the rear camera for higher resolution. Next, turn the grid feature in the camera setting and align your face correctly within the frame. Make sure your head and shoulders are centred within the frame.
2. Positioning the Camera: Angle and Distance
Now position your iPhone at eye level, approximately three feet away from you. For a balanced and distortion-free image, avoid holding the phone yourself and use a tripod or a stack of books. Remember, passport photos typically require your head to take up 50–70% of the image height.
3. Achieving a Natural Expression and Posture
Now the important part. While capturing the photo, avoid tilting your head up or down and maintain a neutral expression with your eyes open and mouth closed. Besides this, keep your shoulders straight and look directly at the camera. Take a deep breath and relax your facial muscles before each shot. In short, aim for a relaxed, natural look—think of it as your resting face.
In addition, don't rush this process. Take multiple photos, adjusting your expression slightly each time. This gives you options to choose from later.
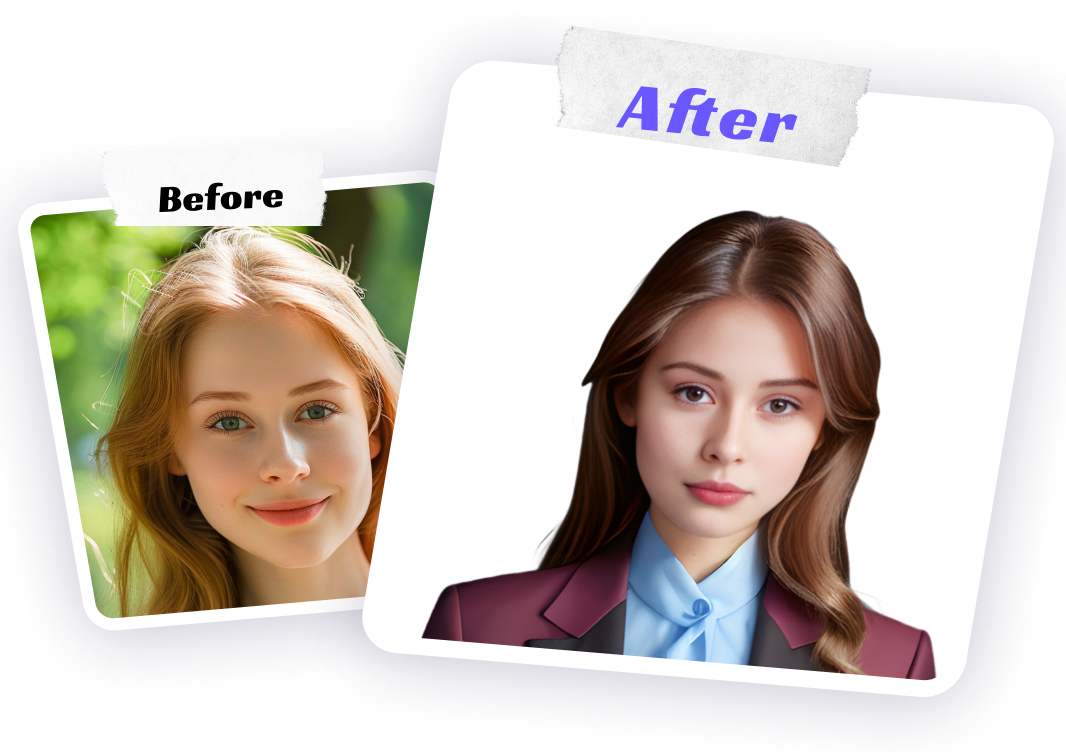
Part 3: Editing Your Passport Photo: Enhancing with HitPaw FotorPea
No doubt, the iPhone camera does a stellar job; a little touch-up can elevate your passport photo. So, if you are looking to further enhance your passport photo, HitPaw FotorPea can serve the need.
HitPaw FotorPea is more than just a basic photo editor. Powered by AI, this versatile tool can transform your iPhone snapshot into a professional-grade passport photo with minimal effort.
Key features of HitPaw FotorPea include:
HitPaw FotorPea - All-in-one Photo Editing Tool for Win & Mac
Secure Verified. 212,820 people have downloaded it.
- Advance photo enhance to make your portrait perfect
- Art Generator with various styles
- Background remover for passport maker
- Object Remover to clean up photo
Secure Verified. 212,820 people have downloaded it.
Wondering how to use HitPaw FotorPea to make your passport photo?
Step 1: Download and Install Hitpaw Fotorpea from the main website
Visit the main website and download Hitpaw Fotorpea. Then Install it following the onscreen instructions.


Step 2: Launch the software and Import Photo
Open the software and from the main interface, select ID Photo Tab. Next click on create and upload the portrait that you want to make it as an ID photo.

Step 3: Adjust the selection by tolls
Once you have uploaded the photo, AI will remove the background from photo automatically. To refine the details, click on Brush and Erase selection tool located at the bottom.
Step 4: Select the Background color
After adjusting, change the background. There are multiple colors to choose from. As white color is the default for Passport, make sure to choose this.
Step 5: Enable the size and select your preferred county
Once you have selected the background, now go to the size selection. Enable the size button and select the country you are in. (It's important because different countries may have different size requirement).
Step 6: Export the Image
If you are satisfied with all the changes, click on “Export” and save your passport photo at the desired location.
Video Guide for You to to Take Passport Photo at Home Using Your Phone
Conclusion
Capturing a passport photo from your iPhone is a convenient and cost-saving option. In this comprehensive guide, you have learned how to take a Passport photo with iphone along with setting up the perfect shot and capturing a stellar passport image.
However, in case you require further enhancement, consider using HitPaw FotorPea, as this versatile tool can make your passport photo stand out. Remember, a well-crafted and professional-looking passport can ensure a smooth travelling experience.

 HitPaw Univd (Video Converter)
 HitPaw VoicePea
  HitPaw VikPea (Video Enhancer)

Share this article:
Select the product rating:
Daniel Walker
Editor-in-Chief
This post was written by Editor Daniel Walker whose passion lies in bridging the gap between cutting-edge technology and everyday creativity. The content he created inspires the audience to embrace digital tools confidently.
View all ArticlesLeave a Comment
Create your review for HitPaw articles